Hi. After my 3D max has updated in this year, my multiple shape loft stuff was very ugly do it ( screenshot i do it the shapes with lines and lofted. ). now i can't get the second shape to use in the same loft. is there a new procedure of steps to get the second or more shapes after the first shape loft? i want to loft an egg shape ( standard one from SPLINES ),than the ellipse shape than again the egg .... and so one. thank you.
Solved! Go to Solution.
Solved by Alfred.DeFlaminis. Go to Solution.
Hello @Anonymous,
Chance are that there is some XForm history in there. I did a test (attached) and it seems to be working ok on my end. I have used this tool a lot and one thing I've found is that the best way to fix the problem you're having is to select those shapes that are giving you problems, then right click on the move icon and right click on all the spinners to put the shapes in the center of your world. Then Reset the Xforms on them at the same time, convert to edit spline, and try again. This isn't a new issue though, it's just an old tool.
Another option is to go into the subobject mode for your middle shape and rotate it to fit a bit better. You probably already know that though but figured I'd mention it.
If you still have problems, attach a sample max file please and I'll take a look and offer suggestions. Thanks!
Best Regards,
Alfred (AJ) DeFlaminis
3ds Max Technical Support Specialist
Autodesk Here to Help | View Max Tips/Tricks | My Screencasts | Autodesk Virtual Agent | How To Reset User Settings | Change Display Drivers in Max | Feature Request Board | Installation and Licensing Forum | 3ds Max Certified Hardware | Network Rendering Troubleshooting Guide
Hello @Anonymous,
I just wanted to follow up here, any progress on this issue?
Best Regards,
Alfred (AJ) DeFlaminis
3ds Max Technical Support Specialist
Autodesk Here to Help | View Max Tips/Tricks | My Screencasts | Autodesk Virtual Agent | How To Reset User Settings | Change Display Drivers in Max | Feature Request Board | Installation and Licensing Forum | 3ds Max Certified Hardware | Network Rendering Troubleshooting Guide
Hi Alfred.
Thank yoy for your reply. I don't have it time to work on it forward,just now i opened your test.
Like this must to be. This is 1 complete cycle and this one i must to multiply it in a string form.
This is do it in FUSION 360 by a friend who try to help me with this speacial construction. Like this i succed before the update to do here. How you see in FUSION 360 we need a lot of shapes for interpolation. For this reason i'm trying with3DMax ,because i see is more quik and easi to work with this shapes like in Fusion.
When i opened your test this message appeared. Maybe at my last update some plugins was lost?
I will have other questions latter,just to see this cycles ( 6-8 cyles ) done about the changes what i need to do forward on this tube.
Another big problem what i have it after upgrating,i can't select the second shape to be put it in a tube. Even i do it like before like in tutorial,i don't succed it. For example : if i selected the big EGG from your test and loft it on a path or spiral,i can't add to it at the X high ( where the little star was ) the next shape. Maybe something change it in this new update and i don't know?
How you do it to select the shapes in the test ? Have an idea about a fresh-new tutorial where to see and try this shape adding?
Thank you,Roland.
Hello @Anonymous,
Don't worry about the MassFx message, that happens anytime a file is made with a different version of Max than it is opened with. There's no changes to loft between 2016 and 2018, but it is an old tool and a bit clunky so I have recorded a video showing how I go about doing this. There are other methods but this is the one I use, and it's easy for me. Please check it out.
Best Regards,
Alfred (AJ) DeFlaminis
3ds Max Technical Support Specialist
Autodesk Here to Help | View Max Tips/Tricks | My Screencasts | Autodesk Virtual Agent | How To Reset User Settings | Change Display Drivers in Max | Feature Request Board | Installation and Licensing Forum | 3ds Max Certified Hardware | Network Rendering Troubleshooting Guide
Hi Alfred .
This tutorial was very helpful for me and perhaps for others too.Thank you.
This is the result.
In this picture i do it in LOFT->DEFORMATION-->SCALE
Question : how can i remove the shapes and remain just the end product there? Is this possibble ? Or i must to scale all the shapes how i want to be the end product ?
Thank you.
Hello @Anonymous,
If your loft is bigger than the shapes that are going into it, then likely they have Xform data that wasn't reset. It's one of the reasons I use "Reset Xform" on my splines before I begin, to avoid this. Is that what you meant there?
Once you are happy with your end product, you can simply right click on it and "Convert to Editable Poly" or mesh and then it's permanently in that shape. You could then delete your shapes with no ill effect. Can you please try that for me?
If I am misunderstanding, please let me know. I'll do what I can to help.
Best Regards,
Alfred (AJ) DeFlaminis
3ds Max Technical Support Specialist
Autodesk Here to Help | View Max Tips/Tricks | My Screencasts | Autodesk Virtual Agent | How To Reset User Settings | Change Display Drivers in Max | Feature Request Board | Installation and Licensing Forum | 3ds Max Certified Hardware | Network Rendering Troubleshooting Guide
Hi Alfred.
I have another questions :
1 . How can i replace one shape with a new one ?
2 . Can i SCALE all this tube like this : 1 end to keep it how is now ( unchanged )a nd the other end to scale it along the tube, to not do shape-by-shape the scaling ?
3 . How can i see the distance of 1 shape from the other one in time i MOVE it ( if previously was 4,5 cm and now i want to be 3.0cm ) ?
Thank you,Roland.
Hello @Anonymous,
Happy to help.
1) To replace a shape, click on the previous/next shape buttons until you are the % area of the shape you want to replace. Then, click "Get Shape" and pick your new shape. Easy!
2) You can indeed! To scale the overall shape along the path, you can use the deformations rollout. Enable "Scale" and adjust one or other other end of the spline to control the size of the cross sections as they go up or down the path. Image below.
3) I am not sure if I fully understand this question. Can you please rephrase it for me? Possibly the red marked areas of my image in question 1) do what you're asking here. Thanks for the clarification!
Best Regards,
Alfred (AJ) DeFlaminis
3ds Max Technical Support Specialist
Autodesk Here to Help | View Max Tips/Tricks | My Screencasts | Autodesk Virtual Agent | How To Reset User Settings | Change Display Drivers in Max | Feature Request Board | Installation and Licensing Forum | 3ds Max Certified Hardware | Network Rendering Troubleshooting Guide
d -- i see that i can't PAST here in a new window if i COPY anything ,just if i write 2 letters and i INSERT between them. Can be done something with this ? thank you
Hi Alfred.
Thank you for your quick answer.
I will write down for myself this answers to not forget that i have them already.
To replace a shape is indeed easy. But to distuinguish where is the green circle on the chose shape was very hard to see it,because the color of that green circle is very light ( which goes up and down ). Can that colour be change it with a stronger light and color : purple,pink or other color ?
The scale is easy too.
Other questions:
1. Can i delete more shapes with 1 selection?
2 . How can i adjust this part in lenght : from right to the left side until the first ring?
The Nr.3 question of my was : a ) how can i adjust the distance between the shapes now?
b ) Can i see this in mm in time i adjust the distance?
c ) In the Path Parameters ( window ) working with Distance ,i must to change somewhere in mm or is in default in mm? Now my Path is : 1147. Is this in mm ?
4 . I want to wrap more this shape around an imaginary cone now.
a ) Is this possible?How?
b ) And , if i do this tube-shape straight ,after that can i wrap it in a coil too?
Thank you,Roland.
d
Hello @Anonymous,
Not much I can do about the paste problems you're having, maybe local security software or a browser problem? That's a bit outside my area.
Ok, for me I don't have a green circle, but a yellow cross which is very small but shows me the current location in the Next/Previous shapes. I'm not fully understanding you, can you please post a screenshot for me?
1) I apologize, I'm not sure what this means.
2) I would select the path spline, go into subobject mode and move the final point wherever you want it. From your screenshot it appears you are modeling a character. You might have more luck using extrude along spline as an edit poly rather than loft.
3) I'm still not sure I fully understand but I'll do my best.
a) I suppose you could subdivide the path and move points around... strange workflow to be honest. Or edit the splines in subobject element mode moving them around a bit.
b) I don't know what mm in time means, I'm sorry. Maybe read up on display units.
c) Those appear to be generic units showing the distance. Should update when you select a new display unit.
4) One option would be to use a Bend modifier or bones. What I'm seeing in the 2nd image could have been easier modeled with straight polygons though. This is a lot of extra work with loft to create that simple shape. Maybe just make a helix and start the loft over on that since it could be created in the shape you want.
b) I am not quite sure what this means, please post a screenshot or something and thanks!
Best Regards,
Alfred (AJ) DeFlaminis
3ds Max Technical Support Specialist
Autodesk Here to Help | View Max Tips/Tricks | My Screencasts | Autodesk Virtual Agent | How To Reset User Settings | Change Display Drivers in Max | Feature Request Board | Installation and Licensing Forum | 3ds Max Certified Hardware | Network Rendering Troubleshooting Guide
w
Hi Alfred.
At 1. question was : if i can choose more shape from this design and delete all together? Not 1 by on 1,if is possible.
Can you help me with a screenshot please,i was trying to find on web and on max how to do it in special the subobject mode finding. sorry.
2) I would select the path spline, go into subobject mode and move the final point wherever you want it.
extrude along spline -- can be used to do this with multiple shapes? i don't find it no tutorial with multiple shapes. i am using 3 shapes combined and how i see in extrude just 1 .
this is what i need to achieve with the 3 shapes( 1 ellipse+1egg+2ndellipse+2nd egg+3rd ellipse ). this 1 cycle. and i need more such a cycles put it together in a string- tube- hollow. which i must to scale to be cone shape ( max has this tool ) ; than every cycle i must to be twisted individualy to x degree clockwise and anticlockwise.
For this reason i need some kind of tools to do it and ask you step by step about this and that.
the 3. question was : i must to work with mm ( in display units. i set the mm now ). in the picture the start of the blue and the end of the green are 3 shapes and the distance betweeb them i must to change it ( and to the other ones too along the entire tube )
4. I suppose you could use a Bend modifier or bones.-- looked at this . the bend i can use for some stuffs . the bone not at all. with the TWIST i do it this ,
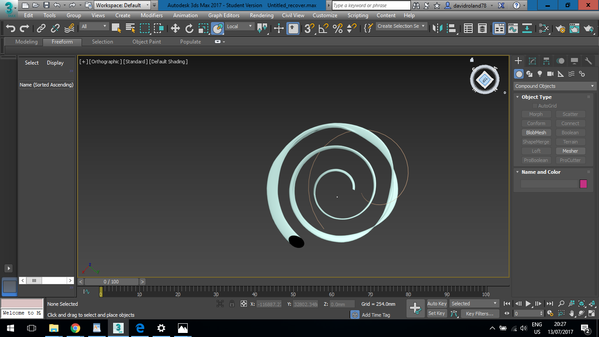
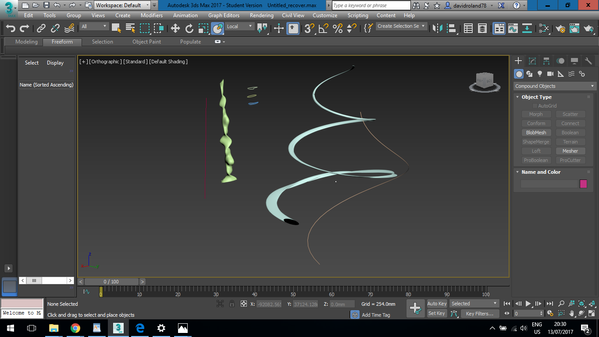
what i see with the TWIST is flatening the shape along the lenght somehow.
in the 4.b -- my question was : if i do this tube like in the 1 picture above , after that can i do it like a spiral ( like in the 2 picture TWIST ) and to keep the original shape and structure ?
Now you can make an idea about this project,if any questions let me know or some better sugestions how to achieve it with 3d max.
Thank you,Roland.
Hello @Anonymous,
You can delete shapes within the modifier stack as shown below. You could delete them all at once this way if you wanted to. You can also select and move the shapes from there if you'd like.
2) No that can't be used with multiple shapes, but those shapes aren't that complicated to make in poly. Why not just export the object you have in OpenCAD already?
3) You can use the twist modifier to twist the shapes. You can put a shell modifier on the object to give it thickness.
4) There is no way to deform an object and keep it's original shape and structure. So no, I don't think that is possible, even theoretically. If twist is flattening your shape, you might have scaled the path instead of using controls such as height. I'd have to see your scene to really say what is happening there. You are better off adjusting height than scaling the path manually though. If it's too late, you can try to Reset the XForm on the shape.
Does that help?
Best Regards,
Alfred (AJ) DeFlaminis
3ds Max Technical Support Specialist
Autodesk Here to Help | View Max Tips/Tricks | My Screencasts | Autodesk Virtual Agent | How To Reset User Settings | Change Display Drivers in Max | Feature Request Board | Installation and Licensing Forum | 3ds Max Certified Hardware | Network Rendering Troubleshooting Guide
Hi Alfred.
The SHELL MODIFIER is not helping me,making it more ugly and the outer shapes are disapiering.
1.) I can give a try to make it in POLY. Have a tutorial for me? In poly is the same like now that i can modifie all in one how i want and need ?
2.) In Openscad i do it just what is in picture and stopt,hoping here or with other programs i can get more . How will help me is i export it , if i can do this modifier on it?
3.) I'd have to see your scene to really say what is happening there ---How can you see the scene? What should i do ?
4.) Or the SPlinE can be modifed with TWIST and other commands himself ? The result will be like now ?
This modifying tools are vital for me to can accomplish this form. In fusion 360 are possibilities to export this form somehow and there to continue? Because there is no possibility to do this loft ( bridge ) without more intermediate shapes and planes for each shape.I have do it this with a friend there until a point. I will ask there the forum if this situation change it already.
Thank you,Roland.
Hello @Anonymous,
1) You can try to set the inner shell instead of the outer. (Or vice versa if your normals are flipped.) That's the best option for you to add thickness and there is no easy alternative.
2) I'm sorry I don't understand.
3) If you want I can create a private folder or you can attach the scene to a forum post. Either way, I'm happy to help. If you want a private folder I can make one for you and I'll send you an email with the link to it.
4) I'm sorry I don't understand.
I think you are better off modeling this in a NURBS program. You seem to want NURBS level control from a poly modeler which isn't going to happen. If Fusion does it easier, model it in Fusion. You can export from fusion, but the file types I am not sure about. @mike.tessier might have more ideas about what is exportable from Fusion.
Best Regards
Alfred (AJ) DeFlaminis
3ds Max Technical Support Specialist
Autodesk Here to Help | View Max Tips/Tricks | My Screencasts | Autodesk Virtual Agent | How To Reset User Settings | Change Display Drivers in Max | Feature Request Board | Installation and Licensing Forum | 3ds Max Certified Hardware | Network Rendering Troubleshooting Guide
Hi @Anonymous,
@Alfred.DeFlaminis enlisted my help to tell you about the file types that can be exported from Fusion. If you are directly exporting from within Fusion, you are a little limited in the file types you can export. From directly within the software, you can export SAT, IGES, SMT, STEP, and F3D files.
However, if you are looking at the design on myhub.autodesk360.com, you can use the cloud translators to export either a SAT, IGES, SMT, STEP, F3D, F3Z, DWG, DXF, STL, FBX, SKP, or OBJ of the file in question.
That's kind of a lot to digest, but the article linked here describes both processes and provides the list of file types exportable through each method.
I hope this helps! Please let me know if you have any other questions about exporting files from Fusion - I am always happy to lend a hand!
Cheers,
Hi alfred.
I can give a try to your idea : ,,I think you are better off modeling this in a NURBS program.". Have you for me an idea with a tutorial for my project ? I have no idea how is working with NURBS.
Thank you.
Hi alfred.
I can give a try to your idea : ,,I think you are better off modeling this in a NURBS program.". Have you for me an idea with a tutorial for my project ? I have no idea how is working with NURBS.
Thank you.
Hello @Anonymous,
I don't have a tutorial for this task, but I can sense you need parametric control over your modeling process which Max doesn't really offer on the level that I think you need it. Fusion and Inventor would be the two products that would work best I think, or you posted a screenshot of a CAD program which seems to be a NURBS modeler.
In Max you might be able to fake it with a path, some spline shapes, and rather than using Loft you might try simply using a path constraint on the spline shapes to position them on the bent path and then attaching them and using a surface modifier. I don't think this is as good as using Fusion or Inventor, but it does offer a bit more flexibility than the loft does.
Best Regards,
Alfred (AJ) DeFlaminis
3ds Max Technical Support Specialist
Autodesk Here to Help | View Max Tips/Tricks | My Screencasts | Autodesk Virtual Agent | How To Reset User Settings | Change Display Drivers in Max | Feature Request Board | Installation and Licensing Forum | 3ds Max Certified Hardware | Network Rendering Troubleshooting Guide
I asked in the mean time the fusion forum too , see pictures.
I transformed in the mean time a trial in quad from 3d max and exported in .obj to fusion and there try it to convert in nurbs , but the fusion stop to respond and closed.
Have an tutorial for this : " In Max you might be able to fake it with a path, some spline shapes, and rather than using Loft you might try simply using a path deform on the spline shapes to position them on the bent path and then attaching them and using a surface modifier. " ?
Or you can help me step-by-step to try this too?
Thank you.
Hello @Anonymous,
Would you please post your current file for me? It might be easier to work with what you already have.
I was thinking you could use path constraint on your shapes to move them into position, then create connecting connecting splines, attach them all together, and add a surface modifier. I do have a link here about the surface modifier. It offers more control but like Fusion, it'll be a lot of work/tinkering to get it just so. I also attached a very simple example to this post. If you try this, make sure you use snaps so that the points of the shapes and the points of the lines are right on top of one another.
Best Regards,
Alfred (AJ) DeFlaminis
3ds Max Technical Support Specialist
Autodesk Here to Help | View Max Tips/Tricks | My Screencasts | Autodesk Virtual Agent | How To Reset User Settings | Change Display Drivers in Max | Feature Request Board | Installation and Licensing Forum | 3ds Max Certified Hardware | Network Rendering Troubleshooting Guide
Can't find what you're looking for? Ask the community or share your knowledge.