Heating and cooling loads per room volume

Heating and cooling loads per room volume

brianwclayton1969
Collaborator Collaborator
3,593 Views
14 Replies
Message 1 of 15

Heating and cooling loads per room volume

brianwclayton1969
Collaborator
Collaborator

How to have Revit calculate Heating and Cooling loads per individual room volume instead of whole house volume? In the real world not every room is balanced due to the sun hitting the house and the shade, and you notice that in a house there are some rooms that are hotter or colder than other because the HVAC system is not balanced. The system is based on whole house volume not individual room volume. Need to have Revit calculate individual room volume to give accurate information.

0 Likes
Replies (14)
Message 2 of 15

rudi.roux
Advisor
Advisor
Accepted solution

Hi @brianwclayton1969


Hope you are well! Smiley Happy


Did you assign spaces to each of the rooms? Go to your Analyze Tab >> Spaces & Zones >> Space and place Spaces in each room as desired. 


When you then run your Heating and Cooling Loads it will then list calculations per space. 


1-space-1.png


After you placed the space, you can click on it and the have a look at your Properties Pallet and scroll down to you Energy Analysis section >> Space Type and assign an appropriate Space Type to your newly created space. 


1-space-2.png


Also, make sure that your Project Location is setup. Manage Tab >> Project Location >> Location. (Different locations will give different loads based on the location and weather stations used). 


I hope this helps! Smiley Wink


Rudi Roux
MSc | Digital Engineering Manager
LinkedIn
Revit Mechanical & Electrical Systems 2018 Certified Professional | Revit MEP & Architecture 2015 Certified Professional
AutoCAD 2015 Certified Professional | Autodesk Building Performance Analysis (BPA) Certificate

If this post resolved your issue, kindly Accept as the Solution below. Kudos are always welcome

Message 3 of 15

brianwclayton1969
Collaborator
Collaborator
Accepted solution

rudi.roux

Yes I provides heating and cooling spaces for each individual rooms and when I run an analysis report, Revit provides incorrect information for smaller rooms compared to larger rooms with the same ceiling heights and wall R value the only thing that is different is the volume. The Analysis breaks down room by room but it seems Revit is still basing the calculations on the FULL whole building volume then separating it by room instead of individual space then combining the whole building. 

0 Likes
Message 4 of 15

rudi.roux
Advisor
Advisor
Accepted solution

Hi @brianwclayton1969


Heating and Cooling Loads will be different due to the Volumes and possible space type and occupancy etc... which might be different per volume. 


Is it possible to provide a bit more information where you feel the calculations are incorrect e.g. - Images or share a part of the problematic project. 


I'll then have a look at it for you. (There are a few factors which could result in different calculations). 


You can also refer to the link below for some additional information/insights on how to achieve better (close to accurate) calculations. 


LINK ONE


I hope this helps! Smiley Wink


Rudi Roux
MSc | Digital Engineering Manager
LinkedIn
Revit Mechanical & Electrical Systems 2018 Certified Professional | Revit MEP & Architecture 2015 Certified Professional
AutoCAD 2015 Certified Professional | Autodesk Building Performance Analysis (BPA) Certificate

If this post resolved your issue, kindly Accept as the Solution below. Kudos are always welcome

0 Likes
Message 5 of 15

brianwclayton1969
Collaborator
Collaborator
Accepted solution

rudi.roux


Rudi,

I have attached jpegs of two rooms that have inaccuracies in the BTUH calculations. The Master Bedroom and bath room are on the same floor. With different sizes but the BTUH are way too high. with occupant load of zero "0".


Thanks

0 Likes
Message 6 of 15

rudi.roux
Advisor
Advisor
Accepted solution

Hi @brianwclayton1969


Thank you for the images, although there might be a couple of things affecting your calculated outputs. Would it be possible to share your project for me to have a look? You can PM me the link (if you're more comfortable with that) and then I'll comment my findings/solutions on this thread? 


Rudi Roux
MSc | Digital Engineering Manager
LinkedIn
Revit Mechanical & Electrical Systems 2018 Certified Professional | Revit MEP & Architecture 2015 Certified Professional
AutoCAD 2015 Certified Professional | Autodesk Building Performance Analysis (BPA) Certificate

If this post resolved your issue, kindly Accept as the Solution below. Kudos are always welcome

0 Likes
Message 7 of 15

brianwclayton1969
Collaborator
Collaborator
Accepted solution

rudi.roux

I can send you the file in PM, I'm fine with that. it is a revit file so you know it is huge. Just let me know. 

0 Likes
Message 8 of 15

rudi.roux
Advisor
Advisor
Accepted solution

Hi @brianwclayton1969


I sent you a PM with further details. I'll post my findings on this thread after reviewing your project. 


Rudi Roux
MSc | Digital Engineering Manager
LinkedIn
Revit Mechanical & Electrical Systems 2018 Certified Professional | Revit MEP & Architecture 2015 Certified Professional
AutoCAD 2015 Certified Professional | Autodesk Building Performance Analysis (BPA) Certificate

If this post resolved your issue, kindly Accept as the Solution below. Kudos are always welcome

0 Likes
Message 9 of 15

rudi.roux
Advisor
Advisor
Accepted solution

Hi @brianwclayton1969


I hope you are well. Smiley Happy


Thank you for the Model, it made it a lot easier to assess everything. My findings are shown below: 


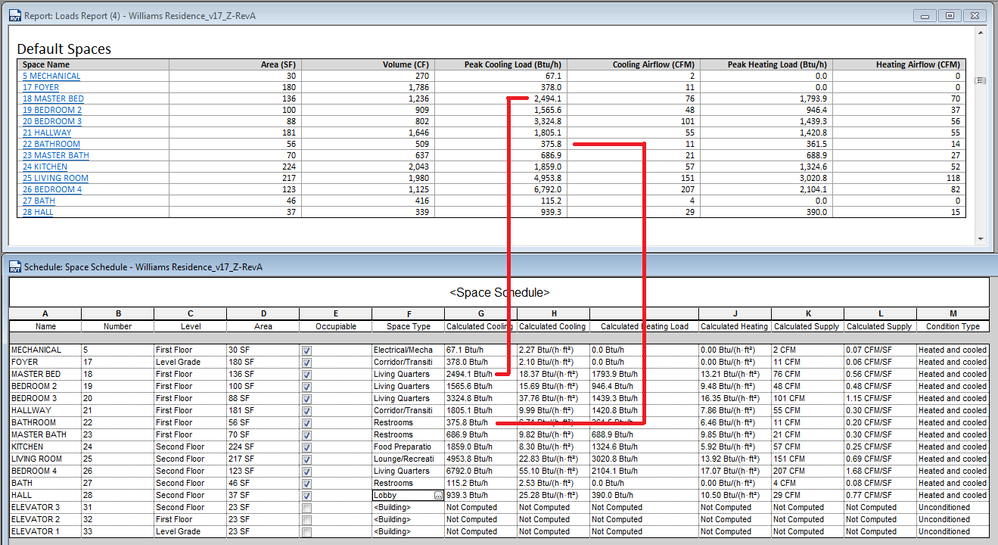
The revised Loads Report along with Space Schedule and new Btu/h values can be depicted from the images. (I'll explain how I got to it further down).
 

1-hvac-1.png


Below is a comparison between two load reports, one using Building Elements and Function Parameters (Space Type) and the other one using Building Envelope Exterior Elements. I generally use the Function Parameters, but you'll notice that there isn't a major difference in all spaces between the two reports in this scenario. 


1-hvac-2.png


Occupancy Schedules along with Space Type (Lighting and Power Schedules) are also important. Let's have a look at the Master Bath below. Space Type >> "Restrooms" >> Occupancy, Lighting and Power Schedules >> "Residential Lighting - All Day"  (This can be changed to your liking with some of the other predefined Schedules). I used the same occupancy, Lighting and Power Schedules for each of the Space Types in you Project. 


1-hvac-4.png


Lastly, one of the main culprits was you Space Limit Offset. The Master Bath provided you with desire Btu/h readings, but as you mentioned, the Master Bed just below the highlighted space and Bathroom to the left of the highlighted space gave Btu/h readings which were very high. I simply assigned the same Limit Offset to all of the Spaces on the First Floor. Then I took the Limit Offset assigned to the Living Room on the Second Floor and assigned the same Offset to the rest of the Spaces on the Second Floor. 


1-hvac-3.png


I hope this helps! Smiley Happy


Rudi Roux
MSc | Digital Engineering Manager
LinkedIn
Revit Mechanical & Electrical Systems 2018 Certified Professional | Revit MEP & Architecture 2015 Certified Professional
AutoCAD 2015 Certified Professional | Autodesk Building Performance Analysis (BPA) Certificate

If this post resolved your issue, kindly Accept as the Solution below. Kudos are always welcome

0 Likes
Message 10 of 15

Scott_D_
Advisor
Advisor
Accepted solution

Apologies for the slightly off-topic question - why do you use Limit Offset rather than Level Above and letting Room Bounding geometry cut the top of the space volume at the correct level?


Whenever I create spaces I always do so using Level Above as I find it avoids problems like some of those in this thread.

0 Likes
Message 11 of 15

rudi.roux
Advisor
Advisor
Accepted solution

Hi @Scott_D_


I find that it comes down to personal or per situation preferences. Yes, using the Upper Limit Constraints is ideal in an ideal world. I also use it. In this thread I simply pointed out where the problems where according to the limit configurations which @brianwclayton1969 is use to using. 


The reason why I say that it comes down to personal preference or situations is because I've had a couple of projects in the past where the Architects where huge fans of using Mass Families/In-Place Mass for all kinds of ceilings and bulkheads etc. Smiley Frustrated Spaces go through masses. Never-mind the times which we received a new arch model just to find that some of their ceilings have been deleted Smiley Very Happy (Obviously providing problematic reporting). 


1-lev-1.png

I hope this helps! 


Rudi Roux
MSc | Digital Engineering Manager
LinkedIn
Revit Mechanical & Electrical Systems 2018 Certified Professional | Revit MEP & Architecture 2015 Certified Professional
AutoCAD 2015 Certified Professional | Autodesk Building Performance Analysis (BPA) Certificate

If this post resolved your issue, kindly Accept as the Solution below. Kudos are always welcome

Message 12 of 15

Scott_D_
Advisor
Advisor
Accepted solution

That's interesting, thanks very much for the explanation. I have never worked with anyone who uses In-place Masses and I am so used to Architects deleting walls and ceilings only to redraw a slightly different one in the same place that its like water of a duck's back now!


You have 300 new unhosted elements, gee thanks for that.


Don't get me started on Copy/Monitor that ignores Type changes. Smiley Mad

Message 13 of 15

rudi.roux
Advisor
Advisor
Accepted solution

Exactly Smiley LOL


Some architectural firms come up with the funniest things in their models which result in me having a "predefined mail" which I use from time to time to guide them through modeling workflows. Smiley Very Happy It's not everyone off-course, but there are some architectural firms which I've worked with, who's adoption to BIM/Revit has been so slow and they win tenders where BIM was a pre-requisite, then they dive into everything without proper software knowledge/workflows... 


Also, some of them only provide us with ceiling void heights, then they use detail lines to draw in ceilings, guess what I need to use then... Generic Limit Offset Height (or as you mentioned, draw in my own generic ceilingsetc.) until they modeled their ceilings into their models etc etc. 


I'm glad the function is available in Revit, due to the reasons which we pointed out...


Rudi Roux
MSc | Digital Engineering Manager
LinkedIn
Revit Mechanical & Electrical Systems 2018 Certified Professional | Revit MEP & Architecture 2015 Certified Professional
AutoCAD 2015 Certified Professional | Autodesk Building Performance Analysis (BPA) Certificate

If this post resolved your issue, kindly Accept as the Solution below. Kudos are always welcome

0 Likes
Message 14 of 15

brianwclayton1969
Collaborator
Collaborator
Accepted solution

rudi.roux

I appreciate it, I will look at my project and use the examples you gave me. This explains alot on where the inaccuracies are located. 

Again I really appreciate it.


Iceman1849

Message 15 of 15

rudi.roux
Advisor
Advisor
Accepted solution

Hi @brianwclayton1969


Only a pleasure! If it resolves your issue as per the provided posts, kindly Accept as a Solution below the post/s which helped you so that future community members can benefit from it. Smiley Happy


Rudi Roux
MSc | Digital Engineering Manager
LinkedIn
Revit Mechanical & Electrical Systems 2018 Certified Professional | Revit MEP & Architecture 2015 Certified Professional
AutoCAD 2015 Certified Professional | Autodesk Building Performance Analysis (BPA) Certificate

If this post resolved your issue, kindly Accept as the Solution below. Kudos are always welcome

0 Likes