Community
Meshmixer
Welcome to Autodesk’s Meshmixer Forums. Share your knowledge, ask questions, and explore popular Meshmixer topics.
Turn on suggestions
Auto-suggest helps you quickly narrow down your search results by suggesting possible matches as you type.
Reply
Topic Options
- Subscribe to RSS Feed
- Mark Topic as New
- Mark Topic as Read
- Float this Topic for Current User
- Bookmark
- Subscribe
- Printer Friendly Page
Message 1 of 6
Anonymous
27981 Views, 5 Replies
07-14-2018
10:40 PM
- Mark as New
- Bookmark
- Subscribe
- Mute
- Subscribe to RSS Feed
- Permalink
- Report
07-14-2018
10:40 PM
Hi everyone, I am attempting to 3d print a miniature with this helmet, however the helmet is not completely solid, therefore the walls of the helmet are thinner than my printer can handle, so I am attempting to fill the helmet to make it solid. I have attempted extruding it and 'make solid' with no luck. I have also used the surface, add sculpt tool to add some in there, but I couldnt get it all. I was hoping for an easier way, any help would be appreciated. Thanks, Matthew

Solved! Go to Solution.
Solved by MagWeb. Go to Solution.
Solved by MagWeb. Go to Solution.
Solved by MagWeb. Go to Solution.
5 REPLIES 5
Message 2 of 6
07-16-2018
01:52 AM
- Mark as New
- Bookmark
- Subscribe
- Mute
- Subscribe to RSS Feed
- Permalink
- Report
07-16-2018
01:52 AM
Seems there are many not needed surfaces inside....
1. Get rid of non connected cavities inside:
Run EDIT/SeparateShells. This separates non connected stuff to an object each. Discard all objects not needed.
2. Get rid of connected cavities (optional if exist):
Go to SELECT. Select something (doesn't matter what - it's just something to start with). Navigate to some aspect where you see as little (best: no) inside surface as possible. Run Modify/SelectVisible. Now navigate to another aspect where you see not selected surface you wish to keep. Again: Run Modify/Selectvisible while you hold down Shift. This adds the new selection to the previous one. Repeat until all you want to keep is selected.
Finally hit I to invert the selection and discard inside stuff via X key.
3. Repairing holes:
Go to ANALYSIS/Inspector. Do not run AutoRepairAll (as there's a main open boundary which you don't want to fill) but click on each marker sphere but the one pointing to the outer boundary. When done leave Inspector.
4. Generate a new thickness:
Go to SELECT and select all. Run Edit/Offset (make sure Connected checkbox is active).
Gunter Weber
Triangle Artisan
Message 3 of 6
06-07-2020
04:11 AM
- Mark as New
- Bookmark
- Subscribe
- Mute
- Subscribe to RSS Feed
- Permalink
- Report
06-07-2020
04:11 AM


I'm trying to 3D print a model called Icarus Pit. Although the files are available the stl file is of the complete model with no slicing. To print it without breaking it down would use an enormous amount of support structure and take a very long time. So I have separated everything in Meshmixer. Some parts are solid, like his head and hands, other parts are either completely hollow or have integral holow sections. Is there a way of filling the insides of the hollow sections. While the response to the previous is interesting, I'm not sure how to achieve the same result here.
Message 4 of 6
06-10-2020
06:25 AM
- Mark as New
- Bookmark
- Subscribe
- Mute
- Subscribe to RSS Feed
- Permalink
- Report
06-10-2020
06:25 AM
SELECT a loop at the interior side at each end. Set BrushMode to UnwrapBrush and filter the selection by a CreaseAngleThresh of around 75°to do this while preventing the exterior to be selected.

Hit X to discard these areas and double click the remaining interior shell:

Hit X to discard that region too and use ANALYSIS/Inspector to fill the open boundaries:

either AutoRepairAll or click the spheres one by one. The latter will give groups for the infills.
Gunter Weber
Triangle Artisan
Message 5 of 6
08-16-2021
05:23 PM
- Mark as New
- Bookmark
- Subscribe
- Mute
- Subscribe to RSS Feed
- Permalink
- Report
08-16-2021
05:23 PM
Hello, I was wondering if I could piggy-back on this thread to ask a similar question without inconveniencing many.
I have an object (part of an upper jaw) that was segmented from a DICOM file that I would like to fill to make a completely solid, non-hollow block (screenshot below.

I first tried MagWeb's advice of inverting, however was not successful with the "offset" part. After the inversion and removal of the unnecessary inner parts, I did try to "make solid", which gave me something that was somewhat close to what I wanted, but not 100%.

Could it be because of the holes highlighted in yellow? Would filling these before attempting any sort of fill help?

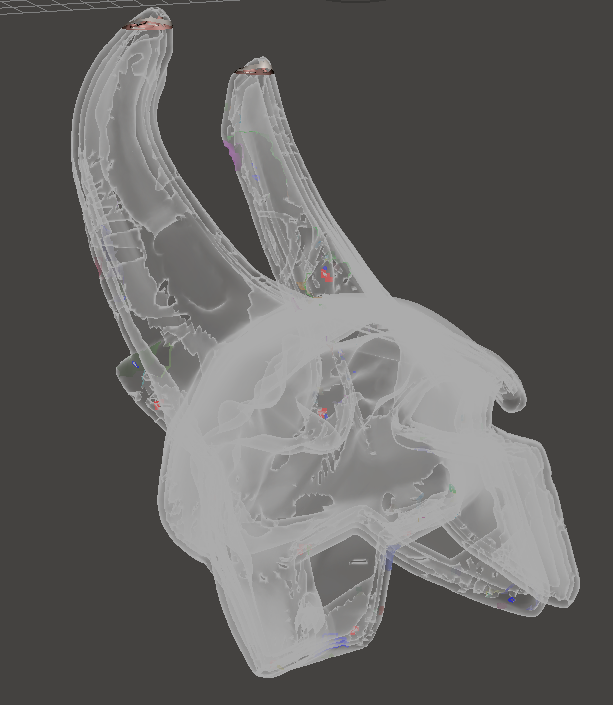
Thank you so much in advance. Amazed by how rich this form is!!
Message 6 of 6
08-17-2021
01:51 AM
- Mark as New
- Bookmark
- Subscribe
- Mute
- Subscribe to RSS Feed
- Permalink
- Report
08-17-2021
01:51 AM
Try MakeSolid to construct a shell and reproject surface details:
Guess or measure (> ANALYSIS/Measure with Type set PointToPoint which is the first button in second row) the diameter of the biggest hole to fill. Let's say for the following it's 3mm.
Run MakeSolid. After the default calculation set SolidType to Accurate and set OffsetDistance to a positive value a bit bigger than the biggest hole's radius. For a 3mm diameter this is 1.5 + (let's say) 0.1 = 1.6. Hit Update and Accept the result. This gives an offset hull.
Run MakeSolid on this hull again. Again, after the default calculation set SolidType to Accurate and set OffsetDistance to the same value you use before but in negative now (-1.6). This gives a fitting hull but you might have lost some details.
To reconstruct details:
Show the source mesh which was hidden in the first MakeSolid step and hit the magnet icon in ObjectBrowser to set it as a target. It turns to blue-transparent. For a better view you may set the target to be rendered opaque in menu:View>Disabling TransparentTarget.
Now with the 2nd hull active go to SCULPT and choose the Attract brush to get back details where you perform a brush stroke.
Gunter Weber
Triangle Artisan
Reply
Topic Options
- Subscribe to RSS Feed
- Mark Topic as New
- Mark Topic as Read
- Float this Topic for Current User
- Bookmark
- Subscribe
- Printer Friendly Page
Forums Links
Can't find what you're looking for? Ask the community or share your knowledge.
Post to forums

