How to create a 3d Shape from Curves ( Loft?)

How to create a 3d Shape from Curves ( Loft?)

NiceNico
Participant Participant
215 Views
10 Replies
Message 1 of 11

How to create a 3d Shape from Curves ( Loft?)

NiceNico
Participant
Participant

Hi everbody,


I'm trying to model the following and can't get any further. NiceNico_0-1756679454998.png

It is the blade of a Whopper Plopper lure. In Rhino I would loft it using several 3D curves, but in F360 I just can't get any further. Thats my progress so far:

NiceNico_1-1756679607617.png


Any advice would be appreciated.

Thanks everybody for their help.

File is attached.

Best,

Nico


0 Likes
216 Views
10 Replies
Replies (10)
Message 2 of 11

Drewpan
Advisor
Advisor

Hi,


It is possible to create 3d sketches in fusion. They are not used often but people

do use them. I am currently doing a project where I required complex 3D curves

but I couldn't get anything accurate enough using 3D curves. The method that I

am using is very crude and may not be the best way but it does work and it creates

very accurate shapes.


My Project is a Ducted Fan that rotates at 20,000rpm. At those speeds the airfoil

shape of the blade is critical. The method that I use is this.


I start by creating a Front View Sketch of what the 3D curve looks like. This is the

Leading Edge of my fan blade.


Drewpan_0-1756684416483.png


Then I do the same with a Side View.


Drewpan_1-1756684466093.png


I do the same for the Trailing Edge.


I then change to Surface Mode and extrude these lines into Surfaces.


Drewpan_2-1756684590621.png


Drewpan_3-1756684608382.png


I then use the Thicken command and turn these surfaces into Bodies.


From here I do a Combine Intersect operation that creates the portion

of these bodies that intersect with each other.


Drewpan_4-1756684859404.png


Now I have two 3D shapes that I can use as Rails for a Loft.


Drewpan_5-1756685033361.png


Drewpan_6-1756685077099.png


The end result is a Blade with complex curves.


Drewpan_7-1756685132005.png


Drewpan_8-1756685154725.png


Drewpan_9-1756685174466.png


Drewpan_10-1756685194165.png


As I said, very crude - but it works.


The trick is to make the thickness of the surfaces thick enough to get

a usable rail. The Rail is the edge of the Body you just created. Lining

up the profiles to Loft is a little bit of a fiddle but you get it by zooming

right up close then click and drag if necessary.
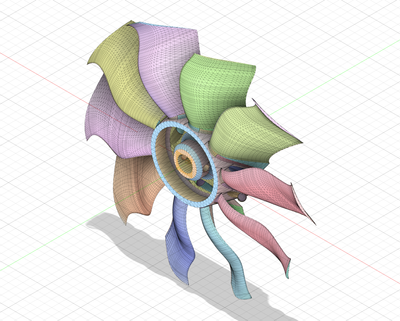
 

Drewpan_11-1756685380115.png


Cheers


Andrew

0 Likes
Message 3 of 11

laughingcreek
Mentor
Mentor

@Drewpan wrote:...I then use the Thicken command and turn these surfaces into Bodies.

...


Drew-I'm still at a loss as to why you thicken the surfaces.  it's an extra step that increases the possibility of selecting the wrong edge for the rail/profile.  just trim the surface and use the resulting edge.

Message 4 of 11

Drewpan
Advisor
Advisor

Hi @laughingcreek 


For whatever reason I cannot get it to work that way. I do it this way because

I can then just select the edge of the resulting body and use this as a rail. It

works for me.


Cheers


Andrew

0 Likes
Message 5 of 11

laughingcreek
Mentor
Mentor

Nico-thought i'd take a stab at this over my morning coffee.  attached is a possible approach you could try.  let me know if you have questions-

laughingcreek_0-1756761605225.png


Message 6 of 11

NiceNico
Participant
Participant

Hi and thank you both @Drewpan  and @laughingcreek,


I thought modelling this would be similar to what I would do in Rhino- similar to what @Drewpan  did.

Somehow I had the impression that there is probably another way in Fusion and that's why I wanted to post the whole thing.
Thank you @laughingcreek for your interesting solution suggestion, which I would definitely never have thought of on my own.


I will try to remodel both for practice.


Thank you again and best regards,


Nico

0 Likes
Message 7 of 11

NiceNico
Participant
Participant

Hi @laughingcreek,


could you tell me how to retunr the axis and plane system to the original position?

NiceNico_0-1757265653161.png

Couldn't find the setting.


Thanks again!

0 Likes
Message 8 of 11

laughingcreek
Mentor
Mentor

I'm not at a computer right now.  It looks like you may have dragged a component out of alignment?  Are there 2 L shaped icons in the upper right corner of the screen? Hit the one that says something like "revert position."


FYI-a lot of information is conveyed to an experienced user from being able to see the whole screen.  Screen shots that include the entire window (including the top menus, the timeline at the bottom, and the browser on the side) can be helpful when answering questions like this.

0 Likes
Message 9 of 11

NiceNico
Participant
Participant

sorry for the incomplete screenshot. I did not changed anything, just dowmloaded your file and this is how it appears on my end. Seems like local coordinate system, or something. I thought, you adapted it, to draw the geometry. I think I probably explained myself very poorly as well. 

NiceNico_0-1757273246589.png


0 Likes
Message 10 of 11

laughingcreek
Mentor
Mentor

oh.  that's just the view cube being off.  I had changed it to get better lighting on the render.  weird that the grid aligns with the view cube and not the model origin.

anyway, reset the view cube from the pull down menu accessed by clicking on the little triangle next to the view cube-

laughingcreek_0-1757282465003.png


Message 11 of 11

NiceNico
Participant
Participant

perfect! That's it.

In the meantime I modelled the body:

NiceNico_0-1757323292154.png

Hope to get some time theses days to keep on the tail.


Thanks again and have a nice week!

0 Likes