Community
Fusion Design, Validate & Document
Stuck on a workflow? Have a tricky question about a Fusion (formerly Fusion 360) feature? Share your project, tips and tricks, ask questions, and get advice from the community.
- Forums Home
- >
- Fusion Community
- >
- Design, Validate & Document forum
- >
- Sculpting jewelry
Fusion Design, Validate & Document
Stuck on a workflow? Have a tricky question about a Fusion (formerly Fusion 360) feature? Share your project, tips and tricks, ask questions, and get advice from the community.
Turn on suggestions
Auto-suggest helps you quickly narrow down your search results by suggesting possible matches as you type.
Reply
Topic Options
- Subscribe to RSS Feed
- Mark Topic as New
- Mark Topic as Read
- Float this Topic for Current User
- Bookmark
- Subscribe
- Printer Friendly Page
Message 1 of 27
Anonymous
5996 Views, 26 Replies
11-19-2018
02:17 PM
- Mark as New
- Bookmark
- Subscribe
- Mute
- Subscribe to RSS Feed
- Permalink
- Report
11-19-2018
02:17 PM
Dear friends,
I'm new to fusion360 because I came from solidworks and rhino. Solidworks helped me in amazing sheet metal and rhino helped me in awesome pieces of jewelry... I found in rhino and fusion very similar commands (some with same name) and in solidworks and fusion I found other similar features. I think I can combine them in one only fusion360 instead of two... and now that is possible to import parts and convert them to sheet metal, I think it's great!
But... do you think its possible to SCULPT jewelry pieces directly without image references, without previous drawings ect? Like an artist using clay, not using sweeps, lofts, extrusions, bridge, and so on. Just starting from a thorus, or a box or a clylinder to scuplt, growing an idea you have in your mind.
Do you think this could be possible?
Thanks for you time and effort.
Goodnight
Marco
Solved! Go to Solution.
Solved by TrippyLighting. Go to Solution.
26 REPLIES 26
Message 2 of 27
11-19-2018
03:21 PM
- Mark as New
- Bookmark
- Subscribe
- Mute
- Subscribe to RSS Feed
- Permalink
- Report
11-19-2018
03:21 PM
@Anonymous wrote:
Do you think this could be possible?
Yes, definitely possible!
Peter Doering
Message 3 of 27
11-19-2018
08:37 PM
- Mark as New
- Bookmark
- Subscribe
- Mute
- Subscribe to RSS Feed
- Permalink
- Report
11-19-2018
08:37 PM
@Anonymous @TrippyLighting
This really depends on what type of structure you want to do.
Fusion has somewhat decent surface modeling tools which makes it easy to model shapes like
the following ring (my wife's wedding ring I made by the way).

T-Splines can be used for some organic looks too.
Where Fusion for jewelry modeling will fall short is when you need bending twisting commands and pattern tools for stone setting.
I have my masters in 3d studio : jewelry design.
Claas Kuhnen
Faculty Industrial Design – Wayne State Universit
Chair Interior Design – Wayne State University
Owner studioKuhnen – product : interface : design
![]()
Message 4 of 27
11-20-2018
07:27 AM
- Mark as New
- Bookmark
- Subscribe
- Mute
- Subscribe to RSS Feed
- Permalink
- Report
11-20-2018
07:27 AM
thanks for your reply...
Have you any infos on how to?
Sculpting a car is a thing... sculpting a ring... it's very much more difficult in my opinion.
I can't figure how to begin
Thank you
Regards
Message 5 of 27
11-20-2018
07:30 AM
- Mark as New
- Bookmark
- Subscribe
- Mute
- Subscribe to RSS Feed
- Permalink
- Report
11-20-2018
07:30 AM
@Anonymous
do you have a reference photo or sketch?
the approach is very much dictated by the shapes you want to model.
Claas Kuhnen
Faculty Industrial Design – Wayne State Universit
Chair Interior Design – Wayne State University
Owner studioKuhnen – product : interface : design
![]()
Message 6 of 27
11-20-2018
07:36 AM
- Mark as New
- Bookmark
- Subscribe
- Mute
- Subscribe to RSS Feed
- Permalink
- Report
11-20-2018
07:36 AM
thank you.
I'm sure your wife was been very very impressed! It's a big and important ring! Congratulations.
Yes, for mechanical feeling jewelry I can see no problem in solidworks also... but I've no idea on how to proceed when I'm inspirate. I don't know if I'm able to explain what I'm thinking about.
I think at some features like sculptris or zbrush...
Thank you very much
Regards
Message 8 of 27
Anonymous
in reply to:
Anonymous
11-20-2018
11:53 PM
- Mark as New
- Bookmark
- Subscribe
- Mute
- Subscribe to RSS Feed
- Permalink
- Report
11-20-2018
11:53 PM
Hi,
here I'm.
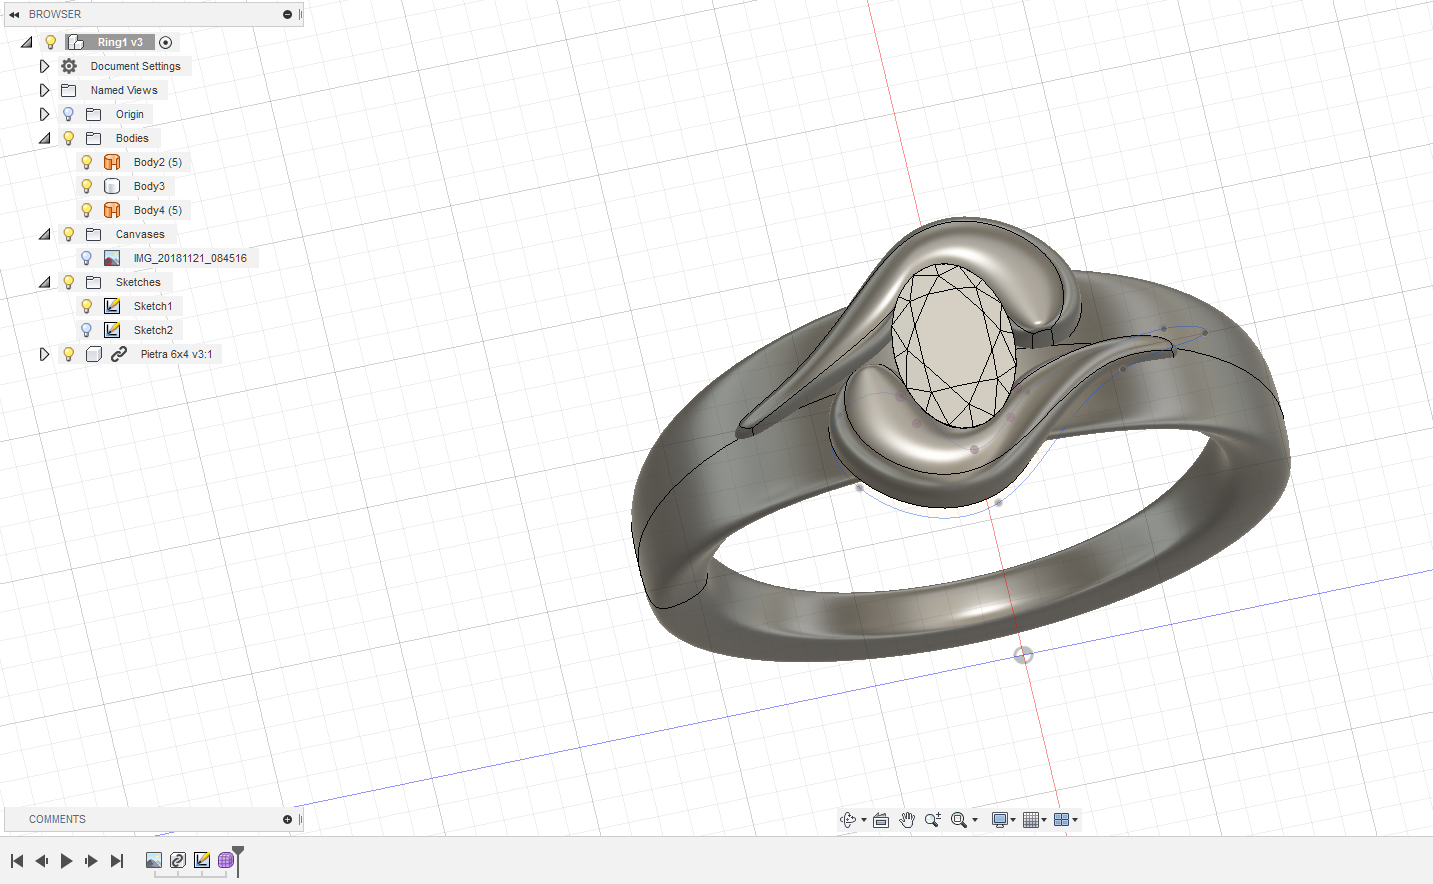
I'm thinking, just to begin, at the idea in the picture.
I've understood that I have to start from the elements and not from a global unique object, so I made the two "drops" after positioning the stone... Ok, but after this, how to "bridge" or "combine" (not the combine command) in a "plastic" organic way the "drops" and the ring body? By the way, the ring body inner diameter should be 17mm and 2,5mm thick.
Thanks a lot.
Marco
Message 9 of 27
11-22-2018
04:48 AM
- Mark as New
- Bookmark
- Subscribe
- Mute
- Subscribe to RSS Feed
- Permalink
- Report
11-22-2018
04:48 AM
Dear friends,
I made the one in the picture... Now, how would you plan to fuse the objects together in one body?
Could you write any advises to me, please?
Thank you very much
Marco
Message 10 of 27
Anonymous
in reply to:
Anonymous
11-22-2018
04:50 AM
- Mark as New
- Bookmark
- Subscribe
- Mute
- Subscribe to RSS Feed
- Permalink
- Report
11-22-2018
04:50 AM
Other question...
Once a thing done, how can i duplicate (move rotate) but keep the editing on one object will be reflected on the other one? In the ring, the two blobs... if I edit one blob, the other remains un-edited.
Thank you
Marco
Message 11 of 27
11-22-2018
04:55 AM
- Mark as New
- Bookmark
- Subscribe
- Mute
- Subscribe to RSS Feed
- Permalink
- Report
11-22-2018
04:55 AM
There are several ways to do that. Here are two:
This assumes the actual gem stone is not involved in the combination.
1. Move into the patch workspace and use Create->boundary fill. You should select all three bodies, the two open surfaces and the solid. That should present you with three cells to select. Then afterwards you have one solid body.
This workflow assumes that the open surfaces completely intersect the surface of the solid body. Otherwise the boundary fill tool will, not be able to determine a boundary.
2. You can cap off the two open surfaces by patching the bottom and stitching it, both in the Patch workspace. Then in the Model workspace you can Modify-.Combine-Join.
Peter Doering
Message 12 of 27
11-22-2018
04:56 AM
- Mark as New
- Bookmark
- Subscribe
- Mute
- Subscribe to RSS Feed
- Permalink
- Report
11-22-2018
04:56 AM
Perhaps export your model as a .f3d and attach it to your next post. Then we can show you.
Peter Doering
Message 13 of 27
11-22-2018
05:16 AM
- Mark as New
- Bookmark
- Subscribe
- Mute
- Subscribe to RSS Feed
- Permalink
- Report
11-22-2018
05:16 AM
Thank you Peter.
Here it is...
Please, see if it's possible to edit one blob and have the same edits on a copy... like the mirror features.
Thanks
Marco
Message 14 of 27
11-22-2018
05:51 AM
- Mark as New
- Bookmark
- Subscribe
- Mute
- Subscribe to RSS Feed
- Permalink
- Report
11-22-2018
05:51 AM
@Anonymous To fuse the parts together with soft transitions you can solid combine them and then select the resulting sharp edges and apply a surface fillet to round it.
Claas Kuhnen
Faculty Industrial Design – Wayne State Universit
Chair Interior Design – Wayne State University
Owner studioKuhnen – product : interface : design
![]()
Message 16 of 27
11-22-2018
06:01 AM
- Mark as New
- Bookmark
- Subscribe
- Mute
- Subscribe to RSS Feed
- Permalink
- Report
Message 17 of 27
11-22-2018
12:33 PM
- Mark as New
- Bookmark
- Subscribe
- Mute
- Subscribe to RSS Feed
- Permalink
- Report
11-22-2018
12:33 PM
WOW!!
Peter, that is great!
Ok, I'm going to start from this advanced/basic video to try to learn! It's very very helpful because learning about an object created by me could help more than object of others!
Thanks a lot
Marco
Message 18 of 27
11-22-2018
01:30 PM
- Mark as New
- Bookmark
- Subscribe
- Mute
- Subscribe to RSS Feed
- Permalink
- Report
11-22-2018
01:30 PM
Thank you, and again thank you!
I think I've found my way in sculpting jewelry!!
It's just needed an idea in my mind and then I can maniplulate some faces and edges that grow second after second giving to me an immediate feedback!
Very enthusiastic!
Please allow me to thank you again and again.
Good night!
Marco
Message 19 of 27
Anonymous
in reply to:
Anonymous
11-25-2018
09:31 AM
- Mark as New
- Bookmark
- Subscribe
- Mute
- Subscribe to RSS Feed
- Permalink
- Report
11-25-2018
09:31 AM
Thanks to all of you, guys.
I've worked on it and I finished it almost like I've thought.
Please have a look at the workflow I used (that is wrong for sure) and please advise me about your thoughts.
Now I'd like to know if it's castable ... hope so.
Thanks a lot for your precious help.
Marco
Message 20 of 27
Anonymous
in reply to:
Anonymous
12-23-2018
11:55 PM
- Mark as New
- Bookmark
- Subscribe
- Mute
- Subscribe to RSS Feed
- Permalink
- Report
12-23-2018
11:55 PM
Hi guys,
here I'm with the results of your advises.
Have a great Christmas 🙂
Reply
Topic Options
- Subscribe to RSS Feed
- Mark Topic as New
- Mark Topic as Read
- Float this Topic for Current User
- Bookmark
- Subscribe
- Printer Friendly Page
