Autodesk Revit is a powerful 3D application which simplifies a lot of tasks by using 2D views to create 3D elements. This can make it hard to keep track of your accuracy and progress. Thus, knowing how to quickly look at just what you want, in 3D, is important. This article shares five tips on using the Section Box to efficiently view your 3D model in Revit.
1) Show in Another View
On large complex projects, it can be hard to select, or even see, the section box. Once selected, it can also be difficult to adjust it just right… you may pull the edge too far, or not far enough. For large projects, this then takes time to regenerate the view’s graphics.
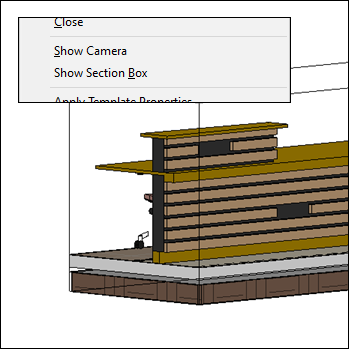
If you are in a plan or elevation/section view, you can make the section box visible from/for another view. Simple right-click on that “other” view, in the Project Browser, and select Show Section Box as shown in the first image below. Now you can quickly adjust it and do so more accurately. FYI: If you don’t see this option in the menu, that means the Section Box option is not turned on in that “other” view.
2) Apply from Another View
If you are having troubles figuring out what is showing, or not showing, in an elevation, section, or plan view? Open the default 3D view and using a View Cube command called Orient to View to make the section box match the width, depth, and height of the “other” view’s crop region and far clip plane!
3) Rotate a Section Box
Did you know a Section Box can be rotated? In the example below, the default 3D view’s Section Box is made visible in a floor plan view, and then rotated to match the angled stair (just use the normal rotate command). Now, in the 3D view, the Section Box looks cleaner, with less distractions on adjacent non-stair stuff!
4) The QA/QC Slice
Using several, or all, of the first three tips we can create a 10’-0” slice through the building to facilitate a QA/QC review. In the first image below, you would orbit around the model, looking for things that do not necessarily show up in clash detection, such as a full-lite door into a unisex toilet room, or a power receptacle not showing up behind an appliance.
Then, move the section box 5’-0” and repeat the process until you’ve reviewed the entire model. Adjust the dimensions based on the size and complexity of your project.
5) Selection Box for the Win
This is the “I use it every day” tool. If you need to look at something quick, simply select it and click the Selection Box tool. The result is a Section box applied to the default 3D view, with the Section Box being just slightly larger than the selected element(s). Tip: you can select more than one element.
The thing to keep in mind with this workflow is that the default 3D view is always thought of as a throw-away view. Meaning, it is never meant to be placed on a sheet, or set up with filters and such. Doing so allows the Selection Box/Section Box to continuously override the view, or you can turn the Section Box off and back on, which manually resets it. Tip, if you delete the default 3D view, and then click the House icon on the Quick Access Tool bar, the default 3D view will automatically be recreated.
You must be a registered user to add a comment. If you've already registered, sign in. Otherwise, register and sign in.


