Simulation Mechanical Forums (Read-Only)
Welcome to Autodesk’s Simulation Mechanical Forums. Share your knowledge, ask questions, and explore popular Simulation Mechanical topics.
cancel
Showing results for 
Show  only  | Search instead for 
Did you mean: 

Local mesh refinement

13 REPLIES 13
Reply
Message 1 of 14
imalleab
782 Views, 13 Replies

Local mesh refinement

Hi,


I have a couple of questions concerning to the meshing process.


  1. I've been trying to refine the mesh from my model, but the only way I was able to do this was by refining the entire mesh. Is there a way to refine just the areas of interest (automatically or manually)? And how to do so?
  2. My model consist of two bodies in surface contact, and the meshes of one body doesn't match the other body nodes, is this a problem in terms of the stress analysis?


Thanks.


Ignacio

13 REPLIES 13
Message 2 of 14

Hi @imalleab,


My experience is as follows (please note there might be other methods to achieve similar results):


1. For shell/plate element types I would recommend you to split part on smaller parts in cad software before loading into Autodesk Simulation. Division shall be considered, since afterwards you will set global mesh size, while selection of the most important parts with right mouse button (RMB) enables you to choose CAD meshing options to be based on part, not entire model. This is the step where you will set appropriate mesh size for particular parts. What more, you can select edges of the coarser-meshed parts and with RMB select to create mesh subdivision which will be same as for adjacent fine-meshed parts. That would be very similar for solid finite elements and it is recognized in my practice as most quick and practical approach. Just take care the transition gradient shall not be too large for big models, otherwise you may have some issues.

2. In general, if this is linear analysis your mesh for two solid bodies shall be connected at nodes, these shall match. On the other hand if this is nonlinear analysis, the match shall not match. If your mesh does not match in linear analysis, there is also something called Smart Bonding, but I do not found it to be plausible due to quality assurance doubts once your project is finished and your report undergoes external review when the third party reviewer is not familiar with Autodesk Simulation.

Message 3 of 14
marwan_azzam
in reply to: imalleab

Hello Matias,


To add to what Engineer Mickey said:


1- Defining part-based mesh sizes work on all element types, not just plate/shell.

In addition to that method, you can define refinement points to refine the mesh locally.  You can define as many refinement points around the model as needed.  This article talks about refinement points as well as other ways to control the mesh size.


2- As far as mesh matching, if you are doing a linear analysis, the parts have to be touching (zero gap between them) for them to interact with each other.  If they do touch but for some reason the mesh does not match you can activate smart bonding.  If they do not touch then there wont be any kind of interaction between them unless you create connecting elements which is a different story.

For a nonlinear analysis such as MES, if you want to define surface to surface contact the parts do not have to touch each other.  For bonded contact it is still recommended that the parts touch each other and the mesh matches so as not to have to create contact pairs.

Message 4 of 14
imalleab
in reply to: imalleab

Thank you both.


I'm performing a nonlinear analysis, so as you said, the unmatched mesh won't be a problem.


About the refinement, I think the best choice for me is the point refinement, but it ask me to write a coordinate (X, Y, Z) to be the center of the point refinement, the problem is that I can't find the origin of my coordinate system, so I don't know what coordinates to use. Does someone know how to do this?


Thanks.


Ignacio

Message 5 of 14
imalleab
in reply to: imalleab

I figured it out.


Thanks.

Message 6 of 14
marwan_azzam
in reply to: imalleab

Hello Matias,


Glad you figured it out.

I'm going to present a few ways to determine the origin in case one of them is easier than what you did:


1- Click the Application button (top left corner) and go to Graphics: Mini-axis and set the position to "At the origin (0, 0, 0)"  This will place the red-green-blue XYZ triad at the actual origin (0, 0, 0)


2- Go to Draw: Construction vertex.  Set X, Y, and Z to all zeros (default).  Make sure Use Relative is not checked and hit Apply.  This will create a construction vertex at (0, 0, 0). Construction vertex will be blue.


3- Go to Draw: Line Make sure Use Relative is not checked.  Hit Enter on the keyboard.  Your mouse will be at the end point of the of the line and the other end will be (0, 0, 0).  No need to actually create the line.


One way of adding a refinement point without needing the coordinates is to select an existing mesh point (vertex) : right-Click: Add: Refinement Point


As far as you doing an MES analysis and the meshes not matching that is perfectly of.  However, if the parts are going to be bonded it's better if the meshes do match.


Marwan

Message 7 of 14
imalleab
in reply to: imalleab

Thank you marwan.


I'm doing iterative mesh refinement analysis, but at this point I'm not reaching converging results as you can see in the table.


Mesh FactorVon Mises (MPa)
213,9
2,523,97
320,3
3,514,15
417,13


Is this normal, and I need to refine even more the mesh or it's more likely another issue?


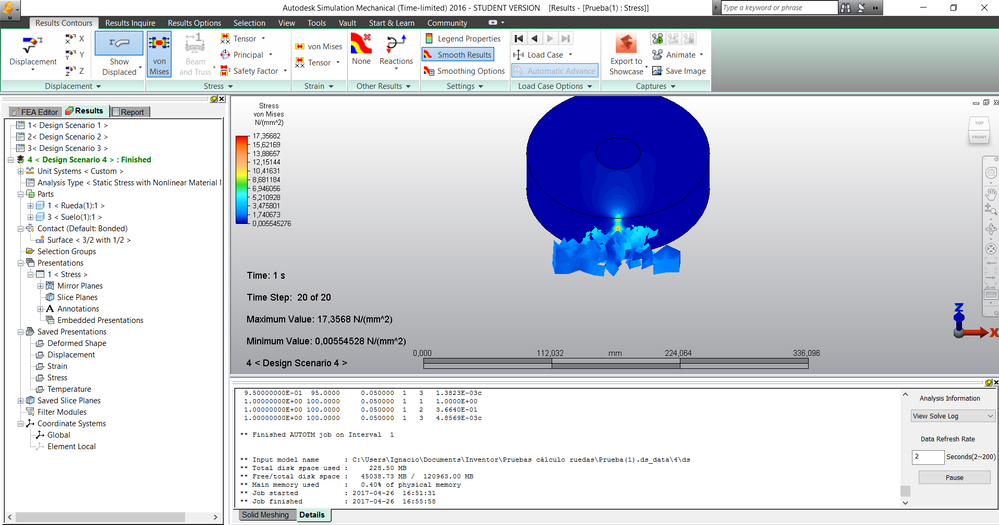
Another thing. Why the bodies looks like the one below in the image after the analysis? Does it have any meaning?


consultaforo.png

Thanks.

Message 8 of 14
AstroJohnPE
in reply to: imalleab

Hi Ignacio,


It is a little hard to see from the image because of the elements from the "tube" are hiding part of the disk, but it looks as if the stress on the disk is not uniform across the width. My guess is that the maximum stress that you are getting is a result of the mesh not being uniform and accurate enough. Essentially, the distorted mesh is causing mathematical stress concentrations. To calculate real contact stresses, you will need a very good mesh on the surface and into the depth of the part. This can be hard to obtain with an automatic mesh on a solid part.


Have you done a hand calculation (or using the program suggested by Keith) to find out what the contact area is for this load? This is just a guess, but you probably want between 4 and 10 elements across the width of the contact area. So if the contact width is 2 mm (just a wild guess), you may need element size of 0.5 to 0.2 mm! (It has been a long time since I did contact stress calculations, so my memory may be inaccurate. It also depends on if you are using midside nodes or not.)


If my memory is correct, the maximum stress is below the surface by some small distance. You probably want 4 to 10 elements through the depth, too. This is why Keith had suggested using a 2D model for the contact stress. The model size can become so large, it is almost not practical to do contact stress with a 3D model. (Also, it is hard to get the stress inside a 3D solid.)

Message 9 of 14
imalleab
in reply to: AstroJohnPE

John:


  1. In fact, I'm getting nonuniform stresses on the contact width with appreciable concentration areas. Which method do you recommend to get a more accurate mesh in the contact area since you are saying that is hard to obtain with an automatic mesh? What I'm doing is: (1) defining a vertex on the middle of the contact line between the two bodies, (2) adding a refinement point, (3) defining a radius to refine the mesh inside that volume, (4) choosing the mesh elements size.
  2. Yes, I have downloaded the program Keith recommended and according to it, the contact area width is about 2,5 mm. (I'm trying to avoid doing manual calculations, since it's a nonlinear analysis and I'm short of time). The element size I've been working with at this point are extremely larger than the 4 to 10 elements per width you are suggesting and they are first order elements. So, trying to get closer to that element density is a good way to improve the results. I will try to find a density as high as my CPU allows me to work with.
  3. In this particular case it would be a good idea to make a 2D analysis, the problem is that on the current model I'm just trying to validate the procedure to start working with my real case, which is a grooved wheel and a tube (with normal and tangential forces), and I think in this case the 2D analysis won't be enough because the stress distribution won't be constant across the section. I'm right with that or it's still feasible to do the 2D analysis?

Thanks.

Message 10 of 14
John_Holtz
in reply to: imalleab

Hi Ignacio,


First, I think that Keith was implying that you are going to use two models: one to calculate the contact stress, and a second model to calculate the tube bending with multiple rolls (and ignoring the contact stress). So for the contact stress model, how much of the roll is required?  Do you need just a 90 degree segment? A 30 degree segment? Can you make 95% of the roll mathematically rigid (by using kinematic elements) and just have elastic elements in the area of contact (see the attached image)? These are questions that I do not know the answer to, but your simplified test model is the way to test them.


You are correct that a 2D analysis will not represent the roll-to-tube contact accurately. So the question is, how close to reality would a 2D planar simulation be? But probably a 3D model is required.


For 1, your options are an automatic mesh, a hand-built mesh, or a combination of the two. Hopefully, the automatic mesh will ultimately work for you, but you may need to modify the CAD model to provide some guidance to the mesher.


If you split the CAD model into 4 parts as shown in the attached sketch, you might be able to control the mesh more accurately. The problem with one refinement point in the middle of the roll is that is still creates a random mesh in the area of contact, and especially because your elements are larger than the contact area, some nodes make contact across the width of the roll, and some nodes do not. This is giving the stress points. You should split the face of the roll across the width (you do that in CAD using the "split" command) so that there are edges and different surfaces going across the width. If the edges are spaced 1 mm apart and your mesh size is 0.5 mm (or 0.2 mm), then you should have a relatively uniform, rectangular mesh in between the edges.


John Holtz, P.E.

Global Product Support
Autodesk, Inc.


If not provided already, be sure to indicate the version of Inventor Nastran you are using!

"The knowledge you seek is at knowledge.autodesk.com" - Confucius 😉
Message 11 of 14
imalleab
in reply to: John_Holtz

Thanks John, dividing the bodies worked well. Using 0,5 mm sized elements on the contact parts gave me uniform stresses and results close enough for me with those obtained with HertzWin.


Now I'm trying to replicate the procedure with the grooved wheel-tube bodies, but I'm having some difficulties.


When I choose elements of 1,5 mm on the contact parts, the analysis goes ok. The problem comes when I refine the mesh to 1 mm, it says "distorted element", and don't converge.


I don't know if it's a problem with the shape of the split elements I made or maybe it has something to do with the curved shapes of the groove or tube and therefore the shape of the bricks/tetrahedra. Here's a picture of the contact parts.


ContactParts.pngContactParts2.png


Thanks!

Message 12 of 14
AstroJohnPE
in reply to: imalleab

What happens with a mesh size of 1.1 or 0.9 mm? Or 0.5 mm?


In other words, the distorted elements are due to the shape of the solid (brick) elements. Other than the quality controls under the solid mesh settings, you have no control over the solid mesh. Your only "control" is to change the surface mesh. If you are lucky, a different mesh size is change the solid mesh enough to avoid the distorted element.


Message 13 of 14
imalleab
in reply to: John_Holtz


First, I think that Keith was implying that you are going to use two models: one to calculate the contact stress, and a second model to calculate the tube bending with multiple rolls (and ignoring the contact stress). So for the contact stress model, how much of the roll is required?  Do you need just a 90 degree segment? A 30 degree segment? Can you make 95% of the roll mathematically rigid (by using kinematic elements) and just have elastic elements in the area of contact (see the attached image)? These are questions that I do not know the answer to, but your simplified test model is the way to test them.


How can I make the elements that don't intervene with the analysis rigid? You say it's by using kinematic elements, but can you explain a little more how to do that?


Thanks


Message 14 of 14
John_Holtz
in reply to: imalleab

Hi,


"Kinematic" is a selection under the Element Type for each part. (They are available in an MES analysis, which I think you are using, and probably nonlinear static.)


John Holtz, P.E.

Global Product Support
Autodesk, Inc.


If not provided already, be sure to indicate the version of Inventor Nastran you are using!

"The knowledge you seek is at knowledge.autodesk.com" - Confucius 😉

Can't find what you're looking for? Ask the community or share your knowledge.

Post to forums  

Autodesk Design & Make Report