Community
- Forums Home
- >
- Revit Products Community
- >
- Revit Architecture Forum
- >
- Re: LEED 8.2 - Views - Visibility Analysis
Revit Architecture Forum
Welcome to Autodesk’s Revit Architecture Forums. Share your knowledge, ask questions, and explore popular Revit Architecture topics.
Turn on suggestions
Auto-suggest helps you quickly narrow down your search results by suggesting possible matches as you type.
Reply
Topic Options
- Subscribe to RSS Feed
- Mark Topic as New
- Mark Topic as Read
- Float this Topic for Current User
- Bookmark
- Subscribe
- Printer Friendly Page
Message 1 of 9
Anonymous
4384 Views, 8 Replies
01-18-2017
07:50 AM
- Mark as New
- Bookmark
- Subscribe
- Mute
- Subscribe to RSS Feed
- Permalink
- Report
01-18-2017
07:50 AM
Hi,
I would like to know whether Revit can perform Visibility Analysis for LEED IEQc8.2 or not. I know that Revit has FREE add-in for lighting analysis that complies with IEQc8.1 Daylight credit.
I am looking for something that can cut-out my manual work for IEQc8.2 - Views credit. There was a trial version of "Revit Credit Manager for LEED" that used to support IEQc8.2 Views calculation.
However, Since July 16, Autodesk has pulled the plug for Revit Credit Manager for LEED, and no longer offer the service.
Is there any other tool available ? or can Revit Credit Manager for LEED be available for use ?
Solved! Go to Solution.
Solved by ermiastessema. Go to Solution.
8 REPLIES 8
Message 2 of 9
04-04-2017
09:06 AM
- Mark as New
- Bookmark
- Subscribe
- Mute
- Subscribe to RSS Feed
- Permalink
- Report
04-04-2017
09:06 AM
It is a work around, but this is how I do it. It might seem complicated at first but once you figured it out it is a piece of cake.
In short what I do is I use SPACE command to create regions out of the rooms where you have a view to outside, and a SPACE SCHEDULE to automatically generate the IEQ8.2 Table. You can create it from scratch but you can save time by taking those from the file I have attached.
1. Open your revit file and this file I have attached to you (IEQ 8.2 Sample.rvt)
Lets assume the plan below is your project

2. From my revit file (IEQ 8.2 Sample.rvt) open the sheet view and copy the table similar to the one you see below and paste it on a sheet created in your file.
In this way you can take my schedule and will be ready for you to use.

3. The other thing I like you to take is a color scheme I made. (You can customise it or create your own) Here is the step how
Go to Manage>Transfer Project Standards > Make sure it is from IEQ 8.2 Sample(1) > Check none (2) > Thick Color Scheme (3) > ok(4) > New Only
4. Apply the color legend into your plan view


Go to Annotate > Color Fill Legend > Click on your Plan>Select 'Spaces' for Space Type and 'LEED IEQ 8.2' for the color Scheme>OK


You have everything ready now you can do the actual work
5. Go to Analyze >Space>Click on the Regularly Occupied Regions

6. Select The space one by one and fill these two important data on the properties tab or on the schedule
a. Make sure the number is similar to room number that's very important
b.check View-No View thick box if you have a direct line of sight and uncheck it if it has no direct line of sight that's when the color scheme starts to work. You see yellow for view and dark gray for no view


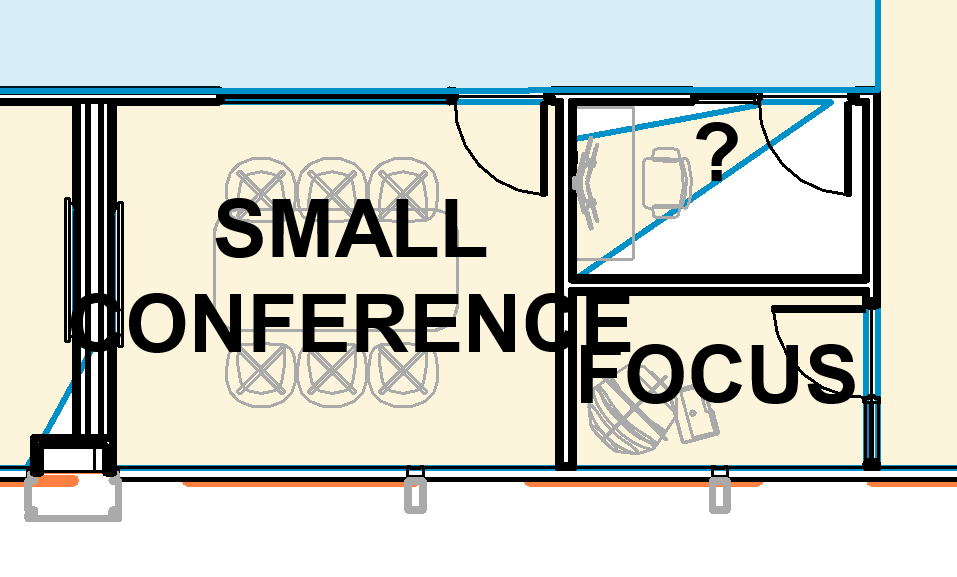
7. Use space separator to draw direct line of sight
When you create an IEQ8.2 plan view (left of the last image) you will automatically have the table for it. You can export this table to excel if you want or you can print a pdf from your sheet view.
You may need to split to discontinue the line where you dont want it to separate (as in Office A on the plan)


I am proud because
-The compliant area changes according to the percentage of the yellow area and based on your input at column 'E' on the table(View / no View)
-You can modify from the plan, from the schedule or from the properties tab anytime and you will get an autoimatic update
Draw Backs.
You should calculate the final calculation by yourself or by exporting it to excel
it doesn't detect when it is classroom or meeting area where you always take the actual yellow area regardless of the percentage
Please Kudos if it helps and I like your comments
Message 3 of 9
10-24-2017
10:06 AM
- Mark as New
- Bookmark
- Subscribe
- Mute
- Subscribe to RSS Feed
- Permalink
- Report
10-24-2017
10:06 AM
Hi ermiastessema,
This is great! Which version of Revit was the sample file created in?
Message 4 of 9
10-24-2017
04:19 PM
- Mark as New
- Bookmark
- Subscribe
- Mute
- Subscribe to RSS Feed
- Permalink
- Report
10-24-2017
04:19 PM
This is indeed amazing;
Finally, I got an answer I was looking for;
I really appreciate your detailed response on this matter;
Kinda excited to implement it in my project, will let you know how it goes;
Thank you once again ! It's due to actually people like you, this community remains vibrant and alive all the time !!
Message 5 of 9
10-25-2017
11:07 PM
- Mark as New
- Bookmark
- Subscribe
- Mute
- Subscribe to RSS Feed
- Permalink
- Report
Message 6 of 9
02-01-2018
01:39 PM
- Mark as New
- Bookmark
- Subscribe
- Mute
- Subscribe to RSS Feed
- Permalink
- Report
Message 7 of 9
07-11-2019
10:16 AM
- Mark as New
- Bookmark
- Subscribe
- Mute
- Subscribe to RSS Feed
- Permalink
- Report
07-11-2019
10:16 AM
You are a god!
Thank you so much for this! it saves several hours of everyone's time as well as their peace of mind!!!
Message 8 of 9
09-23-2019
09:02 AM
- Mark as New
- Bookmark
- Subscribe
- Mute
- Subscribe to RSS Feed
- Permalink
- Report
09-23-2019
09:02 AM
I love this technique, however, it's causing some issues where my room boundaries are linking to the space boundaries. In fact, I can't edit the room boundary because there isn't one.
Message 9 of 9
03-02-2020
02:42 AM
- Mark as New
- Bookmark
- Subscribe
- Mute
- Subscribe to RSS Feed
- Permalink
- Report
03-02-2020
02:42 AM
Is there a way, where Revit can do the space separator automatic? because in large buildings it will take time to do the separator in every space. So is there a way where I can identify the windows and it does the separators on its own?
Thank you
Reply
Topic Options
- Subscribe to RSS Feed
- Mark Topic as New
- Mark Topic as Read
- Float this Topic for Current User
- Bookmark
- Subscribe
- Printer Friendly Page
Forums Links
Can't find what you're looking for? Ask the community or share your knowledge.
Post to forums

