Local Render Blurry

Local Render Blurry

thespaltydog
Enthusiast Enthusiast
4,127 Views
3 Replies
Message 1 of 4

Local Render Blurry

thespaltydog
Enthusiast
Enthusiast

Hello,


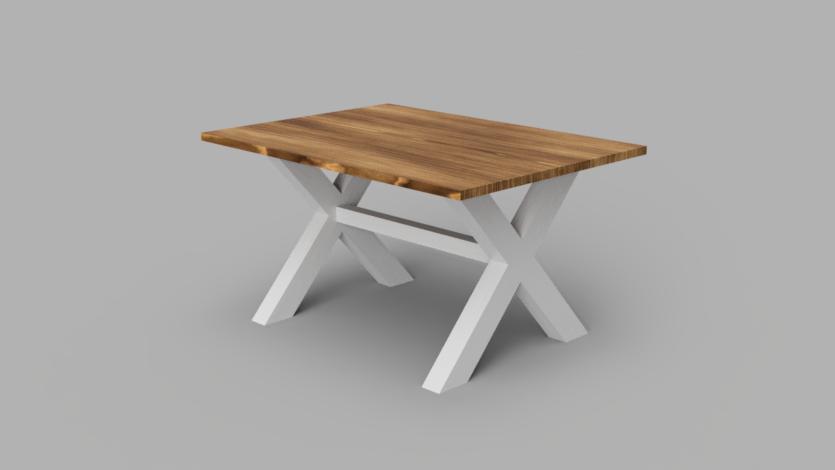
I've seen this topic a few times on the forums but I haven't really found an answer that seems to solve it. Every time I do a local render on my machine I get blurry renders along with artifacts showing around the edges. I'm typically using the 3D wood textures with the standard default exposure settings and the Photobooth environment lighting. Additionally I keep the depth of field turned off.


When exporting I always make sure to toggle the advanced settings and choose the 100 - Excellent quality. However, my renders never appear sharp. I've also tried the different file formats with no luck either.


I've attached one of my renders along with my project file in hopes someone could figure out what I'm missing.


Thank in advance!

Logan

0 Likes
4,128 Views
3 Replies
Replies (3)
Message 2 of 4

ClintBrown3D
Autodesk
Autodesk

Hi @thespaltydog 


I have 2 things you can try. The first one is if you are doing an in canvas render (which it looks like you are)

2021-03-09_15h40_45.png

Make sure that you set the render quality to "Infinite", this will allow the renderer to run through more iterations of the render.


In the image below, I compare 100 iterations with 400, you will (hopefully) be able to see that the 400 iteration image is sharper. The 400 iterations take longer to render, but with each iteration,  the image should get more refined and therefore less "Fuzzy".

2021-03-09_15h53_27.png

The second option is to do a Render. This will add an image to your Render Gallery.

2021-03-09_15h48_47.png

When you click "Render", you will get the following dialogue, here you are able to choose render settings. Again, this has an "Excellent" option, as well as DPI settings, and will take as long as necessary to process based on your settings and your computer hardware.

2021-03-09_15h59_03.png

Here is a screencap of an image based on the settings above. This is the method that I use most.

2021-03-09_16h53_51.png

I hope that this is helpful and that these tips help improve your render quality.


Clint Brown
Senior Product Manager - Autodesk Fusion


Book some time on my calendar
The Ultimate Guide to Drawing Automation
0 Likes
Message 3 of 4

thespaltydog
Enthusiast
Enthusiast

Hey @ClintBrown3D, this is helpful. I actually use most of these settings you show with the exception that I normally choose "Custom" instead of "Print". I'm usually showing these renders digitally and choose a 16:9 aspect ratio. Additionally, I'm typically only doing renders through the gallery and not an in canvas render. The example render I showed was actually through the render dialog using "Custom" 16:9 aspect ratio with the "Excellent" quality specified. However, when using the "Picture" setting that you've shown the quality was significantly better. 


Are you aware of any issues with the "Custom" setting? When using the "Print" option I find it's also a little difficult to frame my shots because the aspect ratios are not available to preview in the scene settings when moving around the project.


Thank you!

0 Likes
Message 4 of 4

Raluca-CoffeBased
Participant
Participant

I tried also many things to try to get the blurry effect away, I found that some appearances/materials are much better than others.. so shiny stuff works better than matte. Also if you bump up the pixels to 4000x4000 you get suuper nice quality but yeah you gotta wait 1-2hours for it..

0 Likes