Community
Fusion Design, Validate & Document
Stuck on a workflow? Have a tricky question about a Fusion (formerly Fusion 360) feature? Share your project, tips and tricks, ask questions, and get advice from the community.
- Forums Home
- >
- Fusion Community
- >
- Design, Validate & Document forum
- >
- Re: Help with cabinets and copy
Fusion Design, Validate & Document
Stuck on a workflow? Have a tricky question about a Fusion (formerly Fusion 360) feature? Share your project, tips and tricks, ask questions, and get advice from the community.
Turn on suggestions
Auto-suggest helps you quickly narrow down your search results by suggesting possible matches as you type.
Reply
Topic Options
- Subscribe to RSS Feed
- Mark Topic as New
- Mark Topic as Read
- Float this Topic for Current User
- Bookmark
- Subscribe
- Printer Friendly Page
Message 1 of 19
May
- Mark as New
- Bookmark
- Subscribe
- Mute
- Subscribe to RSS Feed
- Permalink
- Report
May
Hello
need help with being able to copy this cabinet so that it becomes 4 pcs in width and 4 pcs in height, and being able to change cabinets individually.
I know how to copy and make 4 pieces in width and height, but then everyone will get shelves if I make shelves in one of the cabinets.
I have tried to make boudary fill of a cabinet, but then I get an error.
what is the procedure here
Solved! Go to Solution.
Solved by JamesLodge01. Go to Solution.
18 REPLIES 18
Message 2 of 19
May
- Mark as New
- Bookmark
- Subscribe
- Mute
- Subscribe to RSS Feed
- Permalink
- Report
May
I think I understood what you were attempting to create.
Attached is a fully parametric version of your design for review.
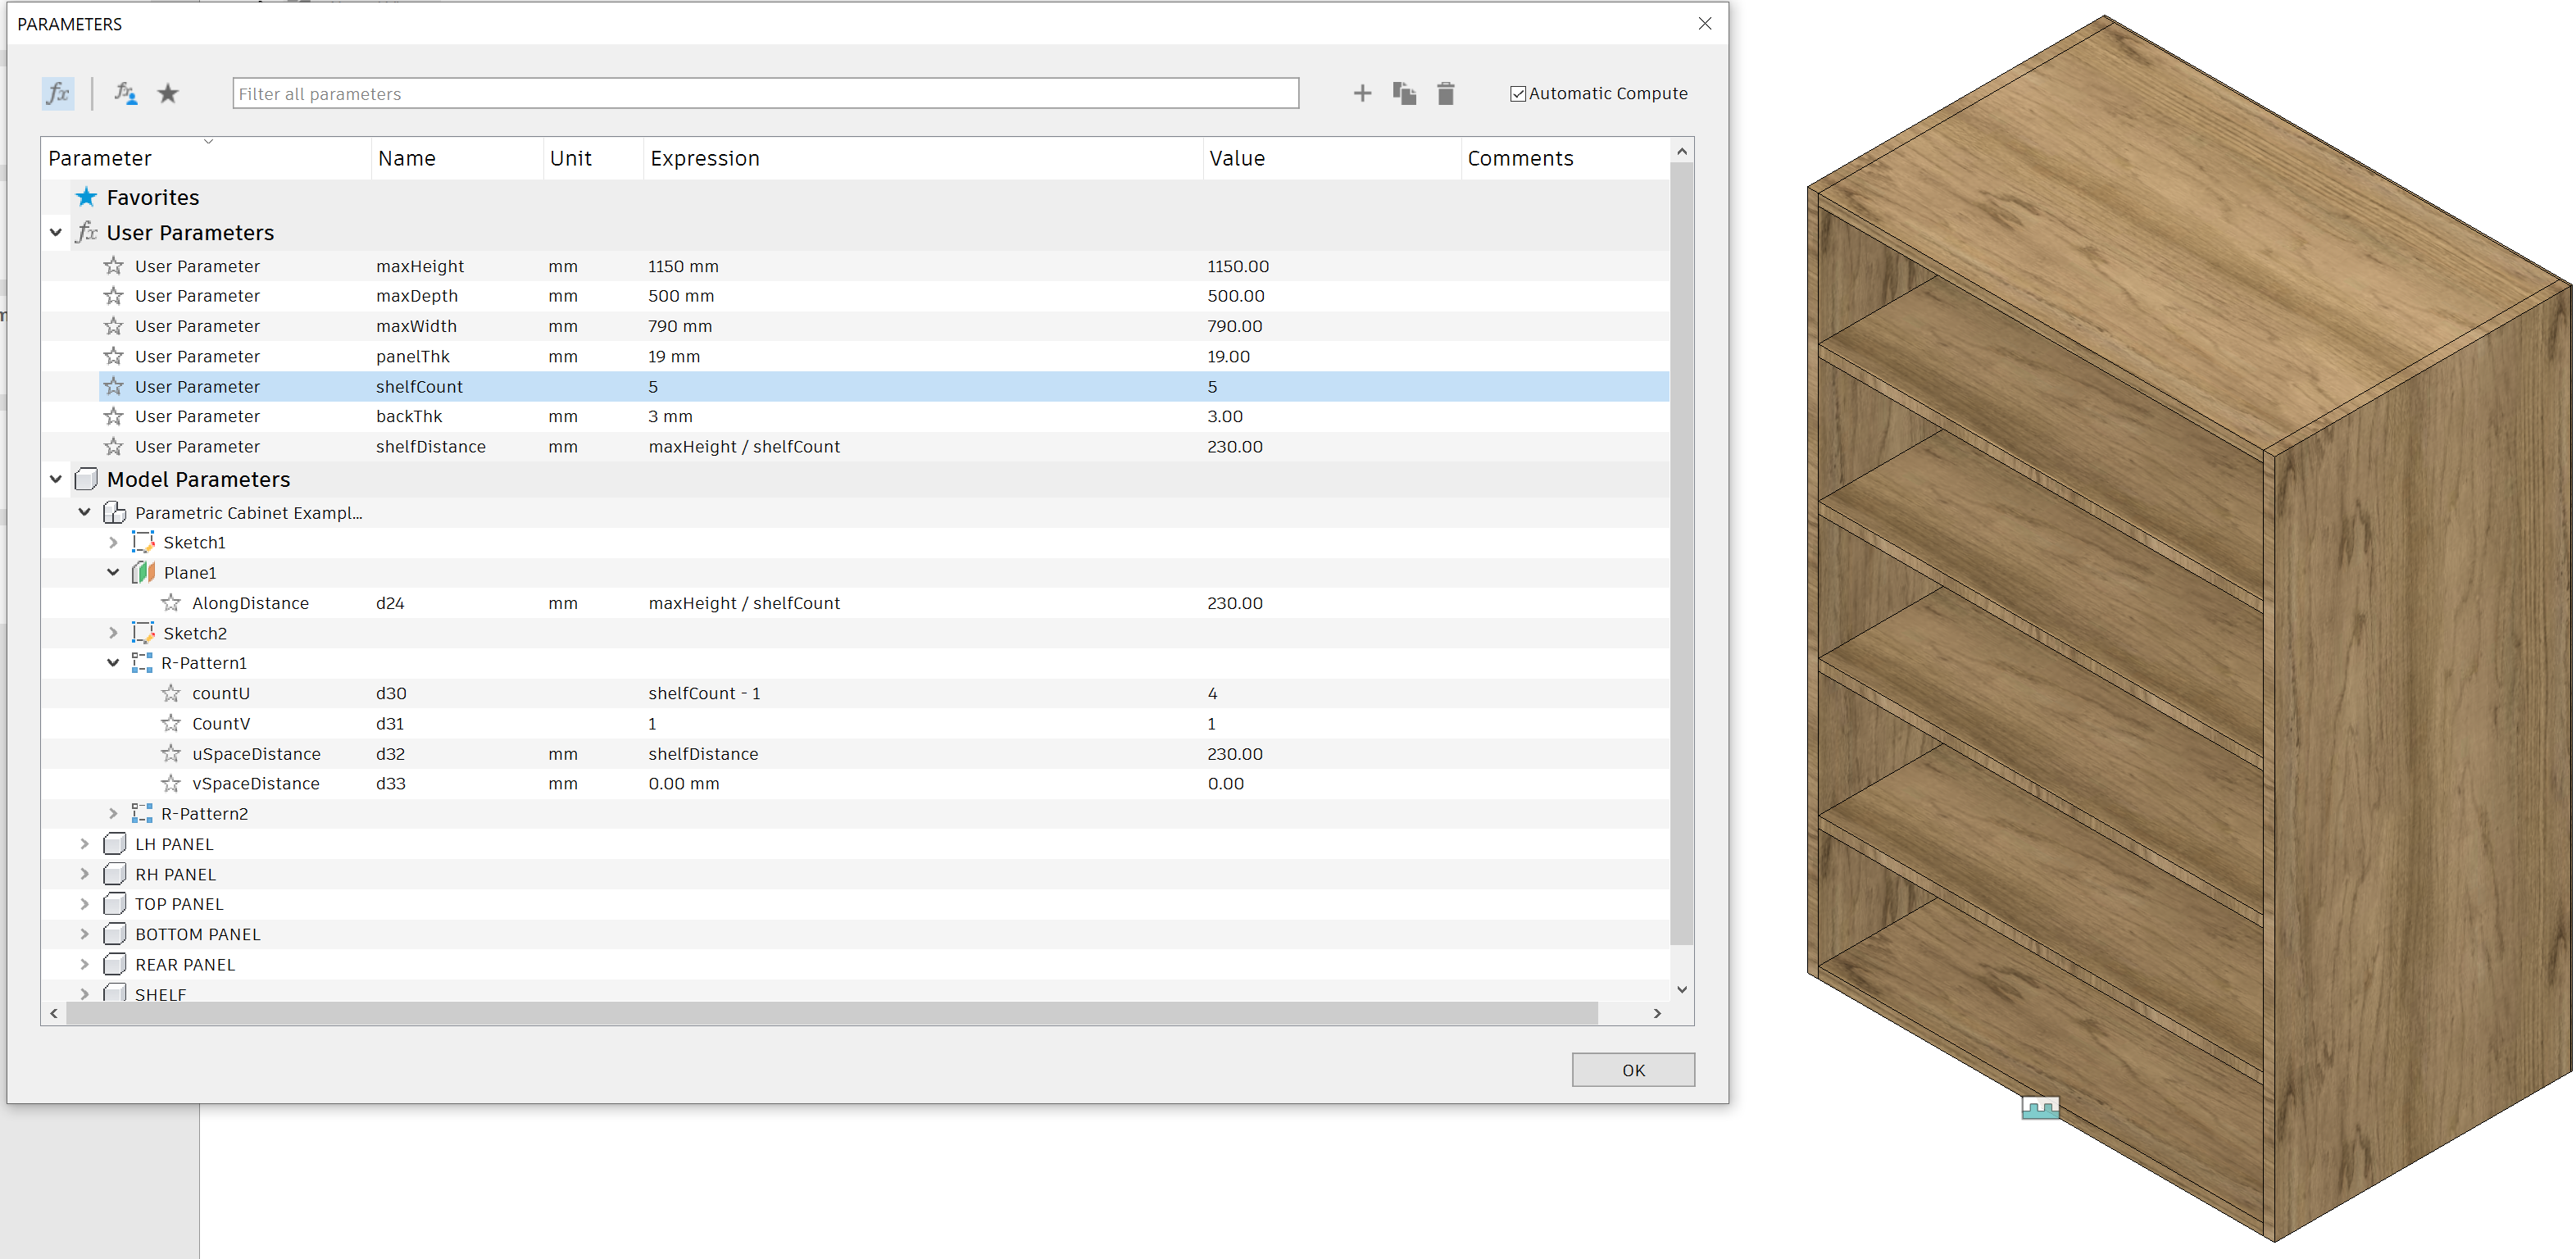
If you go into the Parameters; Solid (tab) >> Modify (panel drop-down) >> Parameters
You can modify the maxHeight, maxWidth and maxDedth and the shelf Count. This will produce you a cabinet of any dimension with any number of equally spaced shelves.
In this example I used a Skeleton Modelling approach, so check out the sketches used to generate the panel profiles. I created the back panel using the same sketches but with an offset for the extrusion start.
Also take a look at the parametric equations I used for generating the equally spaced shelves, this approach can be applied in any direction where components (or bodies) need to be patterned.
Please let me know if this helps.
Message 3 of 19
May
- Mark as New
- Bookmark
- Subscribe
- Mute
- Subscribe to RSS Feed
- Permalink
- Report
Message 4 of 19
May
- Mark as New
- Bookmark
- Subscribe
- Mute
- Subscribe to RSS Feed
- Permalink
- Report
May
Hi,
Is it about the pattern of shelves in a single cabinet or the individual number of shelves in several identical cabinets?
günther
Message 5 of 19
May
- Mark as New
- Bookmark
- Subscribe
- Mute
- Subscribe to RSS Feed
- Permalink
- Report
May
Apologies, I just noticed an issue with my equations, I will post an updated version shortly. I'm also adding in a separator.
Message 6 of 19
May
- Mark as New
- Bookmark
- Subscribe
- Mute
- Subscribe to RSS Feed
- Permalink
- Report
Message 7 of 19
May
- Mark as New
- Bookmark
- Subscribe
- Mute
- Subscribe to RSS Feed
- Permalink
- Report
May
Hello, to avoid having to draw up all the cabinets, I want to copy them so that I get 8 cabinets, 4 on the bottom and 4 on the top, That's fine, I'll fix it.
Then I will make different types of furnishings in the different cabinets. What happens when I create a shelf say in cabinets 1, then all other cabinets will also get that shelf, because cabinets are copies. How do I avoid that?
Message 8 of 19
May
- Mark as New
- Bookmark
- Subscribe
- Mute
- Subscribe to RSS Feed
- Permalink
- Report
May
You don't Pattern the assembly.
You must Copy and then Paste New (Multiple times)
Or you can Pattern the Assembly and make new independent Component for shelves,
Joint and Pattern them as required.
Might help....
Message 9 of 19
May
- Mark as New
- Bookmark
- Subscribe
- Mute
- Subscribe to RSS Feed
- Permalink
- Report
May
Providing im understanding this correctly:
Create your "master" Cabinet. This will allow you to drive the shelf count and sizes.
1. Start a new design and insert the master cabinet into the current design.
2. Break the Link on the inserted cabinet from the Master. (Right-click in browser and select Break link in local menu)
3. Copy this unlinked Cabinet and "Paste New" a number of times and apply the required constraints for positioning.
4. As each cabinet in the new design is unlinked, you can change the size and shelf count as they are independent.
Message 10 of 19
May
- Mark as New
- Bookmark
- Subscribe
- Mute
- Subscribe to RSS Feed
- Permalink
- Report
May
.. you can change the size and shelf count as they are independent.
Only true if you Paste New.
Steps 1 and 2 are not necessary, (just optional.)
Might help....
Message 11 of 19
May
- Mark as New
- Bookmark
- Subscribe
- Mute
- Subscribe to RSS Feed
- Permalink
- Report
Message 12 of 19
May
- Mark as New
- Bookmark
- Subscribe
- Mute
- Subscribe to RSS Feed
- Permalink
- Report
May
Hi @potlsnekkeri I updated the Template Master and also generated you an Assembly for you to examine with 4 Unlinked Parametric Cabinets.
When I brought the Master into my new Assembly Design I performed the following:
1. Start a new design and insert the master cabinet into the current design. Rotate to desired orientation.
2. Break the Link on the inserted cabinet from the Master. (Right-click in browser and select Break link in local menu)
3. Activate the newly inserted, unlinked sub assembly and make necessary changes.
4. Create a Rigid Group.
5. Rename the copied Subassembly.
6. Activate the Top level and repeat.
7. After rotating, move into position (Vertical or Horizontal)
UPDATED TO SUIT RECORDING. New file seen with recording.
Message 13 of 19
May
- Mark as New
- Bookmark
- Subscribe
- Mute
- Subscribe to RSS Feed
- Permalink
- Report
May
thanks i wil look into it soon.
i use the copy tool when i copy the cabinet,is that wrong?
Message 14 of 19
May
- Mark as New
- Bookmark
- Subscribe
- Mute
- Subscribe to RSS Feed
- Permalink
- Report
May
Its not wrong. Just make sure you use the Paste New to ensure the components are not associated with the original's.
My preferred way of working (everyone is different) is to work on a file, in this instance the Parametric Cabinet Example. When I'm happy with the functionality I can then use it as a template for creating other new designs.
Because I can add this to any new design and remove the linking and parametrically drive the "new" variant, it is then possible to generate an infinite amount of designs and configurations if you want to take it that far.
I added the different workflows as food for thought.
Message 15 of 19
May
- Mark as New
- Bookmark
- Subscribe
- Mute
- Subscribe to RSS Feed
- Permalink
- Report
May
@potlsnekkeri - Sorry I read that wrong 🙂
There are a few methods of copying solids and components. You need the following:
1. Select each component in the browser.
2. Right click and select Copy from the local menu.
3. Then right-click in the graphics window where the design sits and select Paste New form the local menu.
Message 16 of 19
May
- Mark as New
- Bookmark
- Subscribe
- Mute
- Subscribe to RSS Feed
- Permalink
- Report
May
My recommendation would be to design this as an external component/assembly and use the Configurations features to create different configurations for the different cabinets.
Then insert a the configurations of the cabinet into the main design.
If you are using a free subscription you are limited to the workflow @JamesLodge01 posted. Quite workable, but not as elegant as Configurations.
Message 17 of 19
May
- Mark as New
- Bookmark
- Subscribe
- Mute
- Subscribe to RSS Feed
- Permalink
- Report
May
Hey @potlsnekkeri
As per my other shared files,, here is the Master Cabinet using Configuration's and an Assembly containing a version of each.
As @TrippyLighting mentioned, if you are using the full license you can open the files for further examination.
So when you pull it all together, Named Parameters and Equation Driven Dimensions used to create a Fully Parametric Model it can then be driven using Configurations (easier to create with named parameters). The example you see has the different shelf configurations as before and I have added different appearances to help you explore the workflow further.
Message 18 of 19
May
- Mark as New
- Bookmark
- Subscribe
- Mute
- Subscribe to RSS Feed
- Permalink
- Report
May
@potlsnekkeri - Recording Attached as requested with model used in recording showing Break Link and Model Adjustment Workflow
1. Start a new design and insert the master cabinet into the current design. Rotate to desired orientation.
2. Break the Link on the inserted cabinet from the Master. (Right-click in browser and select Break link in local menu)
3. Activate the newly inserted, unlinked sub assembly and make necessary changes.
4. Create a Rigid Group.
5. Rename the copied Subassembly.
6. Activate the Top level and repeat.
7. After rotating, move into position (Vertical or Horizontal)
Message 19 of 19
a month ago
- Mark as New
- Bookmark
- Subscribe
- Mute
- Subscribe to RSS Feed
- Permalink
- Report
Reply
Topic Options
- Subscribe to RSS Feed
- Mark Topic as New
- Mark Topic as Read
- Float this Topic for Current User
- Bookmark
- Subscribe
- Printer Friendly Page
Forums Links
Can't find what you're looking for? Ask the community or share your knowledge.
Post to forums

