I've been looking on YouTube for videos to animate gears I've modelled, however all the videos are out of date and I couldn't see one I could follow with the version of Fusion360 I have, can anyone help?
I am trying to create an AS-BUILT JOINT for an axle and a gear.
You will be a lot better of using Joints instead of As Built Joints. Add a Revolve joint to each of your gears. Next drag the gears, using your mouse, until the teeth line up. Go to the Assemble Menu and select Motion Link. When you get the warning to Capture Position be sure you capture it. In the Motion Link dialog select the two previous Revolve Joints, enter the ratio of the two gears check if the rotation is correct and you are done.
John Hackney, Retired
Did you find this post helpful? Feel free to Like this post.
Did your question get successfully answered? Then click on the ACCEPT SOLUTION button.
Thank you, although I'm not having much luck in getting it to animate the way I want, I also have a prop on the top of the axle which I want to rotate along with the axle.
Attach you model to your post. Open the model in Fusion 360, select the File menu, then Export and save the file to your hard drive. Attach it to a reply post.
John Hackney, Retired
Did you find this post helpful? Feel free to Like this post.
Did your question get successfully answered? Then click on the ACCEPT SOLUTION button.
Please see attached exported project. Sorry its a rather large file.
Where to begin. First of all you have a number of errors in your timeline, some are so serious they are RED. Solve your timeline errors as they occur, it is simpler that way. Second, you cannot add Joint to Bodies, you can only add Joints to Components. I had to convert a lot of bodies into components which is not the proper method of creating them. You should create a Component, then create sketches and bodies while the component is ACTIVE. This places all the sketches and bodies under the component they belong to. Third, every assembly has to have at least one component GROUNDED. I grounded a few more because I wanted to skip creating a few joints. There are a number of areas you could improve your modeling practices.
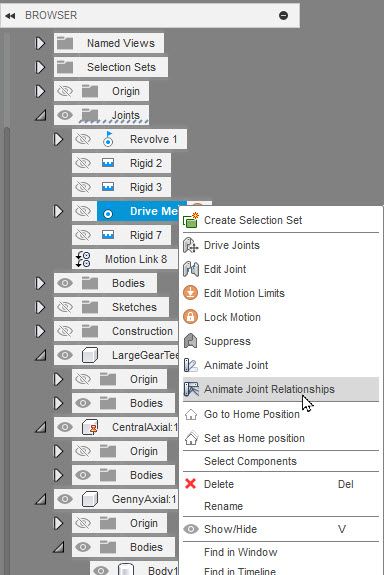
I created a Motion Link between the ring gear and the pinion by eye! I did not take the time to count the ring gear teeth, you can do that and adjust the ratio of the Motion Link. To Drive the assembly, right click on the Joint labeled Drive Me and choose Animate Joint Relationships from the context menu.
Model is attached.
John Hackney, Retired
Did you find this post helpful? Feel free to Like this post.
Did your question get successfully answered? Then click on the ACCEPT SOLUTION button.
In terms of addressing all the errors in the project, what course of action do I need to take? I'm not sure why there are errors in that I've simply been using Fusion 360 to create the sketches and bodies, there were no warnings or errors displayed to me whilst I was doing this ?
I can see that when the vertical axle turns the large gear also turns which is exactly what I was trying to achieve, I would also like the small gear to turn as a result of the large gear turning, is this easy enough?
There are 200 teeth in the large gear and 24 in the smaller gear.
In the model I returned the small gear is turning also, although the ratio was wrong as I did not know the number of teeth on the large gear.
As far as fixing you model, create your component first, activate it, then create your sketches and bodies under it. Repeat for the next component. If you need to add to the component reactivate it to add additional sketches and features or edit existing ones.
I suggest you create a simply component to practice this procedure to understand how it works, the built your model. Stop and solve any errors that show up in you timeline.
John Hackney, Retired
Did you find this post helpful? Feel free to Like this post.
Did your question get successfully answered? Then click on the ACCEPT SOLUTION button.
Thank you I will give it a go, I've opened the file and in the timeline jumped back to the first yellow icon, looking at the warnings:
Warning: Sweep1
<b>1 Reference Failures</b><br/>The model is using cached geometry to solve. Please reselect reference geometry for failed features in the timeline.
<b>1 Reference Failures</b><br/>The profile reference is lost, try editing this the feature to reselect the lost profile.
How do I fix these ?
The related sketch (profile) has been erased or removed. You will have to move your timeline ahead of the error, recreate the missing profile, move the timeline back to the error, edit and select the new profile. This is rather hard to do this large in your model, that is why you need to solve the as they occur.
John Hackney, Retired
Did you find this post helpful? Feel free to Like this post.
Did your question get successfully answered? Then click on the ACCEPT SOLUTION button.
Can't find what you're looking for? Ask the community or share your knowledge.