Community
Fusion Design, Validate & Document
Stuck on a workflow? Have a tricky question about a Fusion (formerly Fusion 360) feature? Share your project, tips and tricks, ask questions, and get advice from the community.
cancel
Showing results for 
Show  only  | Search instead for 
Did you mean: 

Newbie cannot "combine" two parts

47 REPLIES 47
Reply
Message 1 of 48
Quickmarch
4020 Views, 47 Replies

Newbie cannot "combine" two parts

I'm new to Fusion 360, but not CAD design in general. It has been many years since I was
active in the design field - AutoCad 2002 was the last version of AutoDesk software that I
used. So, please bear with me.

I've researched the "suggestions" and cannot find a similar problem.

I've watched numerous videos on the subject so I understand the concept of Bodies/Components,
etc. Pretty intuitive for someone who has been designing mechanical assemblies for the last 35
years.

I'm stuck on the "Combine" command.

I am trying to make a new component out of a combination of the two parts by joining the Base
Plug to The Pocket. I have very carefully made the Plug an exact fit inside the Pocket (within
4 decimal places).

All of the following were attempted in the "Model" Module.

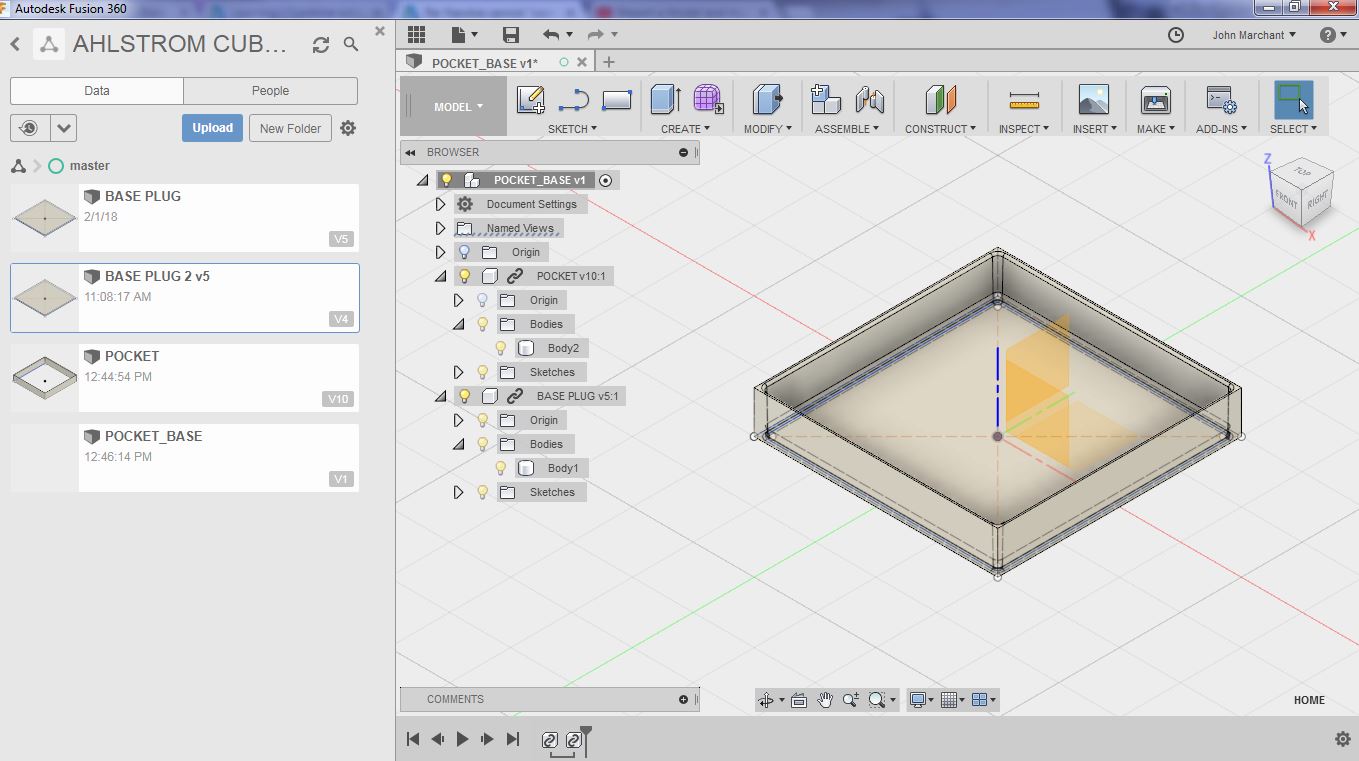
I started a new Project and created and saved two simple parts. I called them BASE PLUG, AND
POCKET. For each part, I started with a sketch on the X-Y axis at 0,0,0 and extruded in the Z
Axis. The parts show up in the Data Panel with appropriate names.

Other operations performed were to add 1 degree of "Draft" to the inside of the Pocket and the
same (opposite) to the outside of the plug.

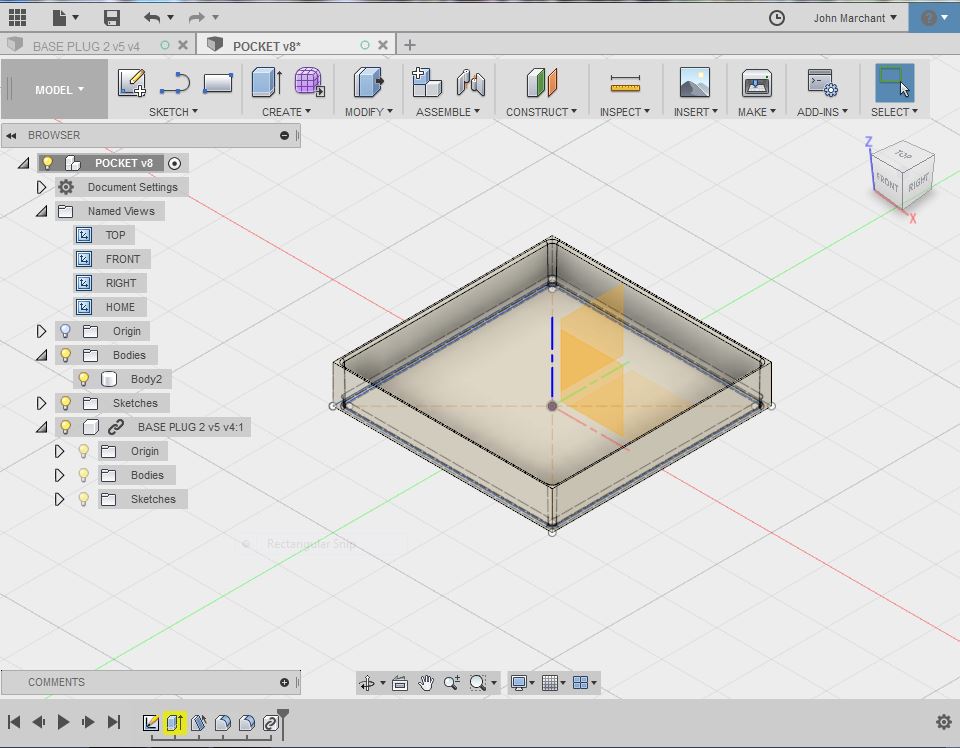
I opened the part "Pocket" then imported the "Base Plug" by right-clicking on the "Base Plug"
in the Data Panel and choosing "Insert into Current Design" from the drop-down menu. The base
Plug and the Pocket share the same origin (0,0,0) so there were no position changes. Both
parts are the latest iteration.

I choose "Combine" from the "Modify" Menu. I then select the Pocket as the Target Body, the
Base Plug as the Tool Body, "Join" from the operation Drop-down and leave "New Component"
unchecked. Fusion 360 automatically puts a check in the box "Keep Tools" as soon as I select
the Tool Body.

This is what I get:

Error: Combine2
Tool Body Error - The tool body is lost, try editing this feature to reselect tool body
Compute Failed - All tool bodies are lost, try editing this feature to reselect tool bodies

I retried the process, this time checking the box for "New Component". The result is exactly
the same.

I even tried editing the Base Plug to be 1% larger than a perfect fit then tried both "Join"
and "Cut" - neither worked. I continue to get the "Tool Body lost" error.

I'm sure I'm missing something simple and would appreciate any help the community can give.

Cheers,
March

Tags (1)
47 REPLIES 47
Message 2 of 48
davebYYPCU
in reply to: Quickmarch

I have not seen that error before.


There is a major clue in he picture you showed us, you have a linked Component, you can't perform operations with content of link ed components.


For further advise, the file will be required, file export, and attach to another post in e section above he post button, attachments.


An observation, two distinct models, to become one component, Combine is not the right method, butI am not sure what you want, an as you are new to Fusion, it may be just terminology.


Might help...

Message 3 of 48
Quickmarch
in reply to: davebYYPCU

Thank you for helping.


Here is the requested file in IGES format. 


That failed with an error message (not a valid file extension) so I think I have to try a different file format - how about a .SAT file?

Message 4 of 48
davebYYPCU
in reply to: Quickmarch

Export from Fusion, will be an f3d extension....


Unfortunately, I am away from Fusion another day yet, hopefully others can chime in....


Message 5 of 48
Quickmarch
in reply to: davebYYPCU

I don't seem to be able to comply with your request. File/Export/ only allows four file types. None of them are the filetype you requested. I've attached another screen capture with the error shown in the lower right hand corner.


There is an option to "Share to Fusion360 Gallery". Is that what you refer to?

Message 6 of 48
jeff_strater
in reply to: Quickmarch

Hi @Quickmarch,


Because this is a 'distributed' design (with linked components), you can't just export it from inside Fusion.  The reasons why that limitation exist are a bit obscure, and not all that satisfying anyway, so I won't go into that here.  You can export this design as a 'Fusion archive' from the web view of the design.  Just click on the "open details on web" button in the data panel:

open on web.png


This should take you to the web view of this design.  Then, click on the blue download icon, and choose "Fusion Archive" type.  This will send you an email with a link to an F3Z file type that you can share here.

a360 download.png


One note on using linked components in Combine:  You should be able to reference the linked component as a tool body just fine (which is the workflow you described).  You just cannot reference it as a target body, because, in Fusion, linked components are read-only and cannot be modified in the referencing design.  But, a tool body should not get modified (which is also why the "keep tools" is checked and cannot be unchecked in your example.


Anyway, I'm interested in what you are seeing, and if you can successfully share your design here, I'd be happy to take a look at it.


Jeff


Jeff Strater
Engineering Director
Message 7 of 48
Quickmarch
in reply to: Quickmarch

You have me thinking about what you refer to as a "linked component". I was attempting to combine two parts by opening one and importing the other. If I come at this problem from a different angle, ie: create a blank part file and import both parts then try to combine, I might not have linked components. 


Unfortunately, this did not work.


Fusion360 will not allow me to designate one of the components as a "Target Body".


I created another part (an assembly) in the Data Panel. I saved this as "Pocket_Base". I inserted Pocket and Base Plug in to this new part. Now, with both parts imported to the new assembly, I tried to "Combine" them. 


I can select any (of the two) part as a Tool Body, but I cannot select either part as a Target Body.


I've attached another screen capture to demonstrate the history.

Message 8 of 48

Another option working with linked designs is Boundary Fill. Set the operation to new component or new body, select the linked bodies then select the cells to keep.


Mark

Mark Hughes
Owner, Hughes Tooling
Did you find this post helpful? Feel free to Like this post.
Did your question get successfully answered? Then click on the ACCEPT SOLUTION button.

EESignature


Message 9 of 48
Quickmarch
in reply to: Quickmarch

Thank you all for your interest in my problem.


@davebYYPCU and @jeff_strater I'm beginning to understand the process. I have exported to the Fusion360 Archive and (I believe) I'm waiting for a link to be sent to me so that I can share it here.


@HughesTooling - I will look into your suggestion right away.

Message 10 of 48
Quickmarch
in reply to: HughesTooling

The export to Fusion360 Archive worked as advertised. I have attached the file to this post. 


I hope you guys can glean something from it. I will try to open it in Fusion360 after I rename it so it doesn't overwrite the file with the same name.


Meanwhile, back to @HughesTooling suggestion - looking into it.


Cheers,

March

Message 11 of 48
Quickmarch
in reply to: HughesTooling

Thank you @HughesTooling. That worked on the second try. The first, I tried to use the function on the Pocket with the Base Plug imported and that failed. The error disappeared so fast that I didn't catch it, nor could I recover it.


The second try was with the file where I created a new part and imported both to the single file. I was able to use your suggestion and save the result as a "New Component" within the same file. Do you think this is the route to go for future part combinations?


I'm afraid I'm a bit confused by the whole process. Combining parts to make new parts was common practice in 3D modelling that I've dealt with in the past. Truth be known - that was a long way past (AutoCad 2002). I retired just as "Solidworks" and the like were being introduced. 

Message 12 of 48
jeff_strater
in reply to: Quickmarch

Thanks for the model, @Quickmarch.  However, that version of the model contains only the pocket body, and does not contain a link to the "BASE PLUG" component.


Screen Shot 2018-02-02 at 2.32.47 PM.png


Just to be clear (because I may not have explained it very well).  You cannot select a linked component as a Target Body, but you can select a linked component as a Tool Body in Combine.  So, your original configuration should have been fine (the target as a local body, and the tool BASE PLUG as a linked component).


Jeff Strater
Engineering Director
Message 13 of 48
jeff_strater
in reply to: jeff_strater

FYI - take a look at the screencast below.  It shows a workflow similar to your original configuration (local target, linked tool).  Different geometry, of course, but same components.  


Jeff


Jeff Strater
Engineering Director
Message 14 of 48
Quickmarch
in reply to: jeff_strater

Thank you @jeff_strater,


I was in the midst of trying to re-post the Pocket with the Base Plug included. I'm not sure what went wrong as I was careful to save the file (as directed) before exporting it. Somehow that did not work so I am going to try it again.


I'm beginning to wonder if I'm chasing something that is unnecessary, vis a vis your comment about the original possibly being OK as it was.


What I am attempting to do is help out a friend who has an idea that he would like to try using a 3D printer. My concern is that all of my geometry should be properly connected before attempting to send the file to a post processor for 3D printing. This particular part is a module that will be produced in both iterations: one without the base plug and the other with. The modules, along with three others, yet to be drawn, will be linked in grids of various combinations. The grids are the items that will go to the 3D printer. I am going to have to be able to "Combine" these parts to make the grids.

Message 15 of 48
Quickmarch
in reply to: jeff_strater

OK,


I was successful on my second try to produce the file. Please see attached.


Watching your screencast, there are a few things that I noted:


#1 - the screencast started after the Target Body had already been referenced, so I was not able to tell if you created a new file and then drew the primitive in that file or simply called up an existing file. That is what I did with the first iteration. I had already drawn and saved the part "Pocket". That is the file that I opened then tried to import the "base" and combine the two. For me, that failed.


#2 - There is an extra step every time you manipulate a part. You seem to click on the component in the browser, it highlights, then you click on a blank section of the drawing surface to kill the highlight before importing the second part. This is something I did not do.


I'm going to go and try to duplicate the exact sequence that you used in the screencast because your process did exactly what I was trying to do. The only difference is that you were able to select a Target Body where I could not.


I might just try my hand at producing a screencast. Might take me a while, so don't everyone hold their breath ; )

Message 16 of 48
jeff_strater
in reply to: Quickmarch

Thanks, @Quickmarch, going to take a look at this model now.  To answer your questions:


#1.  It doesn't matter.  In my simple example, I created the box in place.  But that state should be exactly the same state as if you had a model, and opened it.


#2.  Those "extra steps" were me just trying to show by selecting things, which component was which.  I was too lazy to go get my headset and provide an audio recording to go along, so I was just trying to illustrate the inputs and results.  It should not affect the results at all.


More after I look at your model.


Jeff


Jeff Strater
Engineering Director
Message 17 of 48
jeff_strater
in reply to: jeff_strater

OK.  Good news and bad news.  The good news is:  You are not doing anything wrong.  Your process is just like mine.  The bad news is:  I can reproduce your problem.  Well, bad for you, good for me, because if we can reproduce the problem, we can fix it.  At the moment, I cannot figure out why this is returning bad results.  It is no different than the simple example I showed.  At first I thought that maybe the geometry wasn't quite overlapping or coincident.  But, that error message is saying something completely different.  It is saying it has lost the reference to the tool body, which makes no sense.  I will see if I can find a workaround, and at the same time dig into this problem more deeply to see what we can find.


thanks for sharing the model


Jeff


Jeff Strater
Engineering Director
Message 18 of 48
Quickmarch
in reply to: jeff_strater

Many thanks for all the help. What a great community!


I just finished downloading the Screencast software, intending to try to send you a screencast of what I was doing. Possibly, we would be better served if I put this to bed for a bit and let you get on with what you guys do best.


I'll make the screencast anyway - might help, who knows?  Plus I'll learn how to make a screencast in the process.


Cheers,

March

Message 19 of 48
Quickmarch
in reply to: Quickmarch

@jeff_strater - Here's my first attempt at a screencast. Hopefully, this will help troubleshoot my problem.


@HughesTooling@davebYYPCU, kudos to all three as soon as I figure out how to do that.


Cheers,

March


Message 20 of 48
laughingcreek
in reply to: Quickmarch

The "tool body is lost" error is referring to the extrude feature in the timeline that is yellow.  You need to clear that error before you can use it for a combine function.

Can't find what you're looking for? Ask the community or share your knowledge.

Post to forums  

Autodesk Design & Make Report