Community
- Forums Home
- >
- 3ds Max Community
- >
- Shading, Lighting and Rendering forum
- >
- Why is my render grainey and out of focus?
3ds Max Shading, Lighting and Rendering
Welcome to Autodesk’s 3ds Max Forums. Share your knowledge, ask questions, and explore popular 3ds Max materials topics.
Turn on suggestions
Auto-suggest helps you quickly narrow down your search results by suggesting possible matches as you type.
Reply
Topic Options
- Subscribe to RSS Feed
- Mark Topic as New
- Mark Topic as Read
- Float this Topic for Current User
- Bookmark
- Subscribe
- Printer Friendly Page
Message 1 of 11
Anonymous
6578 Views, 10 Replies
12-10-2016
09:24 PM
- Mark as New
- Bookmark
- Subscribe
- Mute
- Subscribe to RSS Feed
- Permalink
- Report
12-10-2016
09:24 PM
I am working on a 360 render for virtual reality, so you can see you the dimensions of the image are quite large. When I render however, the result is not very sharp and there is a grainy texture. Does anyone have suggestions on what I can do to fix it? Also note that the image of the render is not the full image, but is zoomed in on a portion of it to show the fuzzyness. For what I am using it for it will need to be zoomed in this much and still be sharp.
Thanks
Solved! Go to Solution.
Solved by Francisco_Penaloza. Go to Solution.
10 REPLIES 10
Message 2 of 11
12-12-2016
09:36 AM
- Mark as New
- Bookmark
- Subscribe
- Mute
- Subscribe to RSS Feed
- Permalink
- Report
12-12-2016
09:36 AM
Hello @Anonymous,
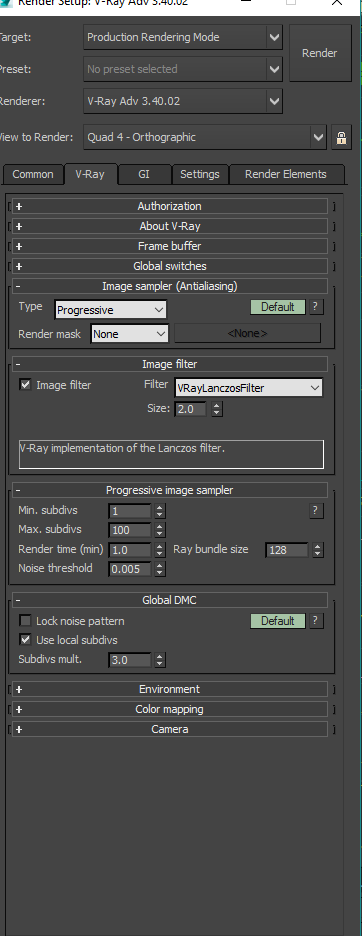
Since you're in Vray 3.4 and using progressive rendering with a .005 noise threshold, all you really need to do here is put your render time higher and possibly use the VrayDenoiser. I would shoot for a 10-20 minute render time to see if the cleans up all your noise. Hard to say the right time for you, but the higher the time, the cleaner the image. I suppose you could also try to set your min AA to 2/100 instead of 1/100 but it's hard to say how zoomed in those screenshots are.
Best Regards,
![]()
Alfred (AJ) DeFlaminis
3ds Max Technical Support Specialist
Autodesk Here to Help | View Max Tips/Tricks | My Screencasts | Autodesk Virtual Agent | How To Reset User Settings | Change Display Drivers in Max | Feature Request Board | Installation and Licensing Forum | 3ds Max Certified Hardware | Network Rendering Troubleshooting Guide
Message 3 of 11
12-12-2016
09:50 AM
- Mark as New
- Bookmark
- Subscribe
- Mute
- Subscribe to RSS Feed
- Permalink
- Report
12-12-2016
09:50 AM
For that large image, I would just set the time to zero and let it cook until get the 100 passes.
As a side note, I don't know how well you understand VRay, but I noticed you have 'use local subdivs' activate, if you know what this mean, then adjusting your maximun sampler would be recommended. If you don't understand how the whole sampler work, I would leave local subdivs unchecked and let VRay do it magics.
VRay 3.4 by default should have less control to move and just let it work alone, no more worries about materials and lights samples.
If you really know what you are doing, you can make it work faster, if you don't and just change random settings, everything will slow down and it won't give you the results you hope.
Just be careful of copying setting from the internet, most of those tutorials are outdated or are configuration to old version of VRay (VRay 2.x) from 3.x you should not mess around with samples anymore, just adjust your maximum sampler, noise, time and that's all. If you choose to use bucket sampling, then time get out of the equation obviously.
PS.
This comments goes to Brittany not Alfred 😛
Message 4 of 11
12-12-2016
03:57 PM
- Mark as New
- Bookmark
- Subscribe
- Mute
- Subscribe to RSS Feed
- Permalink
- Report
12-12-2016
03:57 PM
Hello @Anonymous,
@Francisco_Penaloza is spot on here, I missed the "Use Local Subdivs" checkbox in my lookover there. Good advice! The Vray tuts from the internet were largely spotty even when they were made, relying heavily on unneeded AA samples. (For example, the universal settings which always wanted 100 max AA samples when 22-24 were usually fine.)
Best Regards,
![]()
Alfred (AJ) DeFlaminis
3ds Max Technical Support Specialist
Autodesk Here to Help | View Max Tips/Tricks | My Screencasts | Autodesk Virtual Agent | How To Reset User Settings | Change Display Drivers in Max | Feature Request Board | Installation and Licensing Forum | 3ds Max Certified Hardware | Network Rendering Troubleshooting Guide
Message 5 of 11
12-16-2016
10:42 AM
- Mark as New
- Bookmark
- Subscribe
- Mute
- Subscribe to RSS Feed
- Permalink
- Report
12-16-2016
10:42 AM
I'm still having trouble getting this scene to render properly. My specialty is more in modeling and texturing. I'm having to figure out rendering as I go. I made some adjustments, including adding vray denoiser, unchecking use local subdivisions, increasing the render time, and increasing the size to 5000x10000(I need this size for it to work in oculus, and I need to be able to zoom in very close). It looks great when I'm rendering a small region to test it. But without changing anything in between, when I render the full image it takes 5 hours and turns out un-usable and completely grainy. Any suggestions?
Message 6 of 11
12-16-2016
12:18 PM
- Mark as New
- Bookmark
- Subscribe
- Mute
- Subscribe to RSS Feed
- Permalink
- Report
12-16-2016
12:18 PM
Brittany,
progressive rendering, is not my fav honestly, besides for those large images, it will use more memory than bucket rendering. Having said that, V Ray is very consistent, from your screen shot you still have 10 minutes max to render. As I recommended earlier set the time to Zero (0) and keep the 100 passes or set it to 150 and just let it cook, depending of your computer it may take a while, this is normal for large image, if you need faster renderings I would recommend to use distribute rendering.
Things to be aware. VRay think this way:
I have all this samples to clean the image, This is independent of the time. how I know how many samples should I use?
Noise threshold. default is 0.005 what this means?
VRay will take two pixels and compare how dark or bright they are, if those pixels are within the 0.005 threshold of color difference it will clean them or it will skip it. You can give 100000 passes but if you setup 1 threshold value, it barely will use any, maybe 10, depending. If you want to be sure that uses all your 100 passes you can setup your threshold to 0 but it will take a long long time to render because it will calculate 100 time for each pixel in your scene. That's the 'magic' of V Ray you can control always quality Vs time.
My workflow is very straight forward.
- Reset all VRay values to default.
- First bounce Brute force (or irradiance), Second bounce Light cache.
- Set light cache about 1500 or 200 if you feel fancy, for your scene 1500 will be OK.
- Check how many lights you have in scene, if they are more than 16 change that number in to the 'Probabilistic light' slot, let say you have 8, then you are cool no need to adjust anything, if you have 100 then put that number there.
- Setup your Min Shade rate, default is 6 and this work for most scenes, since your scene is interior and has no height frequency objects ( fancy way to say small pattern object such gills or grass) then you can increase this number to 8 or 10.
- Then set your AA min to 1 max to 20. To test quick rendering
- Setup a raw lighting pass, Specular pass and sample rate pass.
- Do a crop render of your darker area or glossy area. In this case doing a crop render will scale fine compared to full render because it is bucket whereas progressive work differently.
If you render has noise, check your Sample Rate pass, if it is all blue, this mean you didn't use all your sample, so you need to reduce your noise threshold, go 0.003 or lower
If your Sample rate pass is red, then you run out of samples so increase you max to 40 or so.
render again, if you still have noise, rinse and repeat.
If your image is clean or noisy enough (most time some noise is OK) then you are ready to render your large image.
If while you are rendering your image, V Ray tell you that it will take 24 Hours to render your image, then you need to decide if you are OK with that or cancel and increase your noise threshold to leave a more noisy image but it will render in a short amount of time.
I also do VR presentations, this is always my workflow, for exteriors and interiors. Some noise is OK, Oculus Riff has only 960 x 1080 per eye so some noise won't be visible. Galaxy VR has more quality but still some noise is acceptable.
In my machine ( 6 cores Xeon @3.6) renders times are about 4 hours or less. when in a hurry I use distribute rendering, then I can get 40 minutes.
If you understand this concept you'll realize that default setting on VRay should work for most of your scenes, you only need to set your time to 0 and adjust your noise threshold accordingly. but even with that, if you do nothing, VRay by default should give you a good image.
Hope this help, more questions let us know.
Maybe I should prepare a video with this.... mental note 😉
Message 7 of 11
12-16-2016
03:26 PM
- Mark as New
- Bookmark
- Subscribe
- Mute
- Subscribe to RSS Feed
- Permalink
- Report
12-16-2016
03:26 PM
Hello @Anonymous,
@Francisco_Penaloza is some sort of Superman, I can't think of much to add. Very thorough post. I want to also agree that Brute Force is the way to go over Irradiance map for this, and to set the time to 0 if you're going to use progressive. I use the bucket most often personally. Francisco has so much info there that I don't have much to add. If you have any questions, please let me know.
Best Regards,
![]()
Alfred (AJ) DeFlaminis
3ds Max Technical Support Specialist
Autodesk Here to Help | View Max Tips/Tricks | My Screencasts | Autodesk Virtual Agent | How To Reset User Settings | Change Display Drivers in Max | Feature Request Board | Installation and Licensing Forum | 3ds Max Certified Hardware | Network Rendering Troubleshooting Guide
Message 8 of 11
08-06-2017
09:11 AM
- Mark as New
- Bookmark
- Subscribe
- Mute
- Subscribe to RSS Feed
- Permalink
- Report
08-06-2017
09:11 AM
Franciso- seriously why is what you wrote not included with the VRAY documentation itself! This is the most complete and logical set of setup stats I've read yet, especially about the min shading rate etc. Many, many thanks!
Doug Bowker
www.douglasbowker-motiongraphics.com
www.douglasbowker-motiongraphics.com
Message 9 of 11
08-07-2017
08:37 AM
- Mark as New
- Bookmark
- Subscribe
- Mute
- Subscribe to RSS Feed
- Permalink
- Report
08-07-2017
08:37 AM
Thank guys, I am glad to help here. @Alfred.DeFlaminis thank you, I appreciate.
Actually, VRay help explains a lot of the same points here, but I guess since they are explained in a general way, it may be a little confusing when you apply to your own project. Also doing this thing many time a day for many years it teach you how to become more efficient 😉
V-Ray is much easy to use now, compared to previews versions, also there are many tutorials online from preview versions that I guess that's what it confuses people.
now it is much simple to use over all.
Message 10 of 11
05-29-2018
02:04 AM
- Mark as New
- Bookmark
- Subscribe
- Mute
- Subscribe to RSS Feed
- Permalink
- Report
05-29-2018
02:04 AM
Hi Fransisco
I am aware this is an old thread and things have changed much with Vray. However, to me the problem persists with the latest version of vray too. I am trying out 12:1 cubic VR renders for GearVR and find the renders taking more than 18 hours !!! More specifically, I notice that with 'Medium' IR setting, the 3rd pass is taking many hours.
I am amazed that you have very low render times which is really great.
Maybe it would help if you can put out the video that you talked off last.
Also was wondering if 18482:1536 res is an overkill for Gear or if it is the right one.
Any suggestion would help on this with the new versions of Vray and 3DS Max.
One thing that I noticed is that irrespective of changing other settings, the best setting for noise seems to be 0.001.
Was wondering if this can be avoided.
Rgds
GP
Message 11 of 11
05-29-2018
09:37 AM
- Mark as New
- Bookmark
- Subscribe
- Mute
- Subscribe to RSS Feed
- Permalink
- Report
05-29-2018
09:37 AM
How long your render time will depend on the type of machine you are using. Also as I mentioned earlier using distributed rendering will really speed up things.
Also, remember that VRay has this option in the stereo camera that will calculate GI and antialiasing for one eye first then copy the same for the other eye, this also helps you to speed things up.
Last but not least, there is VRay denoiser, so you could let the image be a little noisy so it renders faster but then apply denoiser to get a clear image. Other than that same basic explained earlier still apply.
BTW depending on the scene, Irradiance may be slower than we hope. IMO VRay brute force has a decent performance/speed ratio nowadays and in some cases could be faster than irradiance. But of course, this varies from scene to scene.
take a look in what area of your scene is slower, glossiness, dark areas, over bright, displacement, there may be something that is pushing your irradiance. in some cases using a low setting on irradiance but checking detail enhancement will be OK.
18 Hours may be the price to pay for such large rendering on your machine. Hard to tell not knowing more details.
Reply
Topic Options
- Subscribe to RSS Feed
- Mark Topic as New
- Mark Topic as Read
- Float this Topic for Current User
- Bookmark
- Subscribe
- Printer Friendly Page
Forums Links
Can't find what you're looking for? Ask the community or share your knowledge.
Post to forums
