Composite material not rendering properly in Mental ray

Composite material not rendering properly in Mental ray

Anonymous
Not applicable
5,252 Views
24 Replies
Message 1 of 25

Composite material not rendering properly in Mental ray

Anonymous
Not applicable

Hi, i'm pretty new to 3ds max, I have latest

version 2017 with the updates installed.


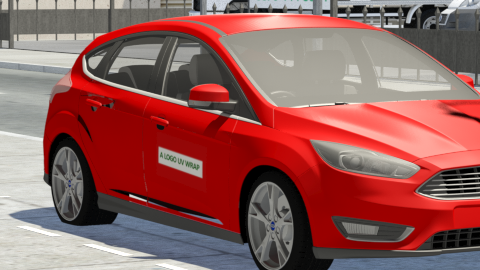
When putting a logo on the side of the car using composite material with  UV map:

material.pngerror_1.png

the decal looks to render ok, but some areas are rendering black or what seems to be transparent.

rear wheel arch, passenger handle and below the door.


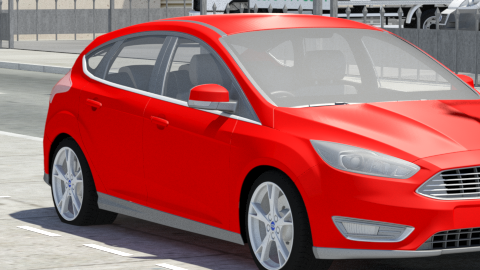
error_2.png

this is rendered with just the Shellac material.


Please can someone help this is so frustrating. 


Accepted solutions (1)
5,253 Views
24 Replies
Replies (24)
Message 2 of 25

Alfred.DeFlaminis
Alumni
Alumni

Hello and welcome to the community @Anonymous,


I'd like to help here.  Things like this can be hard to diagnose without a scene file, and if you'd like I can create a private folder for you if you'd like to upload the file.  However, I have a guess as to what is happening.  I believe the problem may be that the alpha for your logo is tiling in other areas on the car.  I have a screenshot below...  can you please verify this for me?  If tiling buttons are checked, please uncheck them.  You'd think we would see the logo in those other areas however, unless the logo has tiling unchecked but the alpha doesn't.  Again, I can create a folder to check personally if you'd like, might be a bit easier.  


opacity.pngopacity.png


Thanks and best regards,

Message 3 of 25

Anonymous
Not applicable

I went into both bitmap material properties, defuse and opacity map and they are not set to tile:


 error_3.pngerror_3.png


Just out of testing i noticed that when i removed the daylight system it rendered ok, as soon as I put the daylight system back in it did the same thing.

I tried also to change the standard material to Arch and Design, and used the defuse & cutout. you could see the decal but the red of the car looked even worse than standard material. Thanks for helping me out i appreciate it.


0 Likes
Message 4 of 25

Alfred.DeFlaminis
Alumni
Alumni

Hello @Anonymous,


I've spent some time today testing the composite material and going over the documentation for it, and I think the problem is that it's not intended to be used in this way.   It's older and I am seeing the behavior you are describing all the way back to 2014.  There is an inherent lack of control with the Composite material and it blends based on opacity which is the source of the problems here.  


I am having a lot more success with Blend material for this sticker over car paint.  Would that work for you?   


Best Regards,

0 Likes
Message 5 of 25

Anonymous
Not applicable

Just tried blend, looked promising to start, but even that's producing bugs both in the view port and in render.


Is there a better way to place image map over the top while still keeping materials? Sorry i'm a beginner at this stuff.

0 Likes
Message 6 of 25

Alfred.DeFlaminis
Alumni
Alumni

Hello @Anonymous,


No need to be sorry, things happen.  I'll do whatever I can to help.  I am not seeing many bugs with the blend, so maybe I could check your file?  I can create a private folder and email you an invitation if you'd like.  I am happy to do so.  Chances are the problem is that the mask for the stickers needs to go into the blend amount slot.  I have attached a simple scene with this so you can preview it.  (I also included my composite test mat in there.)  


Otherwise, maybe you could post the problem material on a sphere or something and attach it here and I can take a look!  


Best Regards,

Message 7 of 25

Anonymous
Not applicable

ah, this is different to how i had it setup... is there an easy way to align it in the viewport? i cant see the decal in the viewport, only see it on render. (attached)


Also I have some materials which have more than 1 decal sometimes 3 decals, i set the decals with different map channels and have the UVunwrap set to those channels so i can move them around. Will this not be possible anymore?

Message 8 of 25

Alfred.DeFlaminis
Alumni
Alumni
Accepted solution

Hello @Anonymous,


The blend material has 3 buttons labeled "Interaction" next to the material loader slots in the material settings.   Clicking on any of them will allow you to preview that material in the viewport, so you can switch between your mask, your carpaint, or your sticker there.  Please try that for me!


interactive.pnginteractive.png


So if you have a lot of stickers, this becomes a bit more complicated but not impossible.  The key will be to layer them up with the composite map.  (Not composite material.)   You can create it by clicking on the diffuse slot of a material or going into a texture map on a material and clicking where it says 'bitmap' in the upper right.


The complication comes from the fact that the 'composite map' texture has a few bugs in it, which make it hard to use.  (I know, annoying.  I logged it myself.)  So for right now, the composite map order cannot be changed.  It looks like it's changing, but it isn't.   The other problem is that images display as a black strip in there instead of their thumbnail, and that can be confusing too.  To make it easier to understand, I have attached another scene file with this more complicated setup using multiple map channels and texture maps (all named this time), and you can find more information about the features of composite map here. 


I suggest putting the maps and masks in the same composite map in the diffuse channel and leaving the cutout alpha out of the material for now.  Then, use the masks from the diffuse composite map as a new composite map for the Mix amount in the Blend.  Each layer except the bottom should be set to screen for the masks, and for the diffuse it won't matter since they all have alphas already as part of the composite map masks you put in.  I tried to make this easy to follow in my file, but you might have to play with it a bit to get familiar.  


Best Regards,

Message 9 of 25

Anonymous
Not applicable

It also looks like the shellac is not handling shadows correctly. Which I guess is "correct" since shellac isn't energy conserving.

Message 10 of 25

Alfred.DeFlaminis
Alumni
Alumni

I believe that is correct @Anonymous.  Shellac could be unrealistic for this reason, but the Car Paint Mtl is pretty good and works very similarly.  


@Anonymous,


I just wanted to follow up here, any progress on this issue?

Best Regards,

0 Likes
Message 11 of 25

Anonymous
Not applicable

Hi, sorry been working on other stuff, ill take a look tomorrow, Thanks.

0 Likes
Message 12 of 25

Anonymous
Not applicable

Hi, yeah can I send you this project to have a look at?..


Everything looks great in the view port now, but when i render it just get messed up. I cant seem to do the most basic things, its really frustrating. I don't get this much trouble using blender 😉


0 Likes
Message 13 of 25

Alfred.DeFlaminis
Alumni
Alumni

Hello @Anonymous,


There is a learning curve... no doubt about it.  I'm happy to take a look.  


I have set up a private folder for you if you'd like to upload your files there. You should get an email about it shortly, and if you don't see it please check your SPAM folder. These files are private and will not be shared with anyone but yourself and the support staff. Please let me know if you have any questions. Please use at least an 8 character password or the Box account may not work properly.


Best Regards,

0 Likes
Message 14 of 25

Anonymous
Not applicable

Thanks im posting the project, this is a different project but the same principal applies.


thank you for the sensitivity this is for a product thats not launched yet.


the circular LED lights are not mapping correctly its making the model look broken up.


Thanks

0 Likes
Message 15 of 25

Anonymous
Not applicable

thanks for the heads up @dan_dority. ill change it to car paint Mtl

0 Likes
Message 16 of 25

Alfred.DeFlaminis
Alumni
Alumni

Hello @Anonymous,


I have downloaded the file and deleted it from the folder for your privacy.  What are the LED's supposed to look like?  


Currently you have a colored map in here for the alpha set to Use Alpha from RBG Intensity, which isn't ideal.  I would use a black and white alpha in the mix slot.  Can you try that for me, please?  Also, for opacity maps I strongly encourage you to override the map gamma to 1.0.  You don't want to gamma correct your alphas and normal maps usually.  You do this when you load in a texture, shown below as well.  Thanks!


override gamma.pngoverride gamma.png


Best Regards,

0 Likes
Message 17 of 25

Anonymous
Not applicable

Hi, i did what you said, it didnt make a difference... although i think its to do with the model. I even applied a standard map and its seems like the normals are messed up... it was ok before do you know what it could be?


I posted up a PDF to show you what the LEDS should look like.


Thanks again for your help.

0 Likes
Message 18 of 25

Alfred.DeFlaminis
Alumni
Alumni

Hello @Anonymous,


I don't see anything in there, can you please try 1 more time for me?   I do see the issue you are describing, but the problem is with the model itself.  It's got overlapping faces and cross border edges... very messy.   Looks like an export error to me.  I put a screenshot in the box.  


Best Regards,

0 Likes
Message 19 of 25

Anonymous
Not applicable

Hi @Alfred.DeFlaminis on your previous post for multiple decals composite, could you send me the other assets associated with it?


Thanks!

0 Likes
Message 20 of 25

Alfred.DeFlaminis
Alumni
Alumni

Sure @Anonymous, but they are standard assets that come with the default Max installation.  Likely the path just needs to be changed, but I have attached them. 


Best Regards,

0 Likes