Community
Showcase Forum
Welcome to Autodesk’s Showcase Forums. Share your knowledge, ask questions, and explore popular Showcase topics.
Turn on suggestions
Auto-suggest helps you quickly narrow down your search results by suggesting possible matches as you type.
Reply
Topic Options
- Subscribe to RSS Feed
- Mark Topic as New
- Mark Topic as Read
- Float this Topic for Current User
- Bookmark
- Subscribe
- Printer Friendly Page
Message 1 of 14
Anonymous
7158 Views, 13 Replies
01-12-2014
11:28 PM
- Mark as New
- Bookmark
- Subscribe
- Mute
- Subscribe to RSS Feed
- Permalink
- Report
01-12-2014
11:28 PM
Forgive me, posting twice in a row ![]()
I am trying to show a yacht sitting in the water, so I created a block in Inventor and submerged the yacht to the right level. (material set to liquid)

Heres the jpeg:

and the ray trace. I was hoping for a daytime scene. Is there a setting I am missing? The surface oddities on the yacht are due to superimposing 2 hulls which ctrlH sorts out, but the water, I can't come right.

Solved! Go to Solution.
Solved by MarionLandry. Go to Solution.
13 REPLIES 13
Message 2 of 14
01-13-2014
10:28 AM
- Mark as New
- Bookmark
- Subscribe
- Mute
- Subscribe to RSS Feed
- Permalink
- Report
01-13-2014
10:28 AM
HI,
You are on the right track but not there yet.
You have to keep in mind that in order to look real, the water will need to reflect something.. some sort of environment. Right now your scene looks really flat because there is nothing to reflect (no environment)
1- I have created a similar scene then yours and applied the same materials: I used the Autodesk Materials Liquid as per the image: Water-01.png
At this point.. nothing is really exiting because there is no environment in the scene.
2- The minute I add the environment, the materials are starting to beceom alive: Water-02.png
It is still not what I am looking for. The water is really flat and with the limited customization available within the Autodesk materials liquid, even when I try to adjust the settings.. nothing really is happening.. I would like to see some waves or something that would make it more alive.. and more water like..
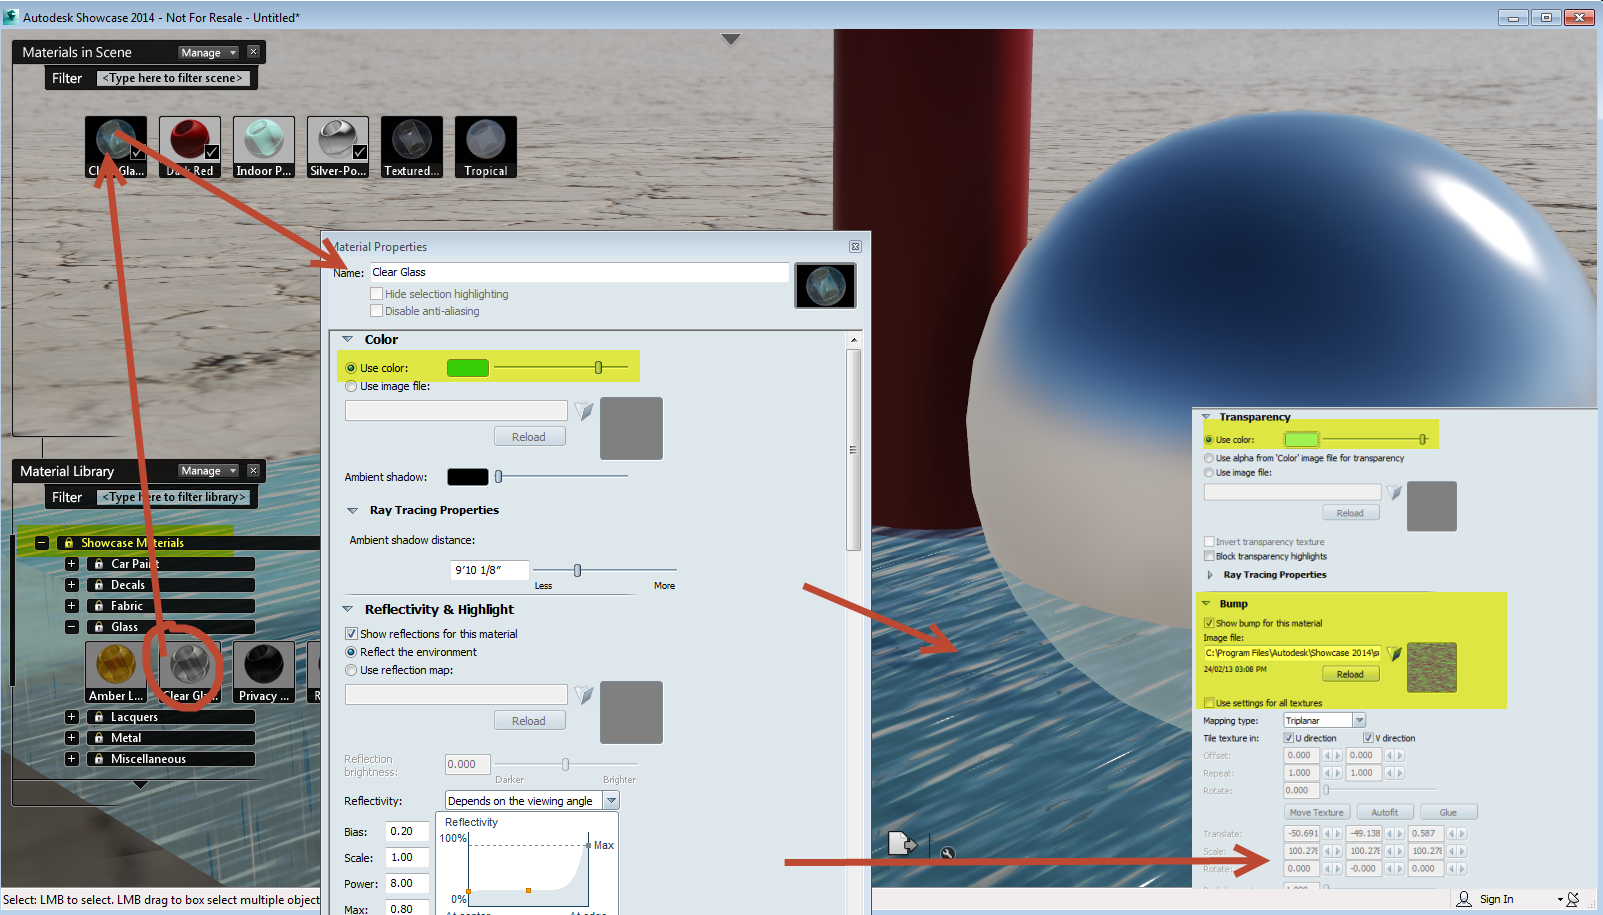
3- I change choose a Showcase material "clear glass" to replace the Autodesk material liquid. Mostly because I can customize the Showcase material to my need. I didn't do to much. I change the material colour to a aqua colour as well as the transparency. But mostly, I applied a bump "normal" and projected it on my cube using the triplannar projection. This allows me to adjust the size of the bump map to suit my need.
But because I am viewing under the hardware mode.. it's still not quite convincing. Water03.png
Read the next post
Message 3 of 14
01-13-2014
10:41 AM
- Mark as New
- Bookmark
- Subscribe
- Mute
- Subscribe to RSS Feed
- Permalink
- Report
01-13-2014
10:41 AM
creating water- Part2
The only thing you need to do next, is to change to ray tracing mode. Ray tracing mode will give you accurate Reflection, Refraction and Transparency really giving you the look that you need for the water. From the Ray tracing mode you might want to continue tunning your material to achieve the exact result you are after.
Water result.png
For my water, I reduced the level of transparency and included a small blurred in the reflection.
I have used for the bump map, the available C:\Program Files\Autodesk\Showcase 2014\support\Materials\brushedMetal_NormalMap.png
It might not be the ideal bump map but it's giving me something similar. I scaled the map considerably to give me nice wave effect.
I would also suggest to make the water cube much larger (larger then the environment) so we don't see the limit of it.
Good luck
Message 4 of 14
01-13-2014
11:18 AM
- Mark as New
- Bookmark
- Subscribe
- Mute
- Subscribe to RSS Feed
- Permalink
- Report
01-13-2014
11:18 AM
Creating water - part3
After browsing online, i found some nice water normal map.
You can view the difference when using a more appropriate bump map...
There is a wealth of normal map available online (free and some you can buy)
I have attached the one I found online:
Message 5 of 14
01-13-2014
10:14 PM
- Mark as New
- Bookmark
- Subscribe
- Mute
- Subscribe to RSS Feed
- Permalink
- Report
01-13-2014
10:14 PM
Wow, a thousand thank-you's Marion, or should I say Renee Magritte!
I have swopped out my cube for a much larger circle, so let me get going with applying some texture. And I did end up putting a second block/disk beneath the first with a solid material, but your way is much more realistic.
I'm still on 2013, so I can't apply the DOF like you have unfortunatley.
Let me get going, I see a full day ahead for me..
Message 6 of 14
Anonymous
in reply to:
Anonymous
01-14-2014
02:59 AM
- Mark as New
- Bookmark
- Subscribe
- Mute
- Subscribe to RSS Feed
- Permalink
- Report
01-14-2014
02:59 AM
Stuck!
I followed your first post and applied the brushed metal texture, which worked perfectly. Then I applied the other water texture and it went smooth.(triplanar) now whatever I do, the surface stays smooth.
If I open a new file I can apply both textures perfectly using the same sequence, but nothing seems to make a difference to my "sea" The funny thing is I opened an earlier version of the file I had saved, and I can't apply texture there either.
And yet if I open an unrelated file it works perfectly. I don't think screenshots will work, because the settings look identical to yours. Is there any way forward?
Message 7 of 14
Anonymous
in reply to:
Anonymous
01-14-2014
04:32 AM
- Mark as New
- Bookmark
- Subscribe
- Mute
- Subscribe to RSS Feed
- Permalink
- Report
01-14-2014
04:32 AM
Sorry, can't figure out how to edit my post.
I have discovered the "scale" feature of the bump.
Thank-goodness for the anonimity of the internet.
Message 8 of 14
01-14-2014
05:07 AM
- Mark as New
- Bookmark
- Subscribe
- Mute
- Subscribe to RSS Feed
- Permalink
- Report
01-14-2014
05:07 AM
Edits are time-limited. 30 mins from when you originally posted, or if the thread receives another reply, whichever comes first.
@Anonymous wrote:Sorry, can't figure out how to edit my post.
Max 2016 (SP1/EXT1)
Win7Pro x64 (SP1). i5-3570K @ 4.4GHz, 8Gb Ram, DX11.
nVidia GTX760 (2GB) (Driver 430.86).
Message 9 of 14
08-04-2014
12:44 AM
- Mark as New
- Bookmark
- Subscribe
- Mute
- Subscribe to RSS Feed
- Permalink
- Report
08-04-2014
12:44 AM
Water study i tried.
Attached the scene if you will need the water 3d mesh for something.
Admaiora
Did you find this post helpful? Feel free to Like this post.
Did your question get successfully answered? Then click on the ACCEPT SOLUTION button.
Facebook | Twitter | Youtube
Message 10 of 14
08-11-2014
02:22 PM
- Mark as New
- Bookmark
- Subscribe
- Mute
- Subscribe to RSS Feed
- Permalink
- Report
08-11-2014
02:22 PM
Thanks for sharing! I have used this example as a Showcase Facebook post.
Marion
Message 12 of 14
Anonymous
in reply to:
Anonymous
09-30-2014
10:26 PM
- Mark as New
- Bookmark
- Subscribe
- Mute
- Subscribe to RSS Feed
- Permalink
- Report
09-30-2014
10:26 PM
I made a big disk in Inventor, my tool of choice. You would need some or other 3D Cad solid modelling program to achieve this.
Message 13 of 14
10-31-2014
08:54 PM
- Mark as New
- Bookmark
- Subscribe
- Mute
- Subscribe to RSS Feed
- Permalink
- Report
10-31-2014
08:54 PM
I was following your steps, but I get stuck at the point of needing to scale the normalmap.
When modifying the "Glass Clear" it allows you to load the normalmap but the scale and position settings remain greyed out and inaccessible for modification. does this very depending on what material I start off with?
http://forums.autodesk.com/autodesk/attachments/autodesk/area-b163/1684/3/Water03.png
"I applied a bump "normal" and projected it on my cube using the triplannar projection. This allows me to adjust the size of the bump map to suit my need. "
This is the part I can't figure out....how to adjust it when the adjustment functionality of the menu is greyed-out
Reply
Topic Options
- Subscribe to RSS Feed
- Mark Topic as New
- Mark Topic as Read
- Float this Topic for Current User
- Bookmark
- Subscribe
- Printer Friendly Page

