Community
- Forums Home
- >
- Revit Products Community
- >
- Revit MEP Forum
- >
- Energy analytical model and geometry challenges
Revit MEP Forum
Welcome to Autodesk’s Revit MEP Forums. Share your knowledge, ask questions, and explore popular Revit MEP topics.
Turn on suggestions
Auto-suggest helps you quickly narrow down your search results by suggesting possible matches as you type.
Reply
Topic Options
- Subscribe to RSS Feed
- Mark Topic as New
- Mark Topic as Read
- Float this Topic for Current User
- Bookmark
- Subscribe
- Printer Friendly Page
Message 1 of 5
06-27-2024
02:54 AM
- Mark as New
- Bookmark
- Subscribe
- Mute
- Subscribe to RSS Feed
- Permalink
- Report
06-27-2024
02:54 AM
Hello!!
I would love to talk to someone more expert in creating energy models in Revit, about some geometry problems. I am creating an energy model of a 3-floor building with a lot of different curtain walls, ceilings, and floor heights. I read the Revit manual and also a lot of YouTube videos. My main challenge is how to create an accurate analytical surface and space from a detailed architectural model. For now, when I create I have wrong interpretations of the analytical surfaces, and the easiest way out of the "mess" that the current analytical energy model is, seems to be to remodel more simple geometry. I was wondering if someone has experience, and have some "tips" on how to approach this type of geometry without having to remodel everything. If anyone has any thoughts on this, or books, videos, or anything to recommend I will be super glad. Even if it is to share experience, or say that the easiest way is remodel. I am doing a master thesis on this process, and would like to help bridge the gap between architects and energy analysis, and would be happy to share the result with anyone that contributes.
Solved! Go to Solution.
Solved by iainsavage. Go to Solution.
4 REPLIES 4
Message 2 of 5
06-27-2024
03:14 AM
- Mark as New
- Bookmark
- Subscribe
- Mute
- Subscribe to RSS Feed
- Permalink
- Report
06-27-2024
03:14 AM
Can you give some examples of the complicated geometry which is giving you errors?
Some screenshots and some more explanation including any error messages etc?
Message 3 of 5
06-27-2024
07:04 AM
- Mark as New
- Bookmark
- Subscribe
- Mute
- Subscribe to RSS Feed
- Permalink
- Report
06-27-2024
07:04 AM
Hi, of course. They are not proper errors, is just while avaliating the analytical space and surfaces created. These are the main points and some wonders about them.
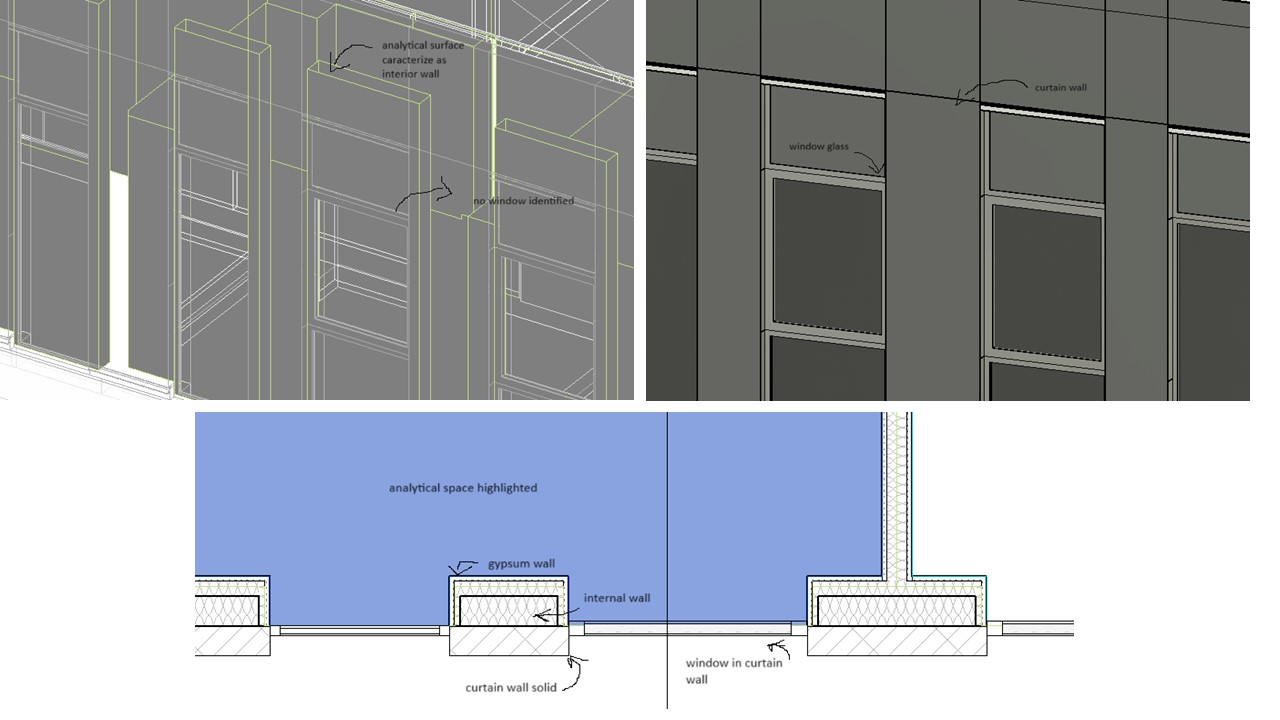
Curtain wall and wall
- There is a internal wall and after it a curtain wall. In this case the analytical space boundary identify the first room bounding which is the internal wall, and them ignore the curtain wall and by consequence the windows. To represent these multiple layers, should I remodel a wall compoused by the compound U-values of both walls in the envelop?
- Also due to the different level between the windows and the solid curtain wall panels the model has a lot of small surfaces. Should these be a concern?
False ceiling gap
- When having a false ceiling there is a gap between the ceiling and the floor, and in the analytical model there is no space created. Is a good practice to great a space in this area or how should this lack of "space" should be adress?
Thank you so much for the reply!
Message 4 of 5
06-27-2024
08:25 AM
- Mark as New
- Bookmark
- Subscribe
- Mute
- Subscribe to RSS Feed
- Permalink
- Report
06-27-2024
08:25 AM
In my opinion best practice to populate your model with Spaces which you place in the model before creating the analytical model. Analytical spaces should then match your placed Spaces, rather than leaving it to Revit to determine where to place, and how to name, analytical spaces.
Using this method you should place Spaces in every part of the building including ceiling voids etc. Another option is to change the ceiling to not room bounding and extend the Space in the room to "Level Above" so that the room Space fills the ceiling void as well.
If you want to keep the ceiling void Spaces separate from the room Space below then you need to create additional plenum levels at the top surface of the ceiling(s).
Regarding your wall and curtain wall issue, I've had a similar experience with projects where and existing wall is upgraded by internally lining it with insulated board etc. I can't remember how I solved that but I think I had to replace the two walls with one multilayer wall.
An alternative might be to make the internal walls not room bounding so that the Space extends to the outer wall, however you'd then need to check if the properties of the overall construction are properly accounted for - you may need to adjust the properties of the outer wall to match the overall properties of the whole construction.
You refer to level differences affecting the Spaces reaching the windows (if I understand you correctly) - by default the extents of the Space are determined at the bottom of the Level (offset zero from the Level) but if you have a wall or other elements which step outwards above floor level then the Space will not reach them - in that case you can change the Level computation height value to be above the floor so that it bypasses the lowest room bounding element and extends out to the stepped out element. Note however that this affects the whole Level, not individual Spaces.
Hope this is of some help.
I'll give a mention to @Kevin.Lawson.PE though who is far better at this stuff than I am and might be able to suggest other tips - he has also developed free software to enhance how Revit runs these calculations.
Message 5 of 5
06-28-2024
04:12 AM
- Mark as New
- Bookmark
- Subscribe
- Mute
- Subscribe to RSS Feed
- Permalink
- Report
06-28-2024
04:12 AM
Hi Iain, thank you so much for the insights! It gave me new perspective to try!
Reply
Topic Options
- Subscribe to RSS Feed
- Mark Topic as New
- Mark Topic as Read
- Float this Topic for Current User
- Bookmark
- Subscribe
- Printer Friendly Page
Forums Links
Can't find what you're looking for? Ask the community or share your knowledge.
Post to forums
