Why can't apply model fill pattern to - cut pattern in material editor

Why can't apply model fill pattern to - cut pattern in material editor

ivo_galantai
Enthusiast Enthusiast
14,833 Views
21 Replies
Message 1 of 22

Why can't apply model fill pattern to - cut pattern in material editor

ivo_galantai
Enthusiast
Enthusiast

Hi Guys, 

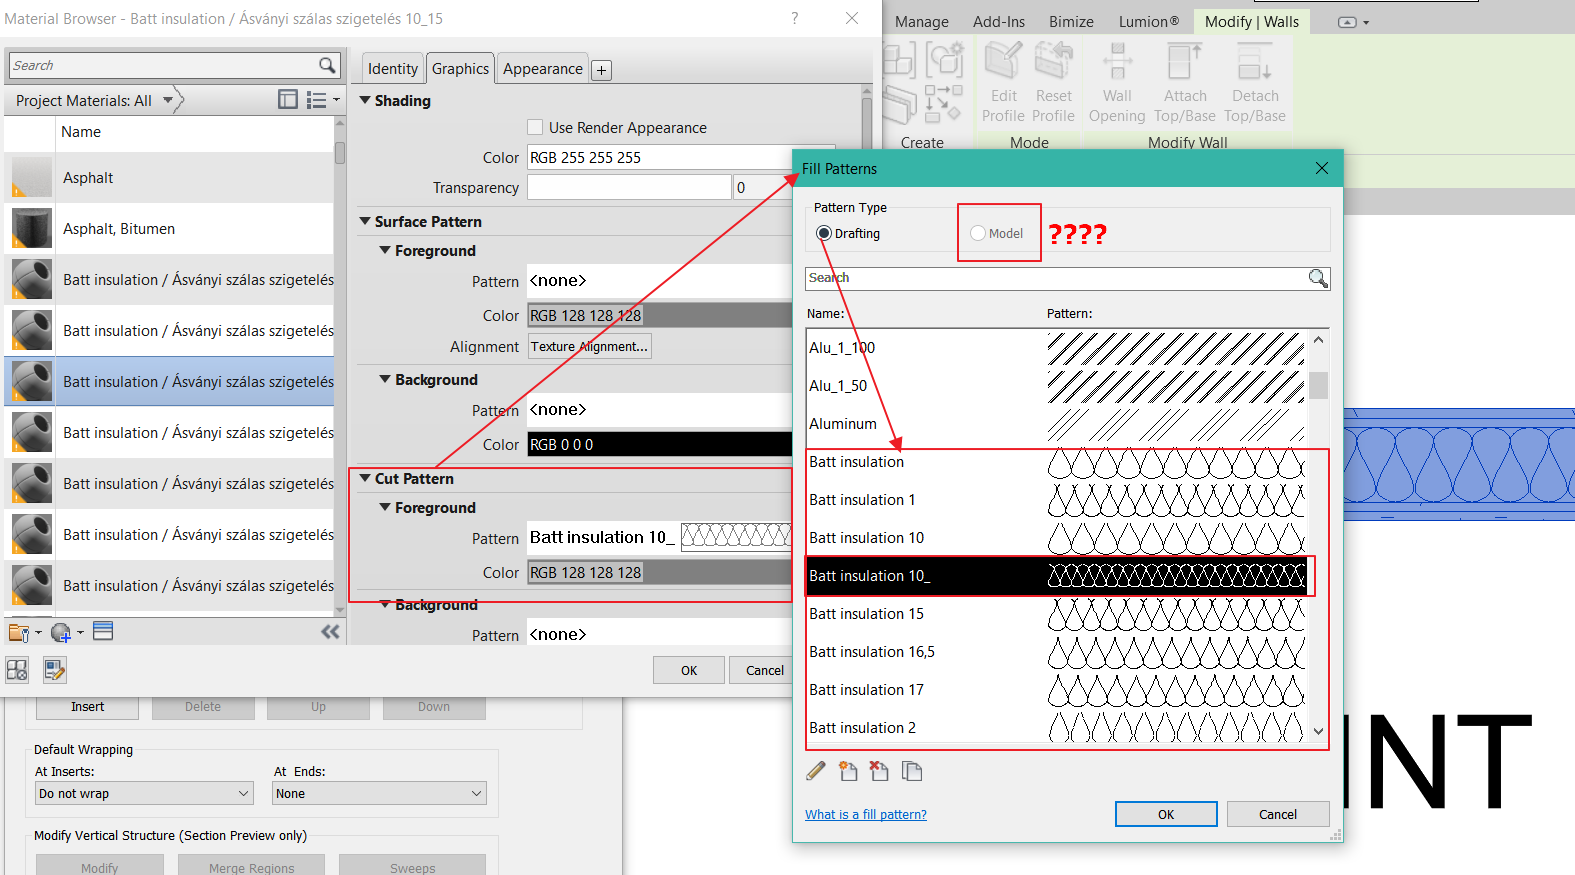
Is there a way to create a material cut pattern which based on drawing scale? 


I mean - Cut pattern can only be drafting pattern - 
I have batt insulation - see uploaded pic - which has to change with scale - 

I couldn't find any solutions for this - any suggestions?

Also for every different type (thickness) of wall we had to created the batt insulation because the orientation was wrong - in the middle of wall.


Filtering material for cut pattern in a view template maybe for 1:50 plans are not possible because than we have to create 150 filters for 150 different size of walls... 

It would be great if there would be a solution or a nested system family in walls  - where i can set material cut pattern to model based not drafting.


Thanks for any suggestion / help


Cheers 


Ivo


14,834 Views
21 Replies
Replies (21)
Message 2 of 22

barthbradley
Consultant
Consultant

Model vs Drafting Pattern? But Revit batting is has thickness and bulge. 


batt.png


https://knowledge.autodesk.com/support/revit-products/learn-explore/caas/CloudHelp/cloudhelp/2015/EN...

0 Likes
Message 3 of 22

ivo_galantai
Enthusiast
Enthusiast

Hi barthbradley Thx for the suggestion  - but I don't want to use 2D - I want my wall cut pattern to be Model fill to have the proper size  when I change the scale.
If I move the wall the 2D insulation wont move with it unless I lock it there - but to do this with 65 floor building - this tool is good for detailing .. -

I  hope we can solve this.


Thanks, 


Ivo

0 Likes
Message 4 of 22

ToanDN
Consultant
Consultant

Cut fill patterns are for symbolic presentation of materials, i.e: diagonal hatch is for brick, diagonal cross hatch is for CMU, etc.  They are not meant to present elements' components.  If you want to show something like bricks being cut when you cut a brick wall then you need to either model the wall with bricks (3D section), or use a detail filled region (2D section).

0 Likes
Message 5 of 22

barthbradley
Consultant
Consultant

You actually want to model it realistically and include it as a component in the modeled wall? 


We confine this LOD to wall details/legends/exploded views.  

0 Likes
Message 6 of 22

ivo_galantai
Enthusiast
Enthusiast

Hi Guys, 


Thx for the reply but I think we are not on the same part - like i think you don't understand the problem 
So my problem is  - If I cut a wall in 2D ( see SS-1 attached) I want to see my batt insulation as a model fill - Drafting pattern fill for material won't change scale if I change SCALE i my view (see SS-2 attached scale in 1:50 vs. 1:100)
So I'm wondering if there is a solution for this a further upgrade for revit - or with some program coding nest a 3D pattern in System family - Walls ...
Because it is insane to create 2 type of walls 2 type of materials to have the right view of cut pattern for batt insulation - and to change it every time when I want to make an Execution plan (1:50) from a permit set (1:100)

I cant make it with filters every wall with different thickness has different size insulation and because its  drafting pattern wont fit in walls with same scale EITHER - (see SS-3)

I think we have to get rid of the standard batt insulation notation and use some other filling ..


Message 7 of 22

barthbradley
Consultant
Consultant

You may be able to change the pattern file to a model type by simply opening it in notepad and changing the ;%TYPE=DRAFTING to ;%TYPE=MODEL 


...Convert all your AutoCAD Hatch To Model Fill Patterns for Revit using Dynamo. Datasets is here: https://goo.gl/bDdoI6

Video tutorial here: https://www.youtube.com/watch?v=HYisnP3j5Qo


...Another resource: https://www.hatchkit.com.au/

0 Likes
Message 8 of 22

ivo_galantai
Enthusiast
Enthusiast

Thank you barthbradley


I know that it works like that i created many hatch patterns..
The problem revit cannot do what i want and no solution for this one.. 

Thanks for the answers,


have a nice day, 

Ivo

Message 9 of 22

barthbradley
Consultant
Consultant

Thank you, @ivo_galantai. I appreciate the shout out. 


So, you are familiar the techniques to convert and create model hatch patterns, but this is not applicable in your particular situation.  Bummer.  


Well, I'll reach out to you with another idea, should one come to mind.


Good Luck.  

0 Likes
Message 10 of 22

chaim7754
Explorer
Explorer

Hi barthbradley 


I came up with a simple solution, but that does not always work.


apply the same material of the wall to the surface of the wall at the opening by using the paint tool.


Good luck.

0 Likes
Message 11 of 22

ToanDN
Consultant
Consultant

@chaim7754 wrote:

Hi barthbradley 


I came up with a simple solution, but that does not always work.


apply the same material of the wall to the surface of the wall at the opening by using the paint tool.


Good luck.


What you do is still showing a surface pattern, not a cut pattern.

0 Likes
Message 12 of 22

chaim7754
Explorer
Explorer
yes it's true you cant add a model pattern to a cut pattern, but at lease,
on this way you can add a modal pattern to the surface of a wall that is
being cut by a wall opening, by adding the modal pattern to the surface
material in the material browser, and then use the paint tool to add it to
the wall where it is being cut.
0 Likes
Message 13 of 22

ToanDN
Consultant
Consultant
I am pretty sure neither the OP or Barth having issues apply a surface pattern to a jamb surface of a wall opening. The question is clearly about a Cut pattern, as a wall being cut by a 2d section cut or a 3d section box.
Message 14 of 22

martijn_pater
Advisor
Advisor

You could annotate the cut section(s) with region with model pattern applied and then it will scale with the different view scales. Bit of manual work though, not ideal I suppose… or paint as proposed above, that might be easier…(not for section)

0 Likes
Message 15 of 22

rartis
Explorer
Explorer

@ivo_galantai Did you ever figure it out? I am trying to the exact same thing right now. 

0 Likes
Message 16 of 22

ToanDN
Consultant
Consultant

@rartis wrote:

@ivo_galantai Did you ever figure it out? I am trying to the exact same thing right now. 


There is nothing to figure out because that is how the program works.  

0 Likes
Message 17 of 22

wcorbittSDHCB
Explorer
Explorer

I believe I understand your reason for wanting this...I have attached a quick snip of my wall.  

I created this 'hatch' via pyRevit addin, but I have to use a "Drafting" hatch - I cannot use "Model" hatch.  The reason is when I open the wall editor and select the hatch pattern for the 'cut' pattern foreground on my wall using a material I created called 8CMU - it will only allow a "Drafting" Pattern Type and not a "Model" type.

If Revit allowed a "Model" type hatch here I believe it would save us all tremendous amounts of time.  I cannot tell you how many hours I have spent using 2D components or even using CAD details exploded to "0" layer and importing to Revit for a wall section.  

Come on Revit get with the times.  And those of you who say this is just how Revit works - that's a pathetic cop-out and you know as well as I (I hope) they can easily program this type of thing in the software to make our sections read much more accurate and MUCH quicker!

Message 18 of 22

Martijn.Pater
Advocate
Advocate

@wcorbittSDHCB ...it's not possible to use model patterns as cut pattern, as you have noticed. I guess usually you would draw 2d detail item on top in this situation.

0 Likes
Message 19 of 22

scadetMH3VD
Contributor
Contributor

We also put the insulation into our wall types. 


We have a three-tiered approach, but found this to be most efficient for our teams:

  1. We set the default scale of the insulation to match our scale for the overall plans and building sections, which often happen to work out to be the same scale for us. We show insulation the most on these so this where we save the most amount of time. 
  2. For enlarged plans, like a restroom plan, the walls are often more consistent, so we'll change the walls' background cut pattern in the view's visibility settings to the insulation secondary scale that matches the enlarged plan scale. 
  3. For even finer details, where we are probably only showing 1 or 2 walls, we'll turn off the wall background hatch and put in the 2D insulation manually, since that's probably faster. (Insulation is the only wall pattern we put in the background so that way we can still show other wall material cut patterns in the foreground and control that visibility separately.) 

The way this works out for us, we have no more than 5 or 6 insulation hatch patterns, even for very large projects. We also use pyRevit to build our hatches super quick. 


In the meantime, you should vote for this idea here: 

https://forums.autodesk.com/t5/revit-ideas/align-wall-material-cut-pattern-to-wall-layer-boundaries/...


Message 20 of 22

gratzlaff
Participant
Participant

I agree that this should be an update in Revit.  It would save so much time if the cut pattern of a wall structure, ex. plywood, could be a model pattern.  That way, no matter what scale I set the view to, the model hatch applied to the cut pattern of plywood in the model wall would match the scale of the plywood model hatch I use in my detail component.  I use a plywood model hatch in my plywood detail component so the hatch aligns with the detail component no matter what direction/angle the detail component is drawn in.   The scale of the view below is 3"=1'-0"  and because the wall is a drafting pattern it doesn't match my model pattern in the plywood detail component.

gratzlaff_0-1680202420141.png


0 Likes