- Subscribe to RSS Feed
- Mark Topic as New
- Mark Topic as Read
- Float this Topic for Current User
- Bookmark
- Subscribe
- Printer Friendly Page
- Mark as New
- Bookmark
- Subscribe
- Mute
- Subscribe to RSS Feed
- Permalink
- Report
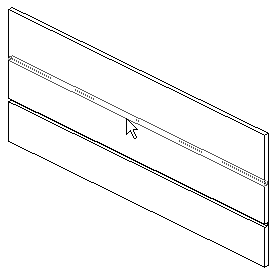
wall sweep and reveal set back
hi,
what is setback of wall sweep and wall reveal ?
- Mark as New
- Bookmark
- Subscribe
- Mute
- Subscribe to RSS Feed
- Permalink
- Report
Sweep tool:
Use the Sweep tool to add a baseboard, crown molding, or other type of decorative horizontal or vertical projection to a wall. You can add a wall sweep to a wall from a 3D or elevation view.
To add a sweep for all walls of a type, modify the wall structure in the wall’s type properties.
You can schedule wall sweeps. Integral wall sweeps, which are part of the wall type definition, cannot be scheduled independently.

Wall reveal:
Use the Reveal tool to add a decorative horizontal or vertical cutout to a wall in an elevation or 3D view.
- Open a 3D or non-parallel elevation view.
- Click Architecture tab
 Build panel
 Wall drop-down
 (Wall: Reveal).
 - In the Type Selector, select the desired type of wall reveal.
- Click Modify | Place Wall Reveal
 Placement panel, and select the orientation of the wall reveal: Horizontal or Vertical.
 - Place the cursor over the wall to highlight the wall reveal location. Click to place the reveal.
- Add the reveal to adjacent walls if needed.
Revit preselects the reveal location on each adjacent wall.
- To finish placing wall reveals, click in the view away from the wall.

aRcHiTeCt.JM
REVIT EXPERT ELITE
➪ ➪ ➪ ➪ ➪ ➪ ➪ ➪ ➪ ➪ ➪ ➪ ➪ ➪ ➪ ➪ ➪ ➪ ➪ ➪ ➪ ➪ is it working for you ? ➪ ⇩ 'Accept as solution' ⇩ ⇦
- Mark as New
- Bookmark
- Subscribe
- Mute
- Subscribe to RSS Feed
- Permalink
- Report
Are you referring to the Horizontal and Vertical Offsets of the Profile itself (e.g. the offset of the profile from the sweep path)?
- Mark as New
- Bookmark
- Subscribe
- Mute
- Subscribe to RSS Feed
- Permalink
- Report
- Mark as New
- Bookmark
- Subscribe
- Mute
- Subscribe to RSS Feed
- Permalink
- Report
Hi everybody,
I've been testing the use of the Room Finishing add-on and it seems to work pretty well. I've only used it to create skirting boards and so far so good, apart from one thing. When I have a door that shows an architrave the skirting doesn't stop at the architrave ends but goes through it until it reaches to the door opening.
I've seen on this post that someone suggested to edit the set back of the sweep in order to get it sorted. However, that doesn't seem to solve the problem. The image attached shows the skirting with the set back set to 76mm (architrave width). As you can see, the skirting board highlighted does stop at the end of the door architrave, however a thinner portion of the wall (which represents the actual wall hosting the sweep profile *) is still visible and still extends to the door opening.
Any suggestion on how to get this sorted? That is fundamental in order to get the correct overall length of the skirting required.
* As per Room Finishing instructions, I had set the hosting wall to be thinner than the sweep profile that's hosting (5mm wall, 10mm sweep profile).
- Mark as New
- Bookmark
- Subscribe
- Mute
- Subscribe to RSS Feed
- Permalink
- Report
Set Default Setback value and untick Cut by Inserts.
Or just select the wall sweep and drag the blue dot to where you want it to end if the conditions varies.
- Mark as New
- Bookmark
- Subscribe
- Mute
- Subscribe to RSS Feed
- Permalink
- Report
Hi Toan,
Thanks for your quick reply.
Would you mind telling me what the properties window on the right hand of your screen grab is referring to? I don't seem to have the same parameters/options if I click on the wall edit button. Have you used the same procedure to create the sweep (Room Finishing add-on) or simply added a sweep to the wall?
I wouldn't really want to go for your second option (drag the blue dot manually) as I'd need to do that for every single opening - annoying! I'd like to get that process automated by Revit depending on the properties I set up for the wall used to show the skirting boards.
Thanks in advance for your help.
- Subscribe to RSS Feed
- Mark Topic as New
- Mark Topic as Read
- Float this Topic for Current User
- Bookmark
- Subscribe
- Printer Friendly Page
Forums Links
Can't find what you're looking for? Ask the community or share your knowledge.


