Wall Closure

Wall Closure

Anonymous
Not applicable
8,492 Views
15 Replies
Message 1 of 16

Wall Closure

Anonymous
Not applicable

Hello,


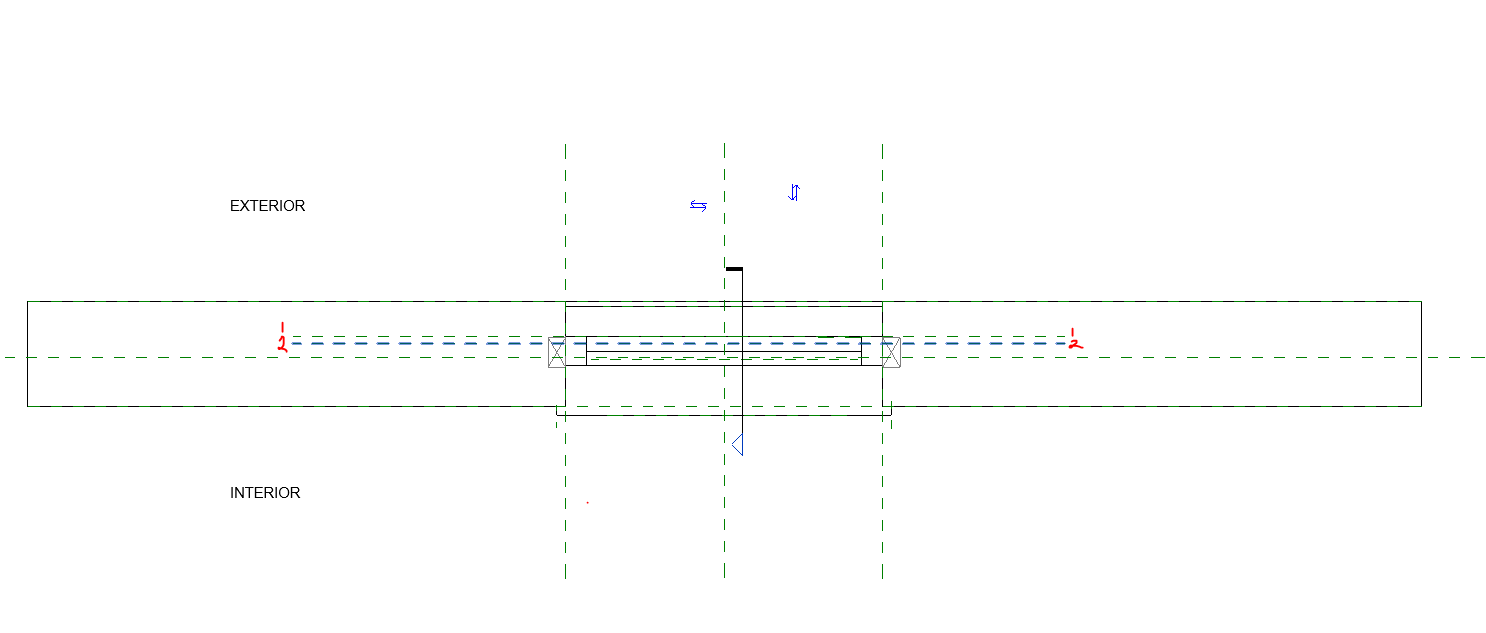
I have a problem with the wall closure surrounding the window family, the wall seems to stretch the wall closure by an extra 100mm, see attached an image file of the wall and window family. I've tried to adjust the wall closure via the windows properties but with no success, the window family works perfectly normal with other walls. Is there any way of rectifying this issue?


Best regards,


James

0 Likes
Accepted solutions (2)
8,493 Views
15 Replies
Replies (15)
Message 2 of 16

Anonymous
Not applicable

More details

0 Likes
Message 3 of 16

Ilic.Andrej
Advisor
Advisor

Open the window family, use two reference planes which will define the closure boundary (select the ref plane and check "wall closure").


Andrej Ilić

phonetical: ændreɪ ilich
MSc Arch

Autodesk Expert Elite Alumni

0 Likes
Message 4 of 16

Ilic.Andrej
Advisor
Advisor

Check this guide 

https://www.youtube.com/watch?v=-9MK0MTIGXQ


Andrej Ilić

phonetical: ændreɪ ilich
MSc Arch

Autodesk Expert Elite Alumni

Message 5 of 16

Anonymous
Not applicable

Hi,


I've already created two reference planes to achieved a certain thickness of the insulation to the window.


I've tried fiddling around with it and even making it perpendicular with the first reference with the second reference but the insulation doesn't seem to want to wrap within the 100mm distance from the window.

0 Likes
Message 6 of 16

barthbradley
Consultant
Consultant

The wall closure can be set to by family or by host.  Have you tried changing it? Still, I'm not seeing the issue in your picture. It looks to be wrapping the wall finish correctly, just too deep ( adjust plan view wall closure ref plane in family to correct).  

0 Likes
Message 7 of 16

Anonymous
Not applicable

Hi brathbradley,


I've tried by host and by family methods and it hasn't made a difference to the width of the closure from the window.


See attach the same window but in a normal 300mm wall with 100mm insulation, I have no issues with this since the width of wall closure is correct.

0 Likes
Message 8 of 16

Ilic.Andrej
Advisor
Advisor

To create accurate wrapping, you need a bunch of instance parameters which define how the window is embedded. Instead of "wall openings", you need to use multiple voids.


1.jpg


Andrej Ilić

phonetical: ændreɪ ilich
MSc Arch

Autodesk Expert Elite Alumni

0 Likes
Message 9 of 16

Ilic.Andrej
Advisor
Advisor

There are some limitations. For example, the insulation which is being wrapped must have consistent thickness. You can't define 40 mm thick EPS around the window if the wall layer is 80mm EPS. Second, the layer wrapping does not work in section (window head). So, the workaround is to nest a generic model into the window family, constrain its instance dimensions with parameters. When loaded into project, the window can be adjusted. You can tab-select the generic model and join it with the wall. The "wrapped" layer will be continuous if the generic model has the same material as the corresponding wall layer. So, you will need to create a material parameter too.


My logic is: everything that defines the interaction between the window and the wall is an instance property, while window dimensions, frame and glass are type properties.


Andrej Ilić

phonetical: ændreɪ ilich
MSc Arch

Autodesk Expert Elite Alumni

0 Likes
Message 10 of 16

barthbradley
Consultant
Consultant

Have you fooled with Join Order yet (on Modify Tab/Geometry Panel) to modify those wall corners at right and left of the Window insert?

0 Likes
Message 11 of 16

ToanDN
Consultant
Consultant
Accepted solution

Capture.PNG


It looks normal - the same layer thickness wrapping the opening.  If you want the it wrap to be of a different thickness, edit Cut Profile in View.

Message 12 of 16

cbcarch
Advisor
Advisor

Edit Cut Profile is OK for 1 location, but not good when you have a large project with 100s of windows.

Probably need a more complete solution for this.

Cliff B. Collins
Registered Architect The Lamar Johnson Collaborative Architects-St. Louis, MO
Message 13 of 16

ToanDN
Consultant
Consultant

@cbcarch wrote:

Edit Cut Profile is OK for 1 location, but not good when you have a large project with 100s of windows.

Probably need a more complete solution for this.


With extra effort, of course.  Revit 2018 sample is attached.


Capture.PNG

0 Likes
Message 14 of 16

FAIR59
Advisor
Advisor
Accepted solution

reduce the wall thickness, by setting the thickness of the interior layer to the required wall-closure, then add an extra wall ( material of interior layer )  to make up the loss of thickness and join the two walls.

Message 15 of 16

Anonymous
Not applicable

First time using cut profile which has done the job for me, thank you! I will look into other suggestions that users have mentioned if there's a long-term solution for my custom made families


@ToanDNwrote:

@cbcarchwrote:

Edit Cut Profile is OK for 1 location, but not good when you have a large project with 100s of windows.

Probably need a more complete solution for this.


With extra effort, of course.  Revit 2018 sample is attached.


Capture.PNG


0 Likes
Message 16 of 16

ToanDN
Consultant
Consultant

@Anonymous


I think @FAIR59 has provided the best workaround so far.