Stair design

Stair design

guillermo4JEUL
Enthusiast Enthusiast
2,721 Views
25 Replies
Message 1 of 26

Stair design

guillermo4JEUL
Enthusiast
Enthusiast

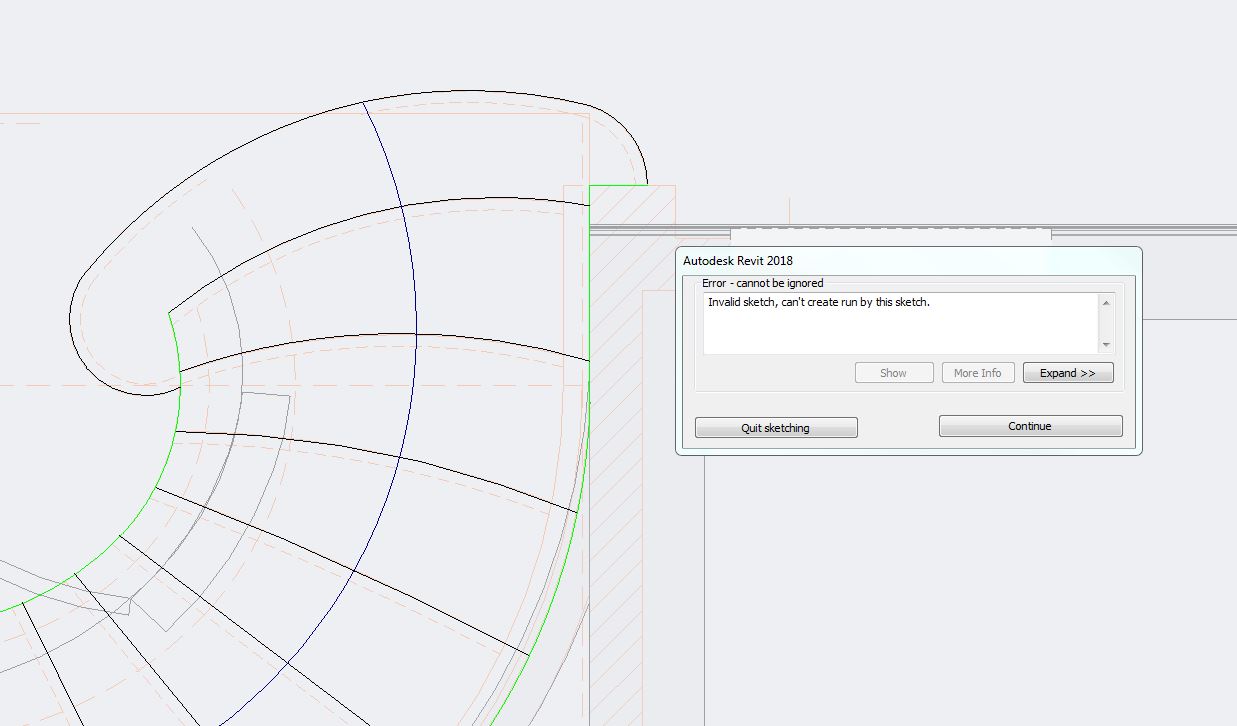
Hello I'm trying to do a stair with the following design but I can't get it to work, Can someone give me an idea How can I get this stair done?

Maybe is easy and I'm just burned already from the day, but I can't find the solution, this is giving me this error and it's not even showing me which part exactly Revit can't do, I tried taking out that first step and it works, but that step is part of the design so I can't take it out.


Thanks for your help!

Revit 2019.2, Windows 7
0 Likes
Accepted solutions (2)
2,722 Views
25 Replies
Replies (25)
Message 2 of 26

barthbradley
Consultant
Consultant
Accepted solution

Boundary is wrong. You got riser wrapping around it. 

0 Likes
Message 3 of 26

guillermo4JEUL
Enthusiast
Enthusiast

So How am I supposed to make this stair? that is what I can't find. 

Revit 2019.2, Windows 7
0 Likes
Message 4 of 26

barthbradley
Consultant
Consultant

Connect riser lines between the left and right boundaries

0 Likes
Message 5 of 26

guillermo4JEUL
Enthusiast
Enthusiast

Can you explain a little better please? I don't understand what you mean, connect how? Cause I've been trying for a while to get it right.

Revit 2019.2, Windows 7
0 Likes
Message 6 of 26

barthbradley
Consultant
Consultant

Project1.jpg

0 Likes
Message 7 of 26

guillermo4JEUL
Enthusiast
Enthusiast

Oh! I see, but unfortunately this is not a solution in this case, because I have to follow the design and that changes the design.

Thanks anyway!! I appreciate your time. So far I build that first step as a family in place separate from the stair, let me see how it goes.


PD: The view was made by the company that does the stairs.

sta.jpg 

Revit 2019.2, Windows 7
0 Likes
Message 8 of 26

ToanDN
Consultant
Consultant
Accepted solution
Model the bottom step as an in place piece.
0 Likes
Message 9 of 26

barthbradley
Consultant
Consultant

@guillermo4JEUL wrote:

Oh! I see, but unfortunately this is not a solution in this case, because I have to follow the design and that changes the design.

Thanks anyway!! I appreciate your time. So far I build that first step as a family in place separate from the stair, let me see how it goes.


No, I don't think you see at all, because this IS THE SOLUTION. Connect riser lines between the left and right boundaries, just like I said AND showed you, and the stair sketch will work -- WHETHER OR NOT YOU CURVE THE SECOND TO LAST RISER. 


0 Likes
Message 10 of 26

guillermo4JEUL
Enthusiast
Enthusiast

Hey man, easy...


I'm sorry if I offended you, but these stairs are not the same, what you showed is not an acceptable solution for me.

If you would show it without curving the second to last riser, I mean with out changing the shape of the risers, then it might be a solution if it works.

And again thank you for taking time to help me, but if it makes you mad, then please don't do it, I won't get lost, besides it doesn't make you good.


I'll stick to in Place Family for the first step, Thanks ToanDN 2587.jpg

Revit 2019.2, Windows 7
0 Likes
Message 11 of 26

barthbradley
Consultant
Consultant

No offense taken. Just trying to explain that you can do exactly what you want using stair sketch method, as long as you follow the rules that I demonstrated --- even with a squared off second riser. Try it. You'll see. 


SBS2.jpg

0 Likes
Message 12 of 26

barthbradley
Consultant
Consultant

It works, doesn't it? Don't be bashful; it's okay to admit it. And look at all the extra work I saved you. Amazing, huh? Smiley Wink

0 Likes
Message 13 of 26

guillermo4JEUL
Enthusiast
Enthusiast

Smiley LOLSmiley LOLSmiley LOL I don't have any problem in admit it, instead I'll do it because this might help others with the same problem.


The solution you propose it works if the 3rd step would begin where the round of the 1st step ends (I tested), but unfortunately this is not the case (see pic), and I can't not make that change, because the stair is being built already. I'll stick to the model in place for the 1st step it's working good so far, and I can't spent more time just playing around to see how I can get it done, it will be for other project. Probably I just need to go and learn more Revit.


But again, thank you for taking time for this. I really appreciate it!

stat.jpg

Revit 2019.2, Windows 7
0 Likes
Message 14 of 26

Viveka_CD
Alumni
Alumni

Hi @guillermo4JEUL


It will be great to see pictures of the actually built stair.


If you find posts have solved your problem, please click on 'Accept as solution' to help others with similar questions.


Thank you.

0 Likes
Message 15 of 26

barthbradley
Consultant
Consultant

Oh, you mean something like this:


Stair Sketch Mode.jpgStair Finish.jpg


0 Likes
Message 16 of 26

ToanDN
Consultant
Consultant

Can we see it in 3D?  I can sort of make it but the bottom step riser doesn't look right.


Capture.PNGCapture1.PNG

0 Likes
Message 17 of 26

barthbradley
Consultant
Consultant

You did good @ToanDN. I see a tell-tale sign that you figured out how I did it.   

0 Likes
Message 18 of 26

barthbradley
Consultant
Consultant

@ToanDN: Hope this works for you. This is same stair as shown in Plan View above. As you see, riser wraps fully. Stair3D.jpg

0 Likes
Message 19 of 26

ToanDN
Consultant
Consultant

What are the curved things from the floor to the underside of the stair?

0 Likes
Message 20 of 26

barthbradley
Consultant
Consultant

What? The stringers? 

0 Likes