Exterior window area to floor ratio calculation

Exterior window area to floor ratio calculation

Marcus.Isacsson
Collaborator Collaborator
10,093 Views
22 Replies
Message 1 of 23

Exterior window area to floor ratio calculation

Marcus.Isacsson
Collaborator
Collaborator

Hi fellas!

We need a way to calculate the ratio between exterior windows to floors.
How would you guys create your setup for this?

Is it possible within standard Revit schedule configurations or do we need to use something like Dynamo?

0 Likes
Accepted solutions (1)
10,094 Views
22 Replies
Replies (22)
Message 2 of 23

Ilic.Andrej
Advisor
Advisor

Ok, I have a solution for you. No Dynamo. Just pay attention to all the details.


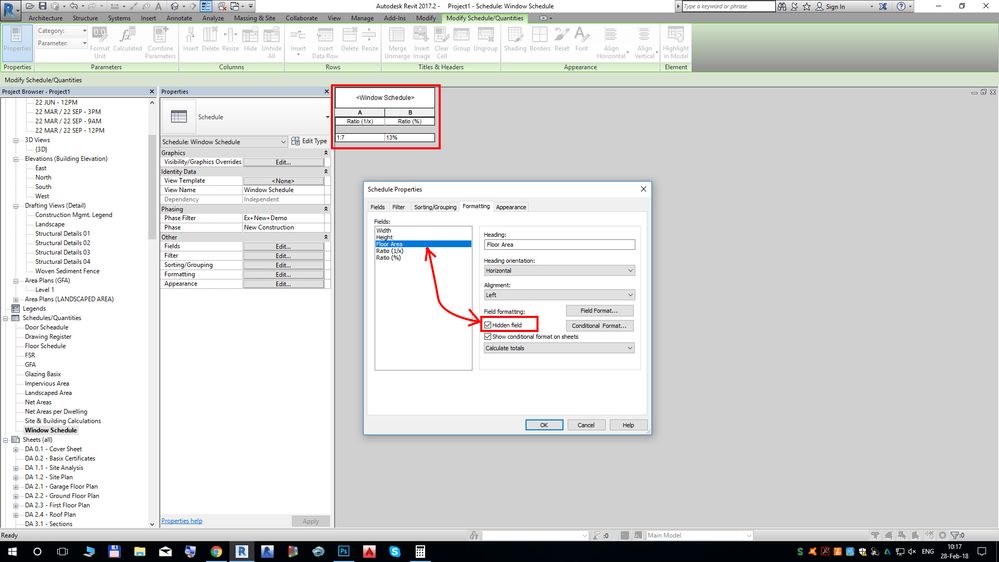
Step 1: Create a project parameter (manage/project parameters). The type of param is <<Area>, assign it to <<Windows>>, call it "Floor Area". This will later be hidden field.


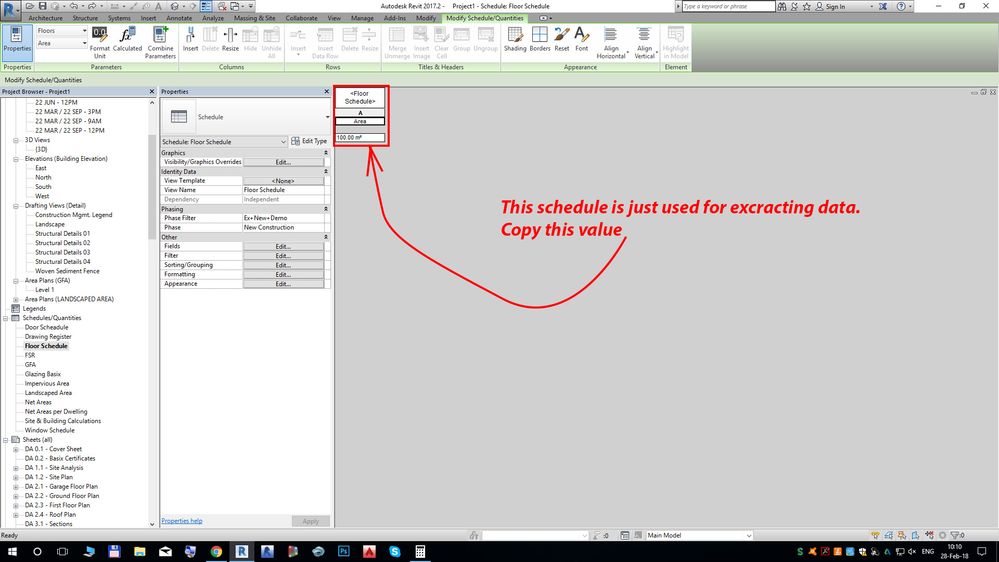
Step 2: Create a floor schedule. You will not put this schedule on a sheet. It will serve to extract data. Assign <<Area>> field. 


Step 3: Create a window schedule. Assign these fields: "Width", "Height" and "Floor Area".


Step 4: Create a calculated value. This will be << Slope >>> parameter. Lets call it "Ratio". Assign this formula: Width * Height / Floor Area


Step 5: Go to Schedule Properties/Sorting and Grouping. Uncheck <<Itemize every instance>>


Step 6: Go to Schedule Properties/ Formatting. Select All fields one by one and use dropdown menu to set <<Calculate Totals>>.


Step 7 Go to Schedule Properties/ Formatting. Select "Ratio". Go to <<Field Format>>. Uncheck <<Use project settings>> You have two good options for what you need. Set <<Units>> to be 1:x or percentage. Set Unit Symbol to be <<1:>> or <<%>>, depending on what units you chose.


Step 8: This step is described with pictures. Click on the image to enlarge it.
 

1.jpg2.jpg3.jpg


I know that this requires you to copy value from one schedule and then paste it to another. But, I'm sure that this ratio is something you will use not very often. You will probably use it when the project is almost finished. It serves just to verify that what you did is good. 


Andrej Ilić

phonetical: ændreɪ ilich
MSc Arch

Autodesk Expert Elite Alumni

Message 3 of 23

Marcus.Isacsson
Collaborator
Collaborator

@Ilic.Andrej wrote:

Ok, I have a solution for you. No Dynamo. Just pay attention to all the details.


Step 1: Create a project parameter (manage/project parameters). The type of param is <<Area>, assign it to <<Windows>>, call it "Floor Area". This will later be hidden field.


Step 2: Create a floor schedule. You will not put this schedule on a sheet. It will serve to extract data. Assign <<Area>> field. 


Step 3: Create a window schedule. Assign these fields: "Width", "Height" and "Floor Area".


Step 4: Create a calculated value. This will be << Slope >>> parameter. Lets call it "Ratio". Assign this formula: Width * Height / Floor Area


Step 5: Go to Schedule Properties/Sorting and Grouping. Uncheck <<Itemize every instance>>


Step 6: Go to Schedule Properties/ Formatting. Select All fields one by one and use dropdown menu to set <<Calculate Totals>>.


Step 7 Go to Schedule Properties/ Formatting. Select "Ratio". Go to <<Field Format>>. Uncheck <<Use project settings>> You have two good options for what you need. Set <<Units>> to be 1:x or percentage. Set Unit Symbol to be <<1:>> or <<%>>, depending on what units you chose.


Step 8: This step is described with pictures. Click on the image to enlarge it.
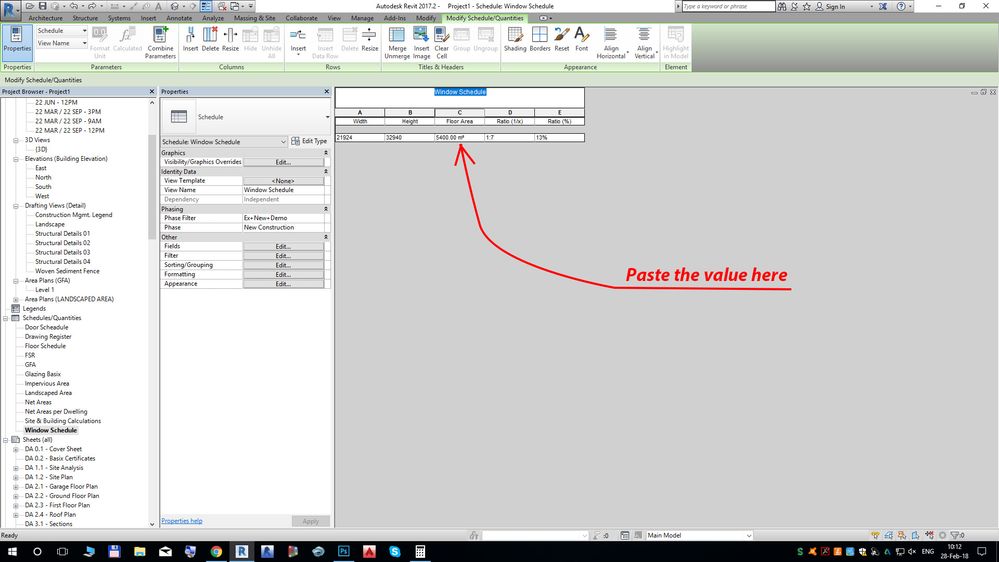


I know that this requires you to copy value from one schedule and then paste it to another. But, I'm sure that this ratio is something you will use not very often. You will probably use it when the project is almost finished. It serves just to verify that what you did is good. 


Sometimes we have requests from the customer that the window area shouldn't be more than a certain percentage of the floor area.
Would be neat to have those requirements checked with an automatic schedule. 

The workaround you present can be good enough but it's a bit of a shame that we have to manually copy values.
Also, is it possible to get the window area compared room by room? Because this will create a total ratio, right?

I'm looking for a way to easily tell which rooms have a problem regarding those demands. 

0 Likes
Message 4 of 23

Ilic.Andrej
Advisor
Advisor

Ok, now I know that this about rooms. I think this can be solved with a multi-category schedule. Give me a sec...


Andrej Ilić

phonetical: ændreɪ ilich
MSc Arch

Autodesk Expert Elite Alumni

0 Likes
Message 5 of 23

Ilic.Andrej
Advisor
Advisor

Nop, sorry I can't do it. The only thing that crosses my mind is that you can create a room schedule and use custom proj parameters which are assigned to rooms. Those will define window surface. For example, you can just add values for widths and heights of windows which are facing a room, make calculated values and go from there...


Andrej Ilić

phonetical: ændreɪ ilich
MSc Arch

Autodesk Expert Elite Alumni

0 Likes
Message 6 of 23

Marcus.Isacsson
Collaborator
Collaborator

Maybe it's included somehow in Autodesk Green Building Studio?
I haven't tried that solution yet. 

0 Likes
Message 7 of 23

cbcarch
Advisor
Advisor

Not exactly what you are asking for, but this might be helpful?


http://blogs.autodesk.com/insight/facade-design-with-insight-webinar/

Cliff B. Collins
Registered Architect The Lamar Johnson Collaborative Architects-St. Louis, MO
0 Likes
Message 8 of 23

Sahay_R
Mentor
Mentor
Can the window schedule be nested : appended? I'm not in front of Revit right now, so I'm just thinking aloud...

Rina Sahay
Autodesk Expert Elite
Revit Architecture Certified Professional

If you find my post interesting, feel free to give a Kudo.
If it solves your problem, please click Accept to enhance the Forum.
0 Likes
Message 9 of 23

FAIR59
Advisor
Advisor
Accepted solution

try this ,

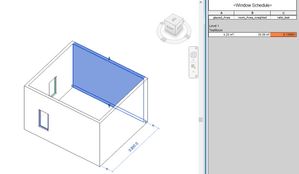
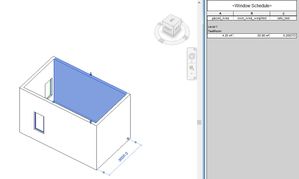
no manual input required, except of course for the glazed_area of the window (project parameter)


windows schedule:


  1. "known" fields: glazed_area, To Room: Name, To Room: Area
  2. calculated fields:
    • glazed_area_weighted ( percentage of glazed_area by To Room: Name)
    • room_area_weighted ( parametertype Area / formula: To Room: Area * glazed_area_weighted )
    • ratio_test ( parametertype Number / formula:  glazed_area / (To_Room: Area * glazed_area_weighted) )
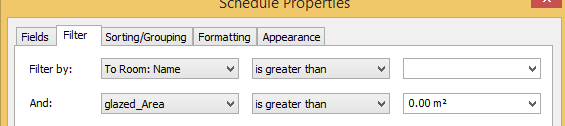
  3. filter for windows with glazed_area > 0
  4. sorting:  To Room: Name
  5. conditional format on ratio_test


picture_1.JPGpicture_2.JPG

Message 10 of 23

FAIR59
Advisor
Advisor

here is my Revit2017 test file

Message 11 of 23

Marcus.Isacsson
Collaborator
Collaborator

@FAIR59 wrote:

here is my Revit2017 test file


Thanks alot. I'll check it out and get back to you! 🙂

0 Likes
Message 12 of 23

damian
Participant
Participant

Hi FAIR59, thanks for your solution.

I've been looking at this for a while, and came across your solution this morning. I've been trying to see how you've done this by reverse engineering your rvt file. I cannot seem to place any new windows into the room that will update the ratio_test calculation.

I've tried to insert another of your windows but, whilst it shows on plan and seems to be identical to the other two, it does not appear in the window schedule. And I cannot copy a window as I get an error message that "Can't place inserts outside of hosts".

How have you hosted the windows?

Thanks again.

Damo

0 Likes
Message 13 of 23

FAIR59
Advisor
Advisor

The Windows are hosted on a wall.

As you can see, in the schedule there is a filter for the ToRoom name. If your new windows don't appear in the schedule then they are facing the wrong direction (i.e. ToRoom.Name is blank, and FromRoom.Name is the room name.)  [ Placing the windows in a 3D View on the interior side of the wall, should result in the correct facing direction]


General Solution:

Make a second window schedule, 

Fields: Family & Type, ToRoom.Name, FromRoom.Name.

Sorting/Grouping: Itemize every instance Checked

In this schedule you can swap the ToRoom.Name with the FromRoom.Name.

0 Likes
Message 14 of 23

damian
Participant
Participant

Hi FAIR59,


Thank you for your reply, appreciated.

In fact, about 30minutes before your post whilst I was still playing with the Revit file I found I was able to place windows, don't know if I had a glitch (I'm using Revit 2019) as I certainly couldn't place windows earlier, but anyway....


However, moving on, I then wanted to see if I could add in my own windows. Placing them was OK, and I manually entered the 'glazed_Area" data under the Type Properties -> Dimensions parameter, but this isn't showing up in the schedule. Wondering if this is related to the 'KC_Kozijnmerk' parameter under Identity Data? Do I need to add this 'KC_Kozijnmerk' to my windows too for them to show up in the schedule, or is there something else I need to add to my window families?


By the way, thank you for the Revit file, I have not found any other solution on Google nor in my Mastering Revit books.


0 Likes
Message 15 of 23

FAIR59
Advisor
Advisor

You can remove the KC_Kozijnmerk filter. I used that to limit the schedule to a few windows in a large project.

The main purpose of those filters is to have only elements with a glazing_area >0 in the schedule.

Message 16 of 23

damian
Participant
Participant

@FAIR59 wrote:

You can remove the KC_Kozijnmerk filter. I used that to limit the schedule to a few windows in a large project.


OK, understood.

Could you give me some guidance on what I need to do to get my own windows to show in the schedule please?

I'm failing here, spent a good few hours (learning lots) from your family but not managing to get my window to show in your schedule. What am I missing?


Thanks

Damian

0 Likes
Message 17 of 23

FAIR59
Advisor
Advisor

attach a project file, where you placed your own windows, and i'll have a look.

0 Likes
Message 18 of 23

damian
Participant
Participant

Thanks, attached (version 2019)


I've also noticed that if I place a window the wrong way around, it doesn't schedule even after I flip it inside:outside. Again, maybe something to do with Revit 2019.

0 Likes
Message 19 of 23

FAIR59
Advisor
Advisor

Flipping a window and assigning ToRoom/FromRoom are 2 separate mechanisms. Changing one doesn't change the other.

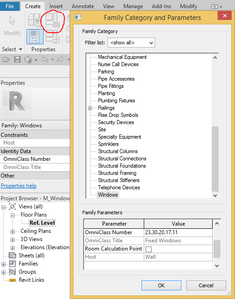
You can however link them, by checking the Room Calculation Point parameter in the family-editor.

familyparams.PNG

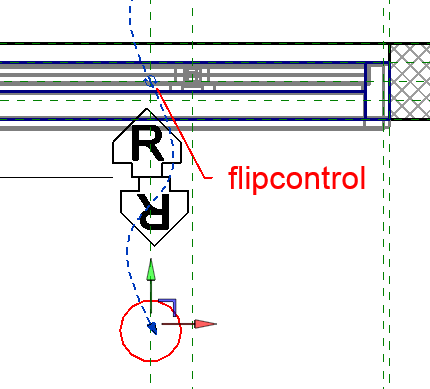
If you do that, make sure that the arrow of the Room Calculation Point points to the interior, using the flip control of the selected Room Calculation Point.

flipcontrol.PNG 

Pointers to get things right:

  • remove the KC_kozijnmerk filter

schedule_filters.PNG

  • assign value to glazed area parameter for  family type Velfac200 1224 (Stru.1248)w x 500h 
  • if you also need instances of the category [Doors] (e.g. sliding door Velfac237) in the schedule, you first need to make a new MultiCategory-schedule with the same fields, filters and sorting/grouping.  and secondly modify the Project Parameter glazed area to include the Doors-category. 
Message 20 of 23

damian
Participant
Participant

Thanks once again FAIR59. I was busy on other items beginning of this week, got around to doing this on Wed, Your guidance was great. All working perfectly now for my windows.


But..... yesterday afternoon I was going around in circles in trying to create a MultiCategory schedule to include the doors. There is no:

  • To Room: Name
  • To Room: Area
  • Room_Area_weighted
  • glazed_Area-weighted

or

  • ratio_test

fields available to select in any of the drop-down options (Multiple Categories, Room, Space, Project Information). This, I'm sure, is very simple but I just cannot figure out what I'm missing.


Thank you again.

0 Likes