Design Options conflicting

Design Options conflicting

erinznire
Enthusiast Enthusiast
5,164 Views
28 Replies
Message 1 of 29

Design Options conflicting

erinznire
Enthusiast
Enthusiast

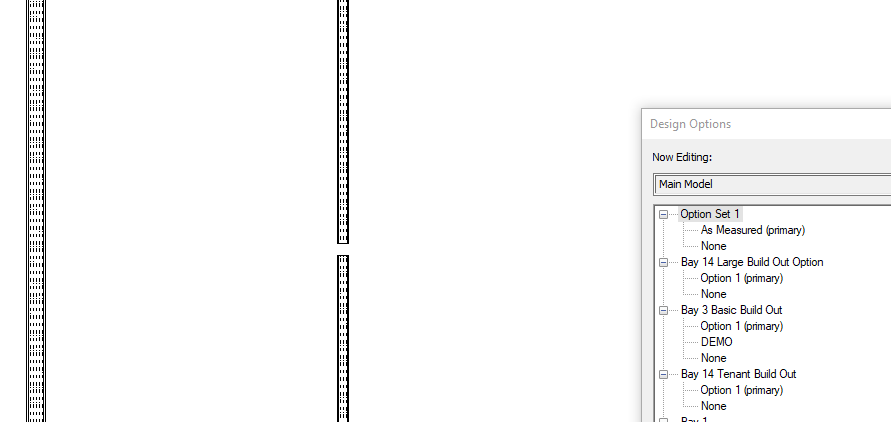
I'm not too sure what will all need to be known, and excuse the lack of official terminology in my repertoire, but I do very basic drawings in Revit - floor plans only really, and I've added a little screenshot showing the design options and the issue I'm having. I welcome all suggestions, on a fix or even if I should be using a different process. I appreciate you taking the time to read.


I utilize design options to separate each bay in large industrial buildings. I have the main building drawn in the primary option, then I have a design set for options which I design, and then I add another for actual confirmed tenant build outs - seems to generally work, aside from the fact that when walls intersect, even if the walls are on another design option that isn't turned on in my view, the wall on the design option that is turned on gets a little cut through it. To now I've been literally drawing in lines to fill in the spots thinking this must just be the way it is. Today I thought I'd ask to see if it is in fact the way she blows or if I'm doing something wrong? The wall with the piece missing, that is shown in my image, is on the "Bay 14 Tenant Build Out" design option, and the wall that is doing the cutting is on the "Bay 14 Large Build Out" option (that is turned off in my visibility/graphics), neither of these walls exist on any other option set, and I've not used any other Revit fanciness that I can think of.


I hope I gave enough info to know the problem, thank you!

0 Likes
Accepted solutions (3)
5,165 Views
28 Replies
Replies (28)
Message 21 of 29

erinznire
Enthusiast
Enthusiast

I feel even more lost than I was...I feel like giving up on this DO crap...which seems to be what mpwuzhere is saying anyways...I wish someone could osmosis themselves here for a face to face haha! - I super duper appreciate all the help!!


To barthbradley: The wall that is intersecting and creating the hole is on the "Bay 14 Tenant Build Out" Option 1, not the main model, (when I turn on "Main Model" it is not select-able) so I'm perplexed by your response...as for splitting at the intersection - I don't want them to intersect, they're different designs, so this seems silly to me??? This brings me into my next response...


To : Just to recap what I'm after, the two walls that are causing problems - should be two different designs - literally and figuratively, they are on different DO's as well as two different design options in the real world. So I don't want them to interact but they are...same page?? So you're saying I SHOULD put the 3 different choices per each bay in one set? When I did this before, I then had the issue of needing multiple schedules. For instance I'd like to be able to have demo and new come up in one schedule - I guess having more than one isn't the end of the world, but it seemed like I should be able to do that in a program as beefy as this is...and assumed the additional DO was the way to do that. I should note that I use the schedules to provide a cost of construction to the owner, as well as one without cost to the site super for construction, basically the same schedule just one without the cost column - not sure if that is a normal use of Revit or not so thought I'd mention my intention.


This all said...

To mpwuzhere: Now were just talking about abolishing my whole process and having a file for each bay. Which is what I thought was a good thing to avoid when it's just one little building...Does this make printing my drawing set for permitting and maintaining one base site file with rent-able area measurements a nightmare?? I would have to update both the base and the bay file each time walls changed to ensure my floor areas were correct, right? I thought this opened up errors, and felt kind of like CAD nightmares I've had before where someone didn't change "this" over "there" too and it caused all sorts of kerfuffle. I thought that this was kind of the point of DO's...? Maybe not for bay by bay exactly, but negating the need to have multiple files for one space...

0 Likes
Message 22 of 29

ToanDN
Consultant
Consultant
Accepted solution

I think you are confused about Options and Option Sets.  A simple example:


A house with 2 options for Bedroom, 2 for Kitchen, and 2 for Toilet.  So you need:

- 1 Bedroom Option Set: 2  design options

- 1 Kitchen Option Set: 2  design options

- 1 Toilet Option Set: 2  design options


Then you can have any combinations from the above: AAA, AAB, ABA, ABB, ....


Again, a wall under Bedroom-Opt.A will never interact with a wall under Bedroom-Opt.B, but if it will to any walls under other Sets.    Set other Set to None only affects the view visibility and schedule calcs, but does not affect how elements interact physically among themselves.

0 Likes
Message 23 of 29

barthbradley
Consultant
Consultant
Accepted solution

So, then set "None" as the primary under "Bay 14 Tenant Build-out" . 


...I'm going expand on what @ToanDN is say by referring you back to the Interdependence thing I was talking about before.  You have Options that are dependent on other Options.  This is problematic.  

0 Likes
Message 24 of 29

Anonymous
Not applicable
Accepted solution

Options that depend on options?   Hey...lets get Phasing involved too!


(tomorrow's headlines....drafter destroys computer in a fit of rage after being overwhelmed by a program called Autodesk Revit)


@erinznire....if you have TI implementation that will affect your primary building model, then you can use phasing to reflect those changes.  As everyone else mentioned, Design Options are for when you have a fork in the design process...do you go straight, right, left, up or down....eventually you will have to go one direction only (usually this is client driven) and you apply that option and go back to just one design.


If you want to stick with the method you are using.....then the easiest method is to have all walls/doors and anything else be one option and duplicate it and rearrange as necessary.  Remember to create new views for each option too, don't try to keep one view and keep changing the design option settings.

0 Likes
Message 25 of 29

barthbradley
Consultant
Consultant

@Anonymous wrote:

Options that depend on options?   


Believe it or not; YES. Some Option Set Options won't reconcile with other Option Set Primary Options. Go figure.  Case in point: the "Option 1" Door that OP can't move in Option Set "Bay 14 Large Build Out Option", can be moved once the "None" Option in Option Set "Bay 14 Tenant Build Out" is set to PRIMARY. 


Rubik's Cube was easier to figure out. he, he.    


0 Likes
Message 26 of 29

Anonymous
Not applicable

Ah...always forget the "set primary" part.

0 Likes
Message 27 of 29

erinznire
Enthusiast
Enthusiast

You know I'm close - watch the Calgary headlines...at the very least I could cry - this has all been quite challenging, I've unfortunately done this to 4 buildings so far, why it's only coming up as an issue now is beyond me, all while being under the gun of an owner who doesn't understand what my delay is...I'm not even sure what to do from here, but I'll struggle through, heeding all of your advise thus far - even though I still don't understand entirely 😞


I'll let you all off the hook, though. I thank you all, greatly, for your time and knowledge!!

0 Likes
Message 28 of 29

barthbradley
Consultant
Consultant

@erinznire wrote:

I'll let you all off the hook, though. I thank you all, greatly, for your time and knowledge!!


So, that's it?!!!  You're all done with us now? 


Dang! I was hoping for a lil' green checkmark at least. 


Oh well.   

0 Likes
Message 29 of 29

erinznire
Enthusiast
Enthusiast

Forgot that part 😉