Scaling a Lattice Rig?

Scaling a Lattice Rig?

Anonymous
Not applicable
4,632 Views
20 Replies
Message 1 of 21

Scaling a Lattice Rig?

Anonymous
Not applicable

Hi all,


I'm rigging a cube using lattices. I have everything working nicely, but I've been running into problems using the "move_all" control that I have. When I do so, the cube bends towards the origin. It's probably a parenting or grouping issue, but I haven't been able to figure it out.


0 Likes
Accepted solutions (1)
4,633 Views
20 Replies
Replies (20)
Message 2 of 21

saihtam
Collaborator
Collaborator
Hey Ben,

At 50 secs you're getting the proper effect it seems, the only issue is that you're double transforming the middle part of the lattice. Notice how the top and bottom part is doing what you want. I assume that you skinned the lattice then added a cluster for the middle section. This is just over complicating it I think. You're having the joint(s) move the lattice, then the cluster comes along and moves it again. This is a really important concept to understand. I'd say just use a joint for the middle section as well, instead of the cluster. Then you'll have it all in one deformer. Now that seems to be the issue for translate and rotate. For the scaling I'd like to have a better look at your rig, but can Imagine this has something to do with the scale not being taken properly into account with the cluster.

If you want to upload your rig I can have a better look at it and give you some feedback.
- Mathias
Message 3 of 21

Anonymous
Not applicable

Thanks for the reply. I did fix the problem, it was a parenting and grouping issue. I grouped all of my controls together and all of my deformers and lattice pieces in a spearate one and it worked fine. I then made my root move control affect the translation and rotation of the "cubeAll" group I made. Is that bad practice? It seems to work cleanly. 


It looks like I can't upload .ma files to the forum... very strange. I attached a video with my updated rig. In the video I pose a new question, and let me clarify first that I already tried the attribute solution I posed, but I'm wondering if there is a way to have both an attribute variable and a parent relationship affect the translate of a single object. 


0 Likes
Message 4 of 21

saihtam
Collaborator
Collaborator
Hey Ben,

Yeah, the forum doesn't allow MA, but if you zip it you can upload.

I think I can spot some very fundamental flaws with your rig(contrained controls, no offset groups, global scale coming from wrong pivot etc). If you upload your file I can have a better look and provide you with some clearer feedback.

I think you're on the right track, just approaching it wrong. If you just want an attribute to move the controls up and down at the same time I'd do this as a connection/set driven key on a group above your controls. These groups are what should be constrained as well. Looks like you have your actual box controls constrained to the global. This is a big no-no.

Good thing you started to separate out the controls and deformers, that's exactly what you want to do.
- Mathias
Message 5 of 21

Anonymous
Not applicable
Thank you so much for your help Saihtam. I'm away from my desktop right now, so I can't upload the file. Question though: would constraining a group instead of the control give me the control I need? I imagine it would, because that would then give me two Ty attributes to work with instead of one.
0 Likes
Message 6 of 21

saihtam
Collaborator
Collaborator
Yes. This is how you should always deal with controls. Make a control, then group it and move the group to where you want the control. This will allow you to zero out the controls easily as well. With your rig now, there is now way to easily get back to the default pose(as far as I can see). Then you can always add in more groups between that group and the control.

Example:
l_wristCtrl_GRP
- l_wristCtrlOffset_GRP
- - l_wristCtrlSDK_GRP
- - - l_wrist_CTRL

This allows for a lot of flexibility and let's you layer up modifications to this as needed. Following a hierarchy like this you can now have you attribute drive an overall stretch that moves the controls apart from each other, and still have the controls zeroed out!

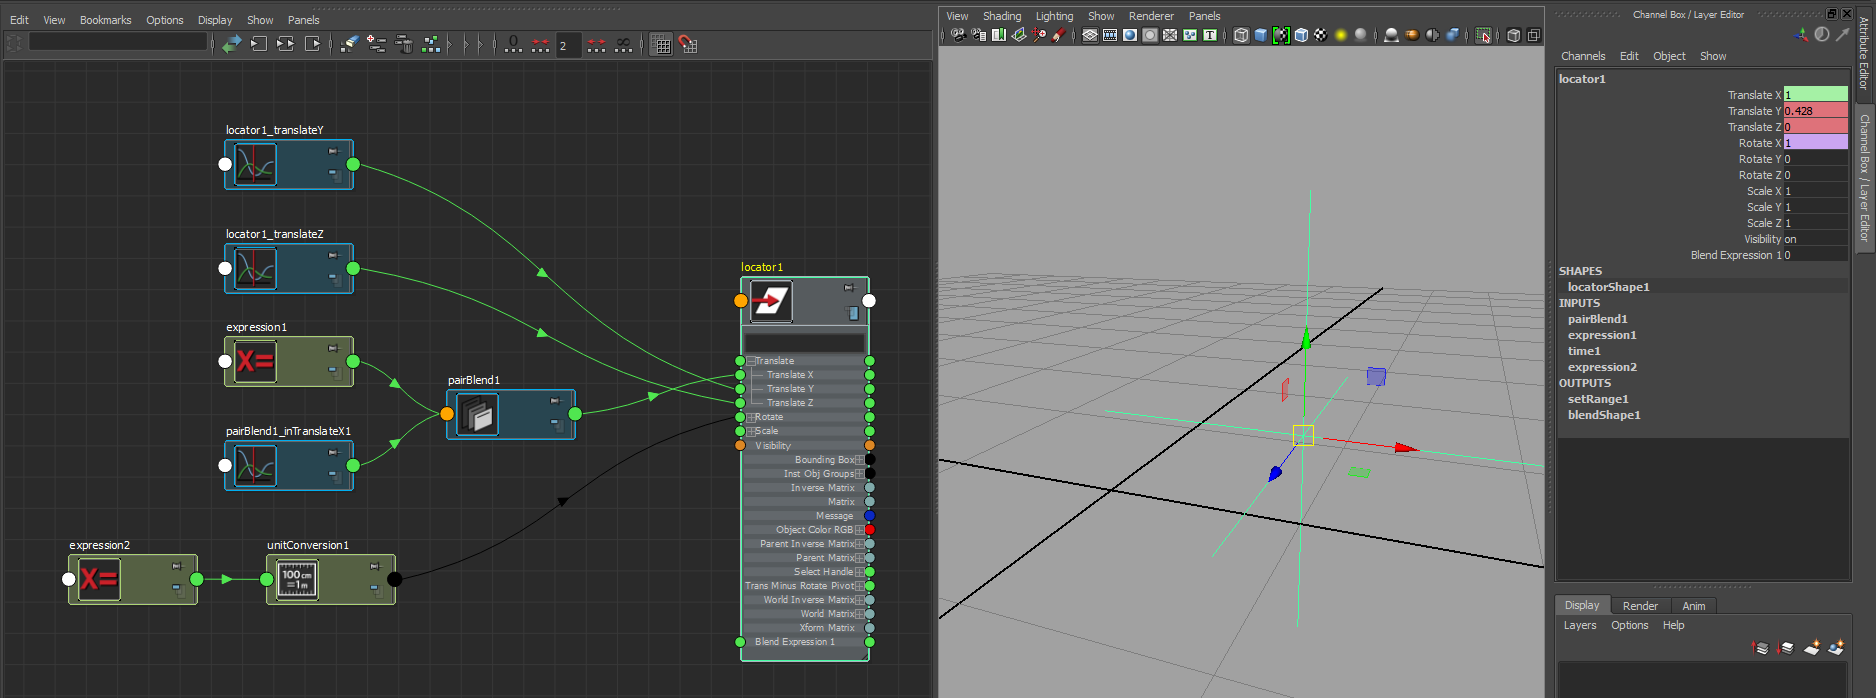
If you look at some parts of your controls(can't remember which right now), you can see that you have green values in your channelbox. This shows that you have to incoming connections on that value and that Maya has created a blend between the two inputs. I assume you constrained this object to something, then keyframed it. Very easy to do, and it looks like everything is working, but this can easily be confusing while working with the rig and can break easily.
- Mathias
0 Likes
Message 7 of 21

Anonymous
Not applicable
The green values are because of expressions controlling that control. I see now that I can make that expression affect a group above that controller. Can I ask what the SDK group means?
0 Likes
Message 8 of 21

saihtam
Collaborator
Collaborator

An expression will yield the same result. When you just have an expression on there it will be purple. Green is used for pairBlend. See my image below.


I'm not that fond of expressions, though they can be very handy. For something like this I prefer nodes. I find it cleaner and easier to work with.


SDK stands for Set Driven Key. It basically allows you to create animation curves for attributes that are driven by a value instead of time. This is something that you can do manually as well by changing the input connection of an animCurve from time1 to an attribute from somewhere else. Very powerful since this allows you to do an animation exactly like you want and then be able to use it when you want. It's often used for driving blendshapes in simple corrective setups, foot roll/twist/bank, finger posing etc.

- Mathias
0 Likes
Message 9 of 21

Anonymous
Not applicable
Oh wow, I'm totally new to the Node Editor but I can see how much more organized that would be than expressions, especially since my expressions are either just linking values or doing simple value conversions.

I'll do some tinkering with the node editor and will try to remake my rig using it once I have a better hold on it. This is a simple rig so it'll be good practice.
0 Likes
Message 10 of 21

Anonymous
Not applicable
Hi Saihtam, I'm trying out the grouping method that you recommended, but I'm running into a few problems. My rig controls are all under groups, but when I move them they don't move in the correct constraint relationships unless I select their group in the outliner.
0 Likes
Message 11 of 21

Anonymous
Not applicable

Here is a zip file of my maya file. I also recorded another video explaining my problem with groups. Thank you again so much for all the help.

0 Likes
Message 12 of 21

saihtam
Collaborator
Collaborator

Hey Ben,


So I've done a video with some feedback and attached you can find my rig file. Some post comments on what I did.

1. The offset I was seeing in the lattice was from the joint being rotated, doh!

2. For the move lattice, you'd really just need 2-2-2 division on the lattice since the squash is being done on another lattice. This will give you a slightly different look in how the middle points move between the top and bottom of the cube. Something to keep in mind if you want to play a bit more with it.


Please let us know if there is anything else you have any questions about or if I glanced over something. I probably did.


- Mathias
Message 13 of 21

Anonymous
Not applicable
Ah! Thanks so much for this! I like your solution for using the bones as both deformers and the measurements for the distance. As for groups, I found a tutorial that seems to explain the concept pretty well. (https://vimeo.com/28519135).
Let me see if I understand it correctly: Your example was:
Parent control
-Child Control Expression Group (drives child control by an expression set on it)
-- Child Control Group (parent constrained to Parent Control)
--- Child Control

So in other words, if I were to want a visible rig control (not a group) to move an object, I would set that as the parent to a group made from the visible child control I have. That way, like you said, I can drive that child with expressions or constraints without that affecting the actual control.
0 Likes
Message 14 of 21

Anonymous
Not applicable

Hi Mathias. I'm trying the joint method that you used, but I'm running across a weighting problem. Do I need that second lattice to be able to control the corners like this? Right now, the movement of the corner control isn't 1:1 with the lattice vertex (well, it's 1 : 0.5 to be exact).


smooth bind help.png

0 Likes
Message 15 of 21

saihtam
Collaborator
Collaborator

Hey Ben,


Good old Zeth Willie! I love his stuff and went though a bunch of it when I was learning. I have that video favorited! I'd recommend you check out more of his stuff. He's really good at explaning and shows some really handy things.


Parent control
-Child Control Expression Group (drives child control by an expression set on it)
-- Child Control Group (parent constrained to Parent Control)
--- Child Control

Nope. You have to remember that a constraint will not care what is going on with the groups above it's object. It will always match the world position of it's target. So what ever you do to the expression group will be overridden by the constraint group. Switch those two around and you're good. 


In my example though I have no expression or any fancy setup. I'm simple scaling the middle control, which then scales the position of it's children. The parent constraint reads this and moves the joints accordingly.


I think you've got it from what I can read. A quick example of a setup that would drive a wrist and finger.


top_GRP  (container group)

- ctrls_GRP  (container group)

- - l_wristCTRL_GRP  (has all the values needed to the control into place, no expressions or constraints)

- - - l_wristCTRLOffset_GRP  (zeroed out values, can be used to offset in specific cases like a fist pose etc)

- - - - l_wrist_CTRL  (zeroed out control shape)

- - - - - l_finger1CTRL_GRP  (has all the values needed to the control into place, no expressions or constraints)

- - - - - - l_finger1CTRLOffset_GRP  (zeroed out values, can be used to offset in specific cases like a fist pose etc)

- - - - - - - l_finger1_CTRL (zeroed out control shape)


- skeleton_GRP

- - root_JNT

- - - l_wrist_JNT  (constrained by l_wrist_CTRL)

- - - - l_finger1_JNT (constrained by l_finger1_CTRL)


The problem you're running into with the skinning is that you added your control object as well. Only select the joints and you should be fine.


- Mathias
0 Likes
Message 16 of 21

Anonymous
Not applicable

Hi Mathias,


I was able to set up my rig to do squash stretch using the node editor by using your setup, but I'm running into a problem. Moving the top and bottom controls gives me the opposite effect so I'd need to multiply by -1. I don't quite understand the multiplyDivide node, so any help would be appreciated. my node setup.PNG

0 Likes
Message 17 of 21

saihtam
Collaborator
Collaborator

The multiplyDivide node does multiplication by default. You want to set it to divide. Select the node and open up your attribute editor and you can change it there.


- Mathias
Message 18 of 21

Anonymous
Not applicable

Hi Mathias,


I'm having another problem, this time with the joints I made. The distance measurement that I create isn't working becuase I'm measuring the distance between two zeroed out controls (dividing by zero). So in this case, would the controls not be zeroed out? For example, in this case I zeroed out the joint control and then moved it into its position using the group, but that makes it's default position 0,0,0, and the distance between two zeroed out objects is... well, zero. 


Here's a video explaining my problem if that was unclear. 

https://vimeo.com/159728940

0 Likes
Message 19 of 21

saihtam
Collaborator
Collaborator
Accepted solution

Hey Ben,


I did a video with some more feedback for you. To summarize:

Group and move your controls, not joints.


- Mathias
Message 20 of 21

Anonymous
Not applicable
thanks man, I really like the method you used at 11:00. Simple point based placement, plus it explains how parenting works with bones. I had no idea you could change around the parenting relationships of bones like that in maya.
0 Likes