Community
Inventor Forum
Welcome to Autodesk’s Inventor Forums. Share your knowledge, ask questions, and explore popular Inventor topics.
Turn on suggestions
Auto-suggest helps you quickly narrow down your search results by suggesting possible matches as you type.
Reply
Topic Options
- Subscribe to RSS Feed
- Mark Topic as New
- Mark Topic as Read
- Float this Topic for Current User
- Bookmark
- Subscribe
- Printer Friendly Page
Message 1 of 22
Anonymous
2545 Views, 21 Replies
10-18-2015
04:46 PM
- Mark as New
- Bookmark
- Subscribe
- Mute
- Subscribe to RSS Feed
- Permalink
- Report
10-18-2015
04:46 PM
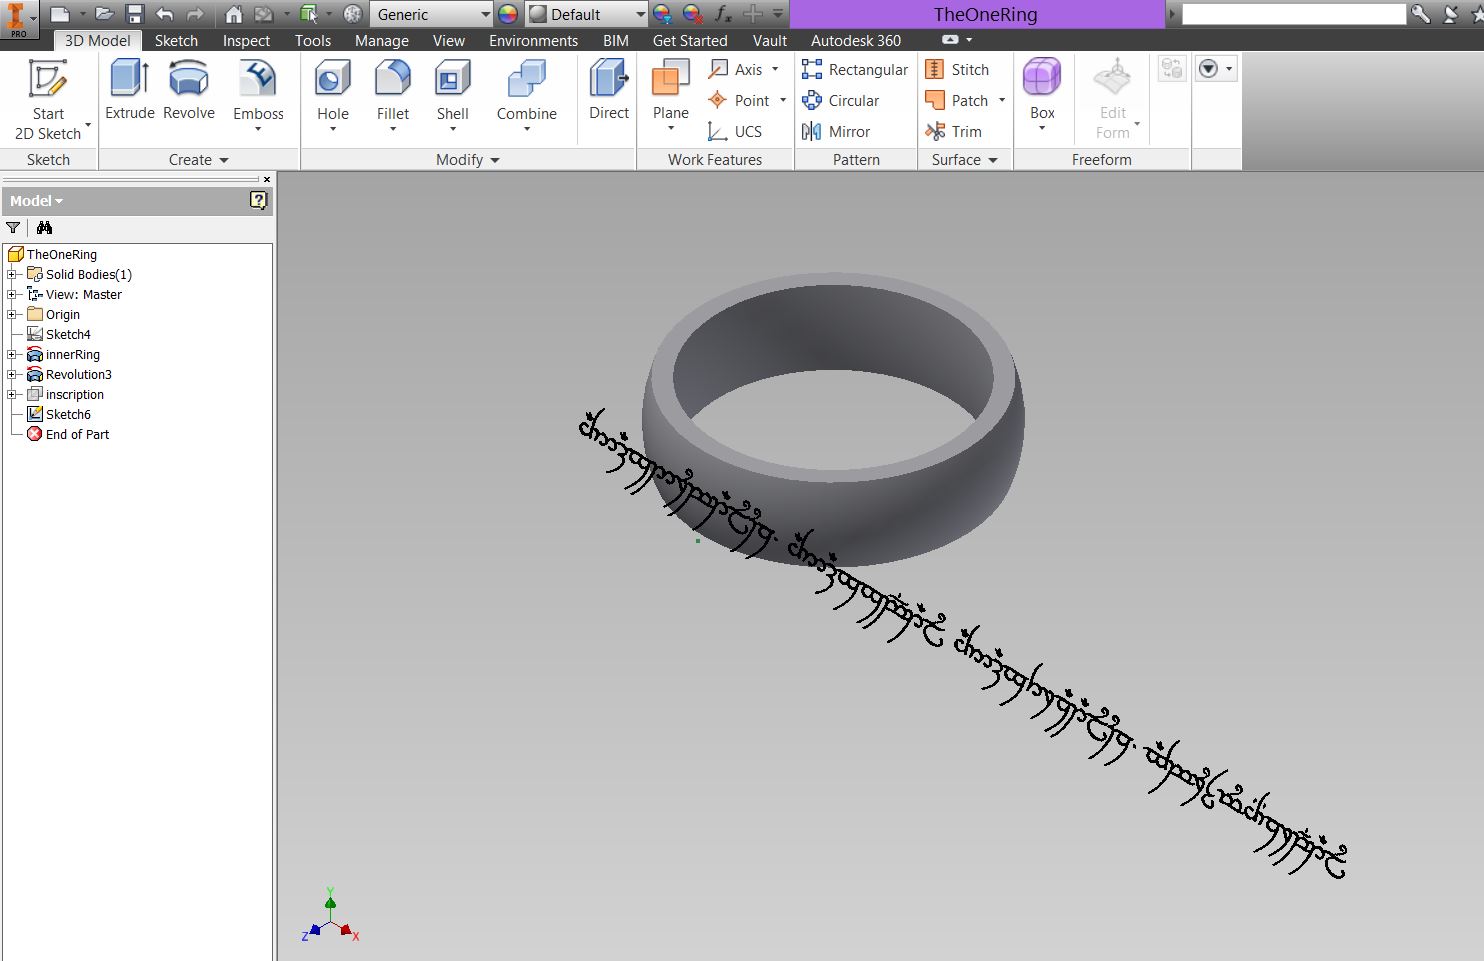
Wrapping text to an object
I'm attempting to wrap text to a ring (yes, its a LOTR thing) but I cant get it to wrap the way I want to. I understand you can only wrap an emboss to a flat surface but, after that, I'd like to "cut" the emboss out of the curved surface on top of it like you can do with an extrude. Is there a way to do that?
21 REPLIES 21
Message 2 of 22
10-18-2015
11:43 PM
- Mark as New
- Bookmark
- Subscribe
- Mute
- Subscribe to RSS Feed
- Permalink
- Report
10-18-2015
11:43 PM
Welcome to the forum.
Attach your attempt here and we will look at it.
Adrian S.
blog.ads-sol.com

AIP2012-2020 i7 6700k AMD R9 370
Did you find this reply helpful ?
If so please use the Accepted Solutions or Like button - Thank you!
blog.ads-sol.com
AIP2012-2020 i7 6700k AMD R9 370
Did you find this reply helpful ?
If so please use the Accepted Solutions or Like button - Thank you!
Message 3 of 22
10-19-2015
12:04 AM
- Mark as New
- Bookmark
- Subscribe
- Mute
- Subscribe to RSS Feed
- Permalink
- Report
10-19-2015
12:04 AM
It can be done, but there's some manual work behind.
IMO, a big problem with your font.

2015 file attached
Walter
Walter Holzwarth
Message 4 of 22
10-20-2015
12:10 PM
- Mark as New
- Bookmark
- Subscribe
- Mute
- Subscribe to RSS Feed
- Permalink
- Report
10-20-2015
12:10 PM
Thank you for taking a look, the file is posted below. I'm not trying to make the letters stand out from the curved surface I'm tryint to cut into it.
Message 6 of 22
10-20-2015
12:23 PM
- Mark as New
- Bookmark
- Subscribe
- Mute
- Subscribe to RSS Feed
- Permalink
- Report

Message 7 of 22
10-20-2015
12:27 PM
- Mark as New
- Bookmark
- Subscribe
- Mute
- Subscribe to RSS Feed
- Permalink
- Report
10-20-2015
12:27 PM
No its acutally Tengwar font created for Lord of the Rings, you have to install a driver for it. But the font shouldnt matter if its doable correct?
Message 8 of 22
10-20-2015
12:38 PM
- Mark as New
- Bookmark
- Subscribe
- Mute
- Subscribe to RSS Feed
- Permalink
- Report
10-20-2015
12:38 PM
Emboss -Wrap the text before the second Revolution.
You can wrap a cylinder or cone.

-----------------------------------------------------------------------------------------
Autodesk Inventor 2019 Certified Professional
Autodesk AutoCAD 2013 Certified Professional
Certified SolidWorks Professional
Message 9 of 22
10-20-2015
12:49 PM
- Mark as New
- Bookmark
- Subscribe
- Mute
- Subscribe to RSS Feed
- Permalink
- Report
10-20-2015
12:49 PM
I deleted the curved face but kept the work plane "on" it to try and force the creation of negavtive space on the emboss but I kept getting this error
Message 10 of 22
10-20-2015
01:02 PM
- Mark as New
- Bookmark
- Subscribe
- Mute
- Subscribe to RSS Feed
- Permalink
- Report
10-20-2015
01:02 PM
@Anonymous wrote:
I deleted the curved face but kept the work plane "on" it to try and force the creation of negavtive space on the emboss but I kept getting this error
So your negative space "experiment" didn't work..
Do it as JDs part shows..
-------------------------------------------------------------------------------------------
Inventor 2023 - Dell Precision 5570
Did you find this reply helpful ? If so please use the Accept Solution button below.
Maybe buy me a beer through Venmo @mcgyvr1269
Message 11 of 22
10-20-2015
01:02 PM
- Mark as New
- Bookmark
- Subscribe
- Mute
- Subscribe to RSS Feed
- Permalink
- Report
10-20-2015
01:02 PM
No equal emboss depth, Jeffrey. Looks ok with low curvature, but ..

Walter Holzwarth
Message 12 of 22
10-20-2015
01:09 PM
- Mark as New
- Bookmark
- Subscribe
- Mute
- Subscribe to RSS Feed
- Permalink
- Report
10-20-2015
01:09 PM
I see what you did, if I understand correctly: you set the whole thing as a revolution, ebmossed the text on it deep enough so that when you did a cut revolution to create the cure the text would still be there
Message 13 of 22
10-20-2015
01:10 PM
- Mark as New
- Bookmark
- Subscribe
- Mute
- Subscribe to RSS Feed
- Permalink
- Report
10-20-2015
01:10 PM
@WHolzwarth wrote:
No equal emboss depth, Jeffrey. Looks ok with low curvature, but ..
I'm sure he is aware of that... But how perfect does a 3d printed "nerd" ring need to be my precious ![]()
-------------------------------------------------------------------------------------------
Inventor 2023 - Dell Precision 5570
Did you find this reply helpful ? If so please use the Accept Solution button below.
Maybe buy me a beer through Venmo @mcgyvr1269
Message 14 of 22
10-20-2015
01:13 PM
- Mark as New
- Bookmark
- Subscribe
- Mute
- Subscribe to RSS Feed
- Permalink
- Report
Message 15 of 22
10-20-2015
01:15 PM
- Mark as New
- Bookmark
- Subscribe
- Mute
- Subscribe to RSS Feed
- Permalink
- Report
10-20-2015
01:15 PM
This example is slightly different with uniform depth.
In my defense - I knew the first example was not uniform depth, but one of those pesky students walked into my office and expected me to do my real job. ![]()
-----------------------------------------------------------------------------------------
Autodesk Inventor 2019 Certified Professional
Autodesk AutoCAD 2013 Certified Professional
Certified SolidWorks Professional
Message 16 of 22
10-20-2015
01:19 PM
- Mark as New
- Bookmark
- Subscribe
- Mute
- Subscribe to RSS Feed
- Permalink
- Report
10-20-2015
01:19 PM
I'm trying to mimic what you've done in your file on my file but it keeps giving me the cannot create error message
Message 17 of 22
10-20-2015
01:22 PM
- Mark as New
- Bookmark
- Subscribe
- Mute
- Subscribe to RSS Feed
- Permalink
- Report
10-20-2015
01:22 PM
Are you attempting with a simple text first?
Is you text string Pi*D minus a tiny fudge factor (cannot self-intersect).
BTW: Have you installed all Service Packs and Updates for your version of Inventor?
-----------------------------------------------------------------------------------------
Autodesk Inventor 2019 Certified Professional
Autodesk AutoCAD 2013 Certified Professional
Certified SolidWorks Professional
Message 18 of 22
10-20-2015
01:28 PM
- Mark as New
- Bookmark
- Subscribe
- Mute
- Subscribe to RSS Feed
- Permalink
- Report
10-20-2015
01:28 PM
I've made sure the string was short enought to fit the circumfrace, it fits when I do a positive emboss with the Tengwar font, but I cant seem to make the negative one work
Message 19 of 22
10-20-2015
01:42 PM
- Mark as New
- Bookmark
- Subscribe
- Mute
- Subscribe to RSS Feed
- Permalink
- Report
10-20-2015
01:42 PM
We can discuss about theory, and we can discuss about what's enough for real life.
Making it short, here are the differences between my above Text on ring.ipt and Jeffrey's last part:
- On my part edges are pointing perpendicular to the surface
- On Jeffrey's part edges are pointing perpendicular to the main axis
Can be an aspect for engraving, but surely doesn't matter in 3D printing.
IMO, I should stop here.
Walter Holzwarth
Message 20 of 22
10-22-2015
03:01 PM
- Mark as New
- Bookmark
- Subscribe
- Mute
- Subscribe to RSS Feed
- Permalink
- Report
10-22-2015
03:01 PM
I've updated everything as far as I know.
I tried to solve the problem by putting the 4 sections of the text in the 4 cardinal directions because, by subbing my text for the plain text, I was able to get one line on the ring without a dimension error popping up. I dont seem able to recreate that was done on the by Mr. JD when he managed that one emboss on that one face
Reply
Topic Options
- Subscribe to RSS Feed
- Mark Topic as New
- Mark Topic as Read
- Float this Topic for Current User
- Bookmark
- Subscribe
- Printer Friendly Page
Forums Links
Can't find what you're looking for? Ask the community or share your knowledge.
Post to forums

