- Subscribe to RSS Feed
- Mark Topic as New
- Mark Topic as Read
- Float this Topic for Current User
- Bookmark
- Subscribe
- Printer Friendly Page
- Mark as New
- Bookmark
- Subscribe
- Mute
- Subscribe to RSS Feed
- Permalink
- Report
I have this part in which i need to Shell 5mm.It keeps giving an error.I could change the design but i would prefer to Shell this part.
Any obvious reasons why it will not Shell.It could be the Loft section causing issue.This is a 2013 part
Regards
IJC
Solved! Go to Solution.
Solved by amaglim. Go to Solution.
Solved by JDMather. Go to Solution.
Solved by CCarreiras. Go to Solution.
Solved by JDMather. Go to Solution.
- Mark as New
- Bookmark
- Subscribe
- Mute
- Subscribe to RSS Feed
- Permalink
- Report
Is there any reason you did this with surfaces rather than strictly solid body?
Workplane1 and 2 are not needed.
Sketch3 is not needed.
Would it be OK for your design for the Loft to be tanagent transitioning into the rounds?
This image is with a Loft that is tangent where yours is sort of conical sharp transition.
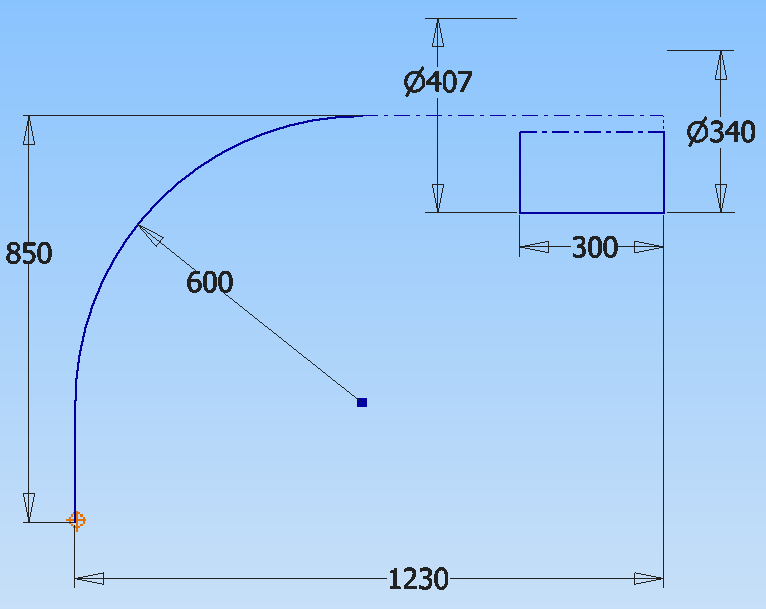
Start a new part file and create Sketch1 as shown below. (Note the position of the origin.)
Create Sketch2 as shown below.
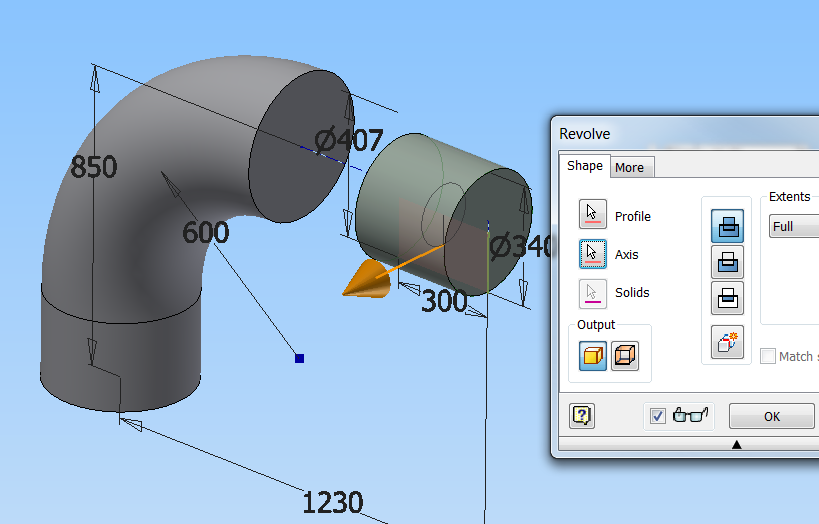
Sweep the circle in Sketch2, make Sketch1 visible again and Revolve the rectangle.
Loft between the end faces of the Sweep and Revolve (not to sketches) and set the Conditions tab to Tangent on both feature edges.
You can control the Weight of the tangency as needed.
-----------------------------------------------------------------------------------------
Autodesk Inventor 2019 Certified Professional
Autodesk AutoCAD 2013 Certified Professional
Certified SolidWorks Professional
- Mark as New
- Bookmark
- Subscribe
- Mute
- Subscribe to RSS Feed
- Permalink
- Report
Thanks JD
I do have a solid version of the finished part (no surfaces)...i was just unsure as to why it would not shell so tried with surface,thicken etc..
Thanks for the help
IJC
- Mark as New
- Bookmark
- Subscribe
- Mute
- Subscribe to RSS Feed
- Permalink
- Report
Hi!
It´s also possible without the tangency (although i agree with it if it is just one complete part).
See the video:
https://screencast.autodesk.com/main/details/3b2c3d71-1ebd-4b3e-bc61-518fb7001595
QUESTION:
Why did you doesn't make it with sheet metal, these are several different parts welded, right? Or it's just one part cast iron?
If it is just one part i agree with the tangency, more realistic.
If it are several welded parts, it's more realistic create the parts in sheet metal environment and mount them in one assembly.
Did you find this reply helpful ? If so, use the Accept as Solution or
Kudos - Thank you!
- Mark as New
- Bookmark
- Subscribe
- Mute
- Subscribe to RSS Feed
- Permalink
- Report
Thanks Carlos...i did use the thicken tool as well originally 1 of the attempts....thanks for the help
- Mark as New
- Bookmark
- Subscribe
- Mute
- Subscribe to RSS Feed
- Permalink
- Report
Here's another way of doing (2013 file).
Walter
Walter Holzwarth
- Mark as New
- Bookmark
- Subscribe
- Mute
- Subscribe to RSS Feed
- Permalink
- Report
Hmm. This version is more straightforward.
Walter Holzwarth
- Mark as New
- Bookmark
- Subscribe
- Mute
- Subscribe to RSS Feed
- Permalink
- Report
Here there is another possible solution that uss the original geometry.
The idea s to split all the closed faces.
I have used Inventor 2014.
- Mark as New
- Bookmark
- Subscribe
- Mute
- Subscribe to RSS Feed
- Permalink
- Report
Hi
I tried opening your 2014 file but it will not open...is it a 2015 version part and not a 2014 part?
Thanks
- Mark as New
- Bookmark
- Subscribe
- Mute
- Subscribe to RSS Feed
- Permalink
- Report
Following your way, the solid could be split, shelled, and mirrored as body.
Thus you don't have the split lines.
Walter Holzwarth
- Mark as New
- Bookmark
- Subscribe
- Mute
- Subscribe to RSS Feed
- Permalink
- Report
Is it possible for a 2014 part of your attempt amagliani or Walter do you have a 2014 version of amagliani attempt showing the following..
Following your way, the solid could be split, shelled, and mirrored as body.
Thus you don't have the split lines.
Thanks
- Mark as New
- Bookmark
- Subscribe
- Mute
- Subscribe to RSS Feed
- Permalink
- Report
@ijc wrote:
Following your way, the solid could be split, shelled, and mirrored as body.
Thanks
See attached.
-----------------------------------------------------------------------------------------
Autodesk Inventor 2019 Certified Professional
Autodesk AutoCAD 2013 Certified Professional
Certified SolidWorks Professional
- Mark as New
- Bookmark
- Subscribe
- Mute
- Subscribe to RSS Feed
- Permalink
- Report
Hi All,
I have asked a colleague to prepare a 2014 example. I have no idea if you can access screencast, but in case there is a video showing the minimal change to the body to make the shell work.
https://screencast.autodesk.com/Main/Details/3c5ef3e8-3cab-47d7-8f65-94a46007d7f1
I have not found any way to remove the split lines.
My idea was not to section the body in two parts and then to use a mirror, but just to split the face that is creating problems.
- Mark as New
- Bookmark
- Subscribe
- Mute
- Subscribe to RSS Feed
- Permalink
- Report
Hi! There is nothing wrong with the way you model the part. The shell failure is not normal. It seems to fail at 4.9994 to 5.0000mm on R2015. Any value outside of the range works fine. The interesting thing is if I recreate the sweep surface, the shell will work on R2015. I will forward this case to development for further investigation.
Thanks!

Johnson Shiue (johnson.shiue@autodesk.com)
Software Test Engineer
- Mark as New
- Bookmark
- Subscribe
- Mute
- Subscribe to RSS Feed
- Permalink
- Report
As Johnson has pointed out the shell shouldn't fail and so the ASM team is investigating this issue.
Thanks for bringing this issue to our attention.

Ben Hazard
SQA Engineer
Autodesk ShapeManager
Design, Lifecycle and Simulation
Autodesk, Inc.
- Subscribe to RSS Feed
- Mark Topic as New
- Mark Topic as Read
- Float this Topic for Current User
- Bookmark
- Subscribe
- Printer Friendly Page
Forums Links
Can't find what you're looking for? Ask the community or share your knowledge.


