
Change base in combined part

Change base in combined part

svacrap
Participant Participant
1,364 Views
6 Replies
Message 1 of 7

Change base in combined part

svacrap
Participant
Participant

Hello dear fellow Inventors,


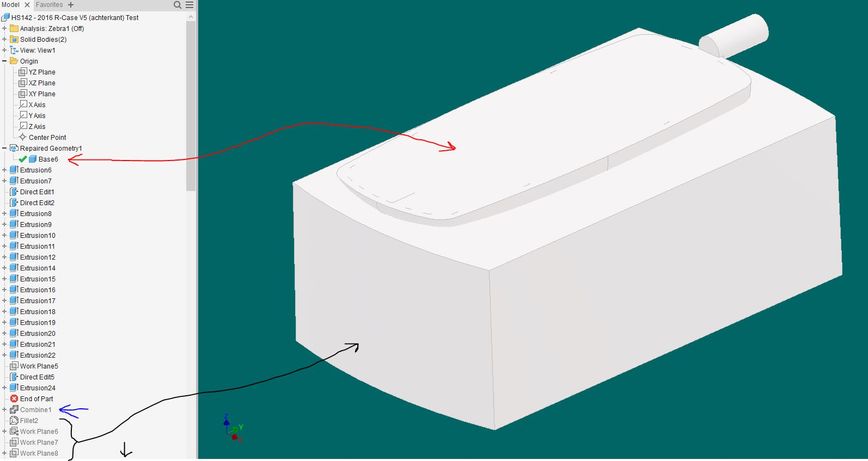
I want to change a base component in a combined part.


The red arrow is the part I want to change for an other part.

The Blue arrow is the combined feature, the base part with the 'squared' block.

The Black arrow are all the features (which are a looooot), for the block.


So, to prevent doing all the black arrow features work again, is there a way to change the Base (Base6)? 
  

Question change base combined component.JPG


I found a post on this forum but in my opinion, there was not an anwer given.


https://forums.autodesk.com/t5/inventor-forum/changing-base-component-reference-of-derived-part/td-p...


Thanks in advance!!


0 Likes
Accepted solutions (1)
1,365 Views
6 Replies
Replies (6)
Message 2 of 7

andrewiv
Mentor
Mentor

You should look at the Direct edit command.  This will allow you change solids without the feature tree.

Andrew In’t Veld
Designer / CAD Administrator

Message 3 of 7

svacrap
Participant
Participant

Unfortunately, the base part is a step file (from SolidWorks). The thing that i needed to change was not possible by the feature 'direct edit'. 


The one who changed it in the right way did that also in SolidWorks. Now i have the right step file, but I need to change the new one with the old one.


So unfortunately, this is not the solution for me :). 

0 Likes
Message 4 of 7

andrewiv
Mentor
Mentor

In that case, I don't think you can do what you are looking for.  You could copy the solid from the new step file into this one and then delete the original one, but that will blow up any features that are dependent on the original solid.  If you had referenced the step file instead of converting it then you could replace the step file and it would update in the ipt, but you're past that point.

Andrew In’t Veld
Designer / CAD Administrator

Message 5 of 7

svacrap
Participant
Participant

I am afraid you are right 😞


I shall try if there are other options. If so, I shall post them here. If somebody else do have a solution...

0 Likes
Message 6 of 7

torbjorn_heglum2
Collaborator
Collaborator
Accepted solution

You could do something like this:

1. Import the new step file o a new Inventor part

2. Move EOP above or up to the base feature

3. Derive the newly created part, and move it as required by direct edit. Break link if you want it independent, suppress link if you want to have the possibility for future updates.


Now you should have a body before all other features, and you should be able to delete the initial body. (delete face, lump). Would expect that some downstream feature repairs are required, but that cannot be avoided.


Torbjørn

Message 7 of 7

svacrap
Participant
Participant

That is a step in the right direction!


Well I did not followed all the steps but 1 and 2 are the basics.

I made a step file of the new base component. Imported it in the old part (very helpfull). I was lucky that it was placed exactly over the old wrong base component. Than, I extruded cut the old wrong base component from the underside so that is was alsmost gone ('deleted' the wrong base). After that, I selected the new base with the feature 'component'.


So, you pointed me out on working on derived parts and that is a part I still a feature I need to learn.

You are right. Some features need some repairs but that is ok. The most complex features are stil intact. A advantage if you work with planes :).


Absolute not the prettiest solution, but it works and for this project, the amount of time I spared is prio 1.


I shall mark your answer as solution, but I am not 100% sure. Anyway, I shall test it out in the feature (or maybe someone else :).


Thanks all of you, wish you the best.

0 Likes