I would like to make a part that is round, and where the top is higher in one place than in others.
The height would be a constant on each radius towards the center. The purpose is to make a hinge that returns to the center.
Imagine the part above the yellow line cut out, and the yellow line to follow the circumference of the barrel.
Is modelling this possible in Fusion 360? I haven't found a way I could do it.
Perhaps a better picture:
Solved! Go to Solution.
Solved by HughesTooling. Go to Solution.
Hi,
please show a picture of a real existing object
günther
Hi,
please show a picture of a real existing object
günther
@lure23 ,
Something like this?
https://knowledge.autodesk.com/community/screencast/1e9c8a37-9df0-4698-9418-096abd1860c5
If you find my answer solved your question, please click the "Accept Solution" button
Sujay D'souza@lure23 ,
Something like this?
https://knowledge.autodesk.com/community/screencast/1e9c8a37-9df0-4698-9418-096abd1860c5
If you find my answer solved your question, please click the "Accept Solution" button
Sujay D'souzaHi,
@dsouzasujay
It honours you to consider what the questioner might have meant.
However, at this point I would like to appeal to all questioners to present their concerns in such a way that potential helpers do not have to call on the help of a crystal ball.
günther
Hi,
@dsouzasujay
It honours you to consider what the questioner might have meant.
However, at this point I would like to appeal to all questioners to present their concerns in such a way that potential helpers do not have to call on the help of a crystal ball.
günther
@g-andresen wrote:have to call on the help of a crystal ball.
This thread that goes into how to create a cylinder cam might help. Start from post #8.
Mark
Mark Hughes
Owner, Hughes Tooling
Did you find this post helpful? Feel free to Like this post.
Did your question get successfully answered? Then click on the ACCEPT SOLUTION button.
This thread that goes into how to create a cylinder cam might help. Start from post #8.
Mark
Mark Hughes
Owner, Hughes Tooling
Did you find this post helpful? Feel free to Like this post.
Did your question get successfully answered? Then click on the ACCEPT SOLUTION button.
@g-andresen You are spot on that I should have included a photo. But I don't even know what these forms are called - so... "cylinder cam" it seems. Kudos, @HughesTooling for understanding my cues!
@dsouzasujay Also - awesome videos. My case would have been the third (extrude from center outward). The work-around I now got suffices my need.
Notes on where I went and the obstacle faced.
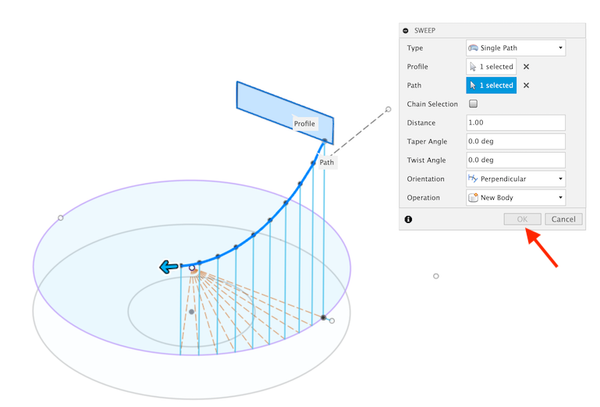
Instead of using multiple planes, I created the fan pattern and the 3D path in one sketch, with parametrically rising 3D lines as one can see.
Then connected the points at the top, but for some reason Fusion 360 doesn't like me sweeping with a spline as the path. (Will see the video again - because I think it did exactly that). Why is my 'OK' disabled?
Can you export the design as an F3D and upload here?
Thanks Mark
Mark Hughes
Owner, Hughes Tooling
Did you find this post helpful? Feel free to Like this post.
Did your question get successfully answered? Then click on the ACCEPT SOLUTION button.
Can you export the design as an F3D and upload here?
Thanks Mark
Mark Hughes
Owner, Hughes Tooling
Did you find this post helpful? Feel free to Like this post.
Did your question get successfully answered? Then click on the ACCEPT SOLUTION button.
Notes on where I went and the obstacle faced.
Instead of using multiple planes, I created the fan pattern and the 3D path in one sketch, with parametrically rising 3D lines as one can see.
Then connected the points at the top, but for some reason Fusion 360 doesn't like me sweeping with a spline as the path. (Will see the video again - because I think it did exactly that). Why is my 'OK' disabled?
---
Edit: Got further in the above situation by selecting Path + Guide Surface (using a temporary extruded cylinder face) - that works!
But that outcome wasn't quite smooth and I disliked that one needs to tune the splines by hand (two of them!).
Here is a way that doesn't involve spline tuning.
1. Create "step" points in a 3D sketch as shown above (but no need to connect them by spline).
2. Surface > Loft them together. I left the topmost (0 step) out.
3. At this point, I extruded a solid body to the surface. Needed to Surface > Modify > Extend the surface since their outlines were the same and "Extrude To" didn't like it.
4. Mirrorred the body
5. Joined the gap (by Solid > Revolve)
6. Smoothened the top (Fillet)
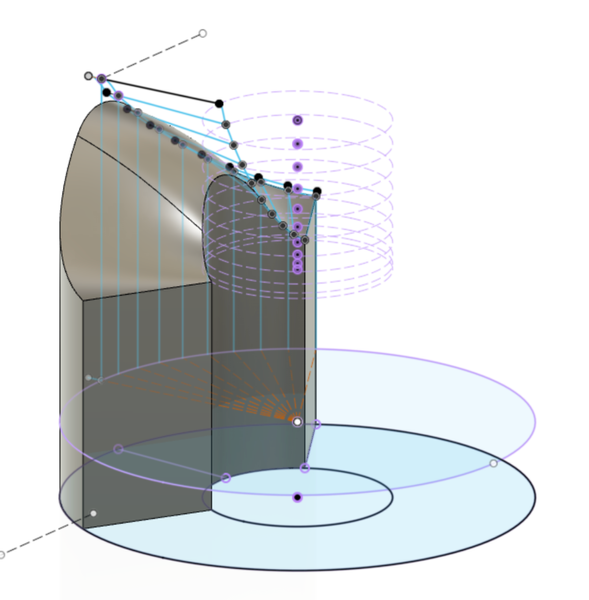
This is still not mathematically ideal since not all surface lines are radial-from-center-and-horizontal (in lack of better terms) but this is good enough. The non-radialness comes from the use of Fillet and can thus be done differently, if someone wants a "horizontal" body (ie. where the highest peak doesn't lean downwards, as it does in the picture).
Hint: Inspect > Isocurve analysis > Type: U may be useful in seeing the forms.
DISCLAIMER:
I needed to struggle with the Fustion 360 Forums as well. Ran out of time editing the above post. That's why the duplicate. I got what I wanted - thanks for the help.
Doesn't emboss get you something closer to what you need? See attached file.
Mark Hughes
Owner, Hughes Tooling
Did you find this post helpful? Feel free to Like this post.
Did your question get successfully answered? Then click on the ACCEPT SOLUTION button.
Doesn't emboss get you something closer to what you need? See attached file.
Mark Hughes
Owner, Hughes Tooling
Did you find this post helpful? Feel free to Like this post.
Did your question get successfully answered? Then click on the ACCEPT SOLUTION button.
Can't find what you're looking for? Ask the community or share your knowledge.