Mirrored Bones Are Black

Mirrored Bones Are Black

Anonymous
Not applicable
3,670 Views
14 Replies
Message 1 of 15

Mirrored Bones Are Black

Anonymous
Not applicable

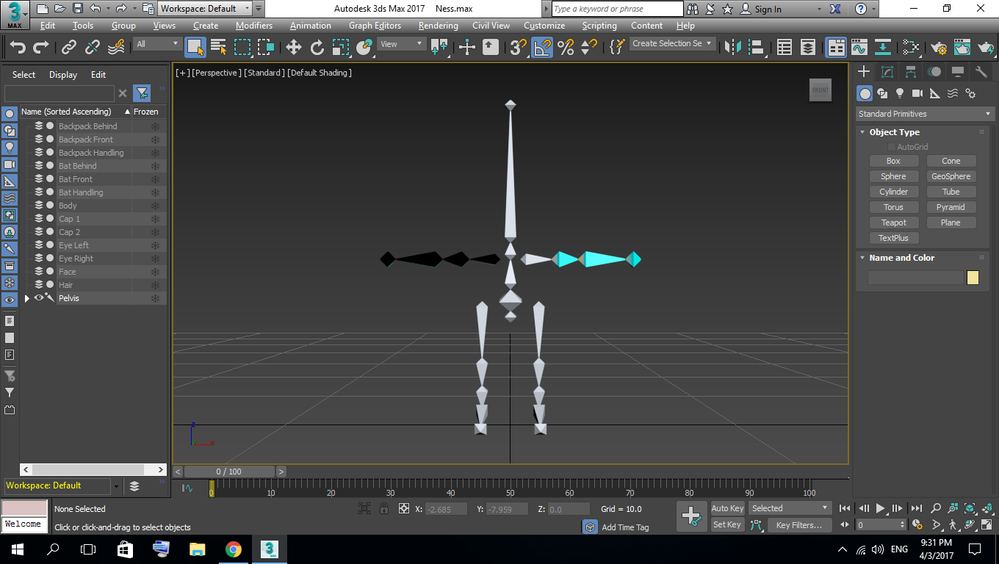
When I mirrored the bones from the left arm to the right arm, it's black!


Screenshot (21).png


I had it black when I mirrored the bones from left leg to right leg, but after I mirrored it again, it's white! I don't know how or why!

0 Likes
3,671 Views
14 Replies
Replies (14)
Message 2 of 15

klvnk
Collaborator
Collaborator

there are "inside out" ie all the normals are facing inwards. Adding an editable mesh mod and flipping the normals should fix it.

0 Likes
Message 3 of 15

Anonymous
Not applicable

Hello zmugeem,


how did you mirror the bones? What you should kee in mind is that mirroring nodes with the standard-mirror tool is the same as a negative scale (check the scaling values before and after mirroring). This causes problems when these nodes are used in a rig and you should use the according options in the "Bone Tools". You can find it in the animation-menu. Bones are correctly mirrored on the other side without negativ scalingValues then.


Hope this helps you!


Cheers,

Martin

0 Likes
Message 4 of 15

Anonymous
Not applicable

How do I add an editable mesh mod and flip the normals? Can you please write a step by step reply like:


"Go to X > Click X > etc > etc"


I'm currently following this:

https://www.youtube.com/watch?v=W13OxAM8F8w&list=PLnKw1txyYzRlxh1-BT4CifPXC5TBg2vUd&index=7


(Extra note: When I go to the Width in Bone Tools and delete the minus I'm putting, it turns to the original color but not properly adjusted)

0 Likes
Message 5 of 15

Anonymous
Not applicable

Anybody found a solution? As for the right legs, it turns out I duplicated it but I didn't reset the stretch and invert the Width and Height value like in the video I am watching. After I did so, the right legs turned black!


https://youtu.be/M06ZBn6DJcI?t=6m34s

0 Likes
Message 6 of 15

denisT.MaxDoctor
Advisor
Advisor

don't watch bad or old tutorials!


you don't need to mirror 'mirror' bones. just move them to the mirror position and rotate their pivot only about side axis (by default it's Z)


delete objects

mapped fn rotateZPivotOnly obj =
(
	local rot = eulerAngles 0 0 180 
	rot = inverse (rot as quat)
	
	animate off in coordsys local obj.rotation *= rot
	obj.objectoffsetrot *= rot
	obj.objectoffsetpos *= rot
	obj.objecttransform
)

(
	b0 = boneSys.createBone [0,10,100] [10,10,50] [0,1,0] 
	b1 = boneSys.createBone [10,10,50] [0,10,10] [0,1,0]
	b1.parent = b0
	b2 = boneSys.createBone [0,10,10] [10,10,0] [0,1,0]
	b2.parent = b1
	b3 = boneSys.createBone [10,10,0] [14,10,-4] [0,1,0]
	b3.parent = b2
	
	oldNodes = #()
	newNodes = #()
	maxOps.CloneNodes b0 offset:[0,-20,0] expandHierarchy:on cloneType:#copy actualNodeList:&oldNodes newNodes:&newNodes 
	
	newNodes.parent = undefined
	rotateZPivotOnly newNodes
	
	for k=1 to newNodes.count-1 do newNodes[k+1].parent = newNodes[k]
	newNodes
)


Message 7 of 15

Anonymous
Not applicable

Why is it bad? It's official from Autodesk. Can you give me a better, simpler tutorial? Besides, I really didn't understand what's your solution. Please elaborate.

0 Likes
Message 8 of 15

Anonymous
Not applicable

Select the bone chain by double-clicking. Go to modifier list and apply a Normal modifier to the bones. Check the Unify Normals and to check or uncheck the Flip Normals depends upon the side the normals have flipped after selecting the Unify Normals. This fixed my issue. I was also following the same tutorial for rigging character.

Message 9 of 15

Anonymous
Not applicable

hi there, i tried this thing already...the only problem in think can occer is that the bone loses its properties....cuz the normal modifier is on top...do we have to select Bone modifier every time to edit it?


0 Likes
Message 10 of 15

wise26E6H
Enthusiast
Enthusiast

I also did this tutorial. Stretching the bones> Minus size> The color of the bones turned black, but I returned the color with the modifier's normals> Invert normals and continued working.
Local coordinates> Rotate> Both bones have moved in sync. I also set IK settings, link helpers, and even skins.
I'm not sure if this is the correct processing method, but I was able to produce it without any problems.
The production environment is 3ds Max 2021

0 Likes
Message 11 of 15

krystianponiewaz06
Observer
Observer
yea, it work. Thanks!
0 Likes
Message 12 of 15

Byteman
Collaborator
Collaborator

It's been a while since the last message on this thread. I did have the same problem. Don't like the idea of flipping normals. God knows what else will be flipped but force 2-sided option for the viewport can solve the problem if this is just about visual. 

I remember a Force 2-sided option for the viewport display, too but couldn't find it anywhere. Found it in help -as being in  Viewport Configuration dialog but it's not anywhere there. 

Used a Standard Material instead with its 2 Sided rendering option turned on. Assigned the material to the bones. They're already non-renderable so display is fine.

0 Likes
Message 13 of 15

denisT.MaxDoctor
Advisor
Advisor

Your suggestion is not about how to solve the problem, but how to make it unnoticeable.

0 Likes
Message 14 of 15

Byteman
Collaborator
Collaborator

You're right @denisT.MaxDoctor.

If anyone just feels annoyed in visual aspect. 🙂


I would regret to be seen as complaining about such a brilliantly organized and presented tutorial. 

It just has inconsistencies from version to version due to changes in the versions-  Flipping in mirrored bones is the least important of problems on my part. 

Started rigging a character in Max 2022 for plugin compatibility concerns with an old scene. The controller objects which are supposed to move up after assigning Position Constraints move to the ground instead(z=0). (which the And the Keep Initial Offset setting in the Motion Panel which is supposed to get them back does nothing. I've been trying to understand at what point I've done something wrong to be this way, ran through the tutorial several times. Apparently it works the same as the version in the tutorial in the latest Max version. I now wonder if it will work fine after 2022 conversion.


0 Likes
Message 15 of 15

Richard.lee.personal
Observer
Observer

This is an old original post, but I have come across it many times and from the span above its somewhere people land a lot. Its also still a problem if following that old 12 year old tutorial (3ds Max 2026). Someone above posted, don't mirror bones, and I agree. The way I do it is as follows:


I first create point helpers for all the limb joints on one side, plus the final end points - shoulder, elbow, wrist, hand, base of each finger, one for each knuckle and the finger tips; top of the thigh, knee, ankle, midfoot, ball of foot, each toe knuckle and tips of each toe. Leaving Nubs on.


Then I hide all but those helpers. Switch the the view that makes most sense. Turn on snapping Pivot/End Point flags only. Then create the bones by connecting the helpers from shoulder to finger tips and thigh top to toe tip.


Then is check the X position of the helper nearest the x axis (lowest x value) - usually the shoulder and make a note of it. With helpers set in the selection filter (ribbon), I then select all the helpers and mirror them about X with an offset equal to twice the x value I noted down.


Then I hide all the original helpers, leaving the mirrored ones, and create bones for them in the same way. 


Leave the NUBs on.


Then select all the new limb bones, except the NUBs, and rotate the pivot points 180 degrees in Y.


Select all the new bones and in bone tools click the Realign, reset stretch and reset scale buttons. (its a good ides to do this to all bones if the pivot is changed).


Not as fast a just mirroring, but not that much slower - and without all bugs and stress of fixing things after with crazy workarounds.
0 Likes