Community
3ds Max Modeling
Welcome to Autodesk’s 3ds Max Forums. Share your knowledge, ask questions, and explore popular 3ds Max modeling topics.
Turn on suggestions
Auto-suggest helps you quickly narrow down your search results by suggesting possible matches as you type.
Reply
Topic Options
- Subscribe to RSS Feed
- Mark Topic as New
- Mark Topic as Read
- Float this Topic for Current User
- Bookmark
- Subscribe
- Printer Friendly Page
- « Previous
-
- 1
- 2
- Next »
Message 1 of 35
Anonymous
6718 Views, 34 Replies
07-15-2017
01:31 AM
- Mark as New
- Bookmark
- Subscribe
- Mute
- Subscribe to RSS Feed
- Permalink
- Report
07-15-2017
01:31 AM
Hi All, I've been stuck on this all day! I need advise on how to convert a 2d .dxf file (attached) into a 3d object in 3ds Max. My workflow has been: import into 3ds max > create editable spline > extrude or bevel. When I try and extrude / bevel, Max crashes. Any ideas? Thanks in advance
Solved! Go to Solution.
Solved by Fadhil_Farook. Go to Solution.
Solved by Fadhil_Farook. Go to Solution.
Solved by Fadhil_Farook. Go to Solution.
Solved by Fadhil_Farook. Go to Solution.
34 REPLIES 34
Message 21 of 35
07-31-2017
04:27 AM
- Mark as New
- Bookmark
- Subscribe
- Mute
- Subscribe to RSS Feed
- Permalink
- Report
07-31-2017
04:27 AM
You can do it two ways.
1. Apply a UVW map modifier and select Planar mapping. (check or uncheck Real-World Map Size depending on which suits the best. Before you do this, you can apply a checker map as material to see if there are distortions in the texture and the scale of it as well.) To scale up/down the texture size, you click the small arrow to the left of the UVW map modifier and select Gizmo under it. Then after using the scale tool, scale it up/down as you wish.
*2. Apply an Unwrap UVW map modifier. After applying the modifier do the following:
1. Under Selection, select the polygon sub-object mode. Keyboard shortcut key is "3". (unless it's already selected)
2. Under Configure, uncheck Normalize Map and then go to Edit UV's > Open UV Editor.
3. Press ctrl + A to select all the polygons then go to Projection and click on the Planar Map button (the left button next to the Cylinder) and under align options click Z.
4. In the UV Editor, under Arrange Elements click Pack UV's button. (** See attachment for all this steps)
PS! When you open the UV editor immediately after applying the Unwrap UVW modifier, it might seem as if everything is perfect. But it's not. If you notice, the UV is slightly stretched along V (Y axis in the UV editor). The steps mentioned above is to fix this problem.
* The 2nd suggestion is under my assumption that you're not aware of Unwrap UVW map modifier and it's tools. Please bear with me.
** This attachment shows all the Bold and Italic texts from the 2nd suggestion.
Message 22 of 35
07-31-2017
11:37 PM
- Mark as New
- Bookmark
- Subscribe
- Mute
- Subscribe to RSS Feed
- Permalink
- Report
07-31-2017
11:37 PM
Hey Fadhil, THANKS as always. I went with your 2nd suggestion, and yeah your assumption is correct, I'm just learning the Unwrap UVW map modifier ( going through tutorials on Youtube etc) I'm really not sure if I'm doing this right. See attached 'checkered' is this OK? Also see UV_editor.
I exported as FBX and Max gave me a warning. Then importing into UE4 I got another warning. So I feel that I'm still doing something wrong.
Message 24 of 35
08-01-2017
12:21 AM
- Mark as New
- Bookmark
- Subscribe
- Mute
- Subscribe to RSS Feed
- Permalink
- Report
08-01-2017
12:21 AM
Warning in 3DS Max:
Ignore that message. It's popping up because the material that you applied is only supported by 3DS max. It doesn't affect your workflow since you'll probably texture it manually in painting programs or use UE4's shaders. But the image of the UV editor, I see that you've not perfected it. That is... the UV's still appear to be squeezed from the sides. I am able to tell this because the circles appear to be squeezed.
Warning in UE4:
This message is popping up because the height of the object is not unwrapped. First off, this is my fault because you did as I suggested and therefore only the top and the bottom faces were properly UV mapped. I did this because the model's height is almost non existent in your model, so I ignored it's height. I am sorry for that. Unless the height of the model is gonna be visible in Unreal, or you want to texture the height along with the top and bottom faces, you can ignore this warning. But make sure if the height has a real significance, you unwrap it as well.
The warning is probably because because of how UV's are treated in any renderers. Because the height was not properly unwrapped (we used planar mapping meaning it's flat), the height is now just a single line. Meaning no amount of pixels can fit into the UV. The result would be stretched textures (see attachment). If you see the attachment and the highlighted region, the texture is stretched vertically, because that region of the UV is flat in the UV editor (I failed to notice that when I was unwrapping that model). If your model's height is gonna be so small as to be not noticed, just ignore this. As long as what people see is fine, you're good to go.
Message 25 of 35
08-01-2017
12:41 AM
- Mark as New
- Bookmark
- Subscribe
- Mute
- Subscribe to RSS Feed
- Permalink
- Report
08-01-2017
12:41 AM
Thanks for explaining all this, I really appreciate it.
Re: "the image of the UV editor, I see that you've not perfected it. That is... the UV's still appear to be squeezed from the sides. I am able to tell this because the circles appear to be squeezed." How do I perfect it? I'm not sure what I'm doing wrong.
Good to know I don't have to worry about the sides. The objects act as 'platforms in space' in UE4 with an emissive material, so I won't worry about the sides then. See attached examples.
Is there anything else I should do to the objects in Max to optimise for UE4?
Message 26 of 35
08-01-2017
12:46 AM
- Mark as New
- Bookmark
- Subscribe
- Mute
- Subscribe to RSS Feed
- Permalink
- Report
08-01-2017
12:46 AM
Thanks for explaining all this, I really appreciate it.
Re: "the image of the UV editor, I see that you've not perfected it. That is... the UV's still appear to be squeezed from the sides. I am able to tell this because the circles appear to be squeezed." How do I perfect it? I'm not sure what I'm doing wrong.
Good to know I don't have to worry about the sides. The objects act as 'platforms in space' in UE4 with an emissive material, so I won't worry about the sides then. See attached.
Is there anything else I should do to the objects in Max to optimise for UE4?
Message 27 of 35
08-01-2017
02:47 AM
- Mark as New
- Bookmark
- Subscribe
- Mute
- Subscribe to RSS Feed
- Permalink
- Report
08-01-2017
02:47 AM
If you're not gonna texture the object and the emissive is always on... then there's really no need to worry about unwrapping. Why? The reason is that the object is emitting a single color and is uniform. So these objects at actually acting as a light source. There's no need to unwrap these objects.
About the squeezed Circles... Following my previous answer where I posted about the Unwrapping method in the correct order as mentioned should fix this issue.
Message 28 of 35
08-01-2017
06:01 AM
- Mark as New
- Bookmark
- Subscribe
- Mute
- Subscribe to RSS Feed
- Permalink
- Report
08-01-2017
06:01 AM
That's great! Makes the workflow much easier. I thought I had to unwrap because of the UE4 warning. Ok cool then. THANK YOU SO MUCH FADHIL. Really really appreciate it.
Message 29 of 35
08-01-2017
06:10 AM
- Mark as New
- Bookmark
- Subscribe
- Mute
- Subscribe to RSS Feed
- Permalink
- Report
08-01-2017
06:10 AM
Oh one last question! Is there anything else I should do to the object to optimise it for UE4? Like is the polycount as best as it can be? I'm going to be importing a lot of these into the level.
Message 30 of 35
08-01-2017
06:29 AM
- Mark as New
- Bookmark
- Subscribe
- Mute
- Subscribe to RSS Feed
- Permalink
- Report
08-01-2017
06:29 AM
honestly, your object is very much not suited for any game engines for one particular reason, not just poly/tricount. Your objects are not made of quads, but are all n-Gons. It means, any polygon that has more than for vertices that are unconnected such as pentagon, hexagon etc... See attachment for better understanding it.
Before continuing, you can ask any lead artist or programmers if they are ok with the objects the way they're now. But usually, for games or any other CGI, and 3D models we work with quads (four sided polygons) or minimum, Triangles (although we try to avoid it wherever we can). This can provoke warnings in UE as well if I remember right.
Message 31 of 35
08-01-2017
06:08 PM
- Mark as New
- Bookmark
- Subscribe
- Mute
- Subscribe to RSS Feed
- Permalink
- Report
08-01-2017
06:08 PM
right, thanks Fadhil. . can I retain the same geometry if converting to quads or tris? Any tips? I'll start researching this.
Message 32 of 35
08-01-2017
08:16 PM
- Mark as New
- Bookmark
- Subscribe
- Mute
- Subscribe to RSS Feed
- Permalink
- Report
08-01-2017
08:16 PM
Hey Fadhil,
I've been thinking about it and. . do you want any part time work? I feel bad to always hassle you with endless questions. If you could help me establish a clear pipelines to get these assets optimised for UE4, I'm happy to pay for that. I'd like to do the work myself, just I need to map out a pipeline with correct technique/ best practice.
I'm aiming to import up to 1000 of these graphics into a level. The project is a VR exhibition of crop circles true to their original scale. If you're not aware of crop circles, they are graphics that appear in various crops worldwide, made by anonymous artists. see attached CC_scale to get an idea how big these things are. VR is a great medium to view these true to their original scale, however building a level that can handle such huge imagery is the challenge. So I need to make these assets as lightweight as possible. My idea is to have a menu to navigate through designs so they are displayed individually.
Re the n-Gons problem. I tried the 'turn to poly' modifier. See before (1) and after (2). . is this any better?
I read that n-gons are ok as 2d meshes. I don't need these graphics to be 3d objects. They could be 2d planes if this is a better option.
So if you're interested in some stop/start work, let me know. Also. . if you don't have time for this just let me know too/ I really don't want to exploit your generosity. My background is in the arts, mostly film making, this VR medium is a steep learning curve so thanks for easing that 🙂
Message 33 of 35
08-02-2017
04:10 AM
- Mark as New
- Bookmark
- Subscribe
- Mute
- Subscribe to RSS Feed
- Permalink
- Report
08-02-2017
04:10 AM
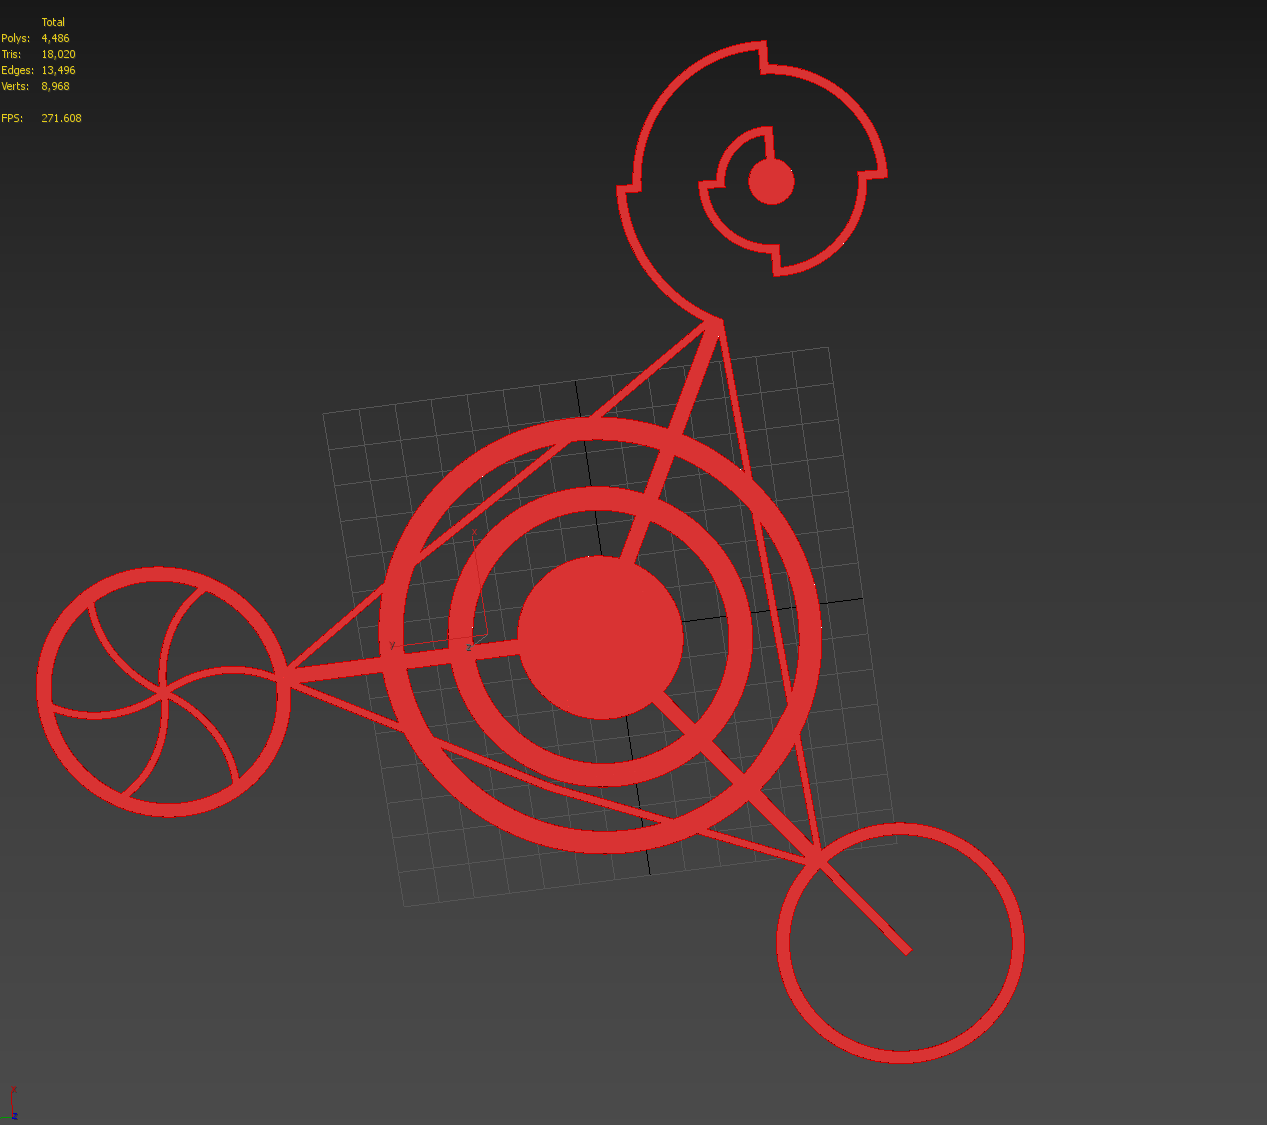
Sure, I would love to... But I would like to know if you really need all those polygons to start with. Because It seems to me that it's very high poly. You should consider the polycount for all 1000 objects. Because game engines can handle anywhere between 1 to 3 millions (may be few more), before it starts to lag. You should also consider the users and their hardware and technology. So it's best to optimize further.
Message 34 of 35
08-02-2017
06:40 PM
- Mark as New
- Bookmark
- Subscribe
- Mute
- Subscribe to RSS Feed
- Permalink
- Report
08-02-2017
06:40 PM
That's awesome! Thanks Fadhil. Do you have an hourly rate? Let me know how you want to work this. Really happy to collaborate with you. Your expertise is very welcome. I'm in Melbourne, Australia. not sure if we're on the same time zone.
The less polygons the better for sure. The important thing is to retain the geometry of the designs. As the objects are greatly enlarged in VR, there has be a certain amount of detail to retain real curves on the circles, as well as sharp corners / angles with the straight line work. As this is an accurate document of the crop circles in VR, I need to retain the original geometry and scale. Can we lower poly count while keeping geometry unaffected?
Also, I am yet to figure out a way to accurately translate the original scale of the crop circles into VR.
Message 35 of 35
08-04-2017
12:14 AM
- Mark as New
- Bookmark
- Subscribe
- Mute
- Subscribe to RSS Feed
- Permalink
- Report
- « Previous
-
- 1
- 2
- Next »
Reply
Topic Options
- Subscribe to RSS Feed
- Mark Topic as New
- Mark Topic as Read
- Float this Topic for Current User
- Bookmark
- Subscribe
- Printer Friendly Page
- « Previous
-
- 1
- 2
- Next »
Forums Links
Can't find what you're looking for? Ask the community or share your knowledge.
Post to forums
