Community
- Forums Home
- >
- 3ds Max Community
- >
- 3ds Max Modeling forum
- >
- Blueprints Not Lining Up Correctly [Picture Inside]
3ds Max Modeling
Welcome to Autodesk’s 3ds Max Forums. Share your knowledge, ask questions, and explore popular 3ds Max modeling topics.
Turn on suggestions
Auto-suggest helps you quickly narrow down your search results by suggesting possible matches as you type.
Reply
Topic Options
- Subscribe to RSS Feed
- Mark Topic as New
- Mark Topic as Read
- Float this Topic for Current User
- Bookmark
- Subscribe
- Printer Friendly Page
Message 1 of 5
Anonymous
967 Views, 4 Replies
05-24-2011
07:52 PM
- Mark as New
- Bookmark
- Subscribe
- Mute
- Subscribe to RSS Feed
- Permalink
- Report
05-24-2011
07:52 PM
Blueprints Not Lining Up Correctly [Picture Inside]
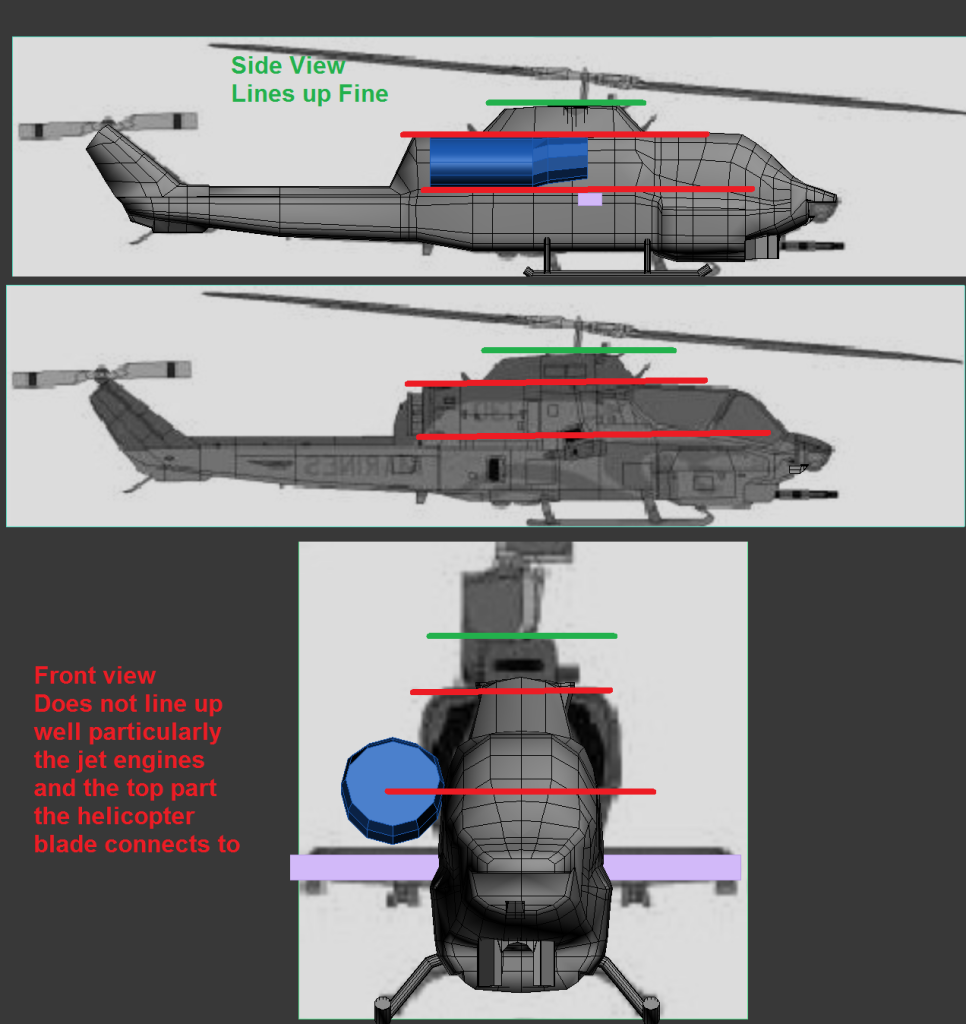
This is the first time I have had this much trouble with blueprints. I downloaded the blueprints for a Cobra Helicopter, and the side and front blueprints are not lining up correctly at all. I am not sure if this may be an issue with the actual blueprints themselves, or something I may be doing incorrectly. Below illustrates the problem, the green and red lines show areas where the front and side blueprints do not line up at all. Here are the blueprints I am using, I cropped both the front and side blueprints from the top and bottom most point. http://www.the-blueprints.com/blueprints/modernplanes/bell/26473/view/bell_ah_1w_supercobra/
Here are shots showing the plane dimensions and the dimensions of the actual file to show they are set up correctly.
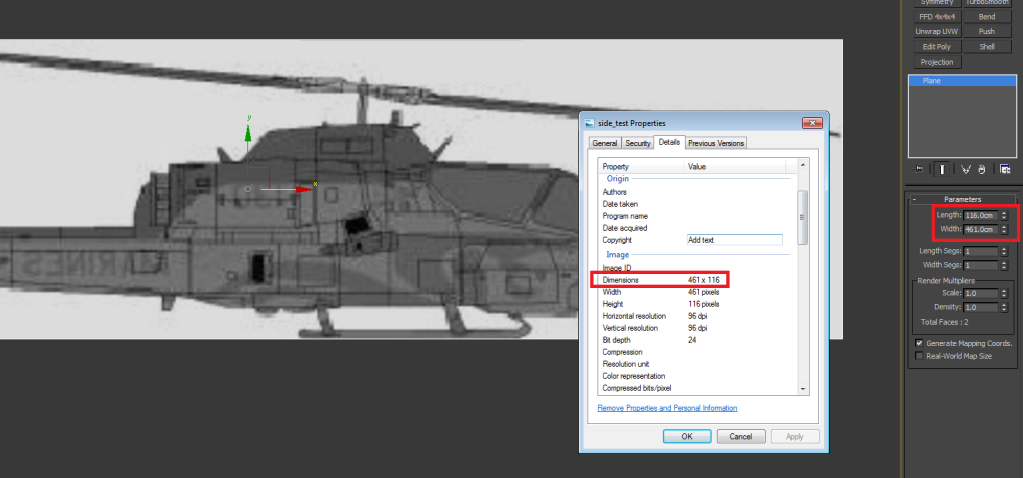
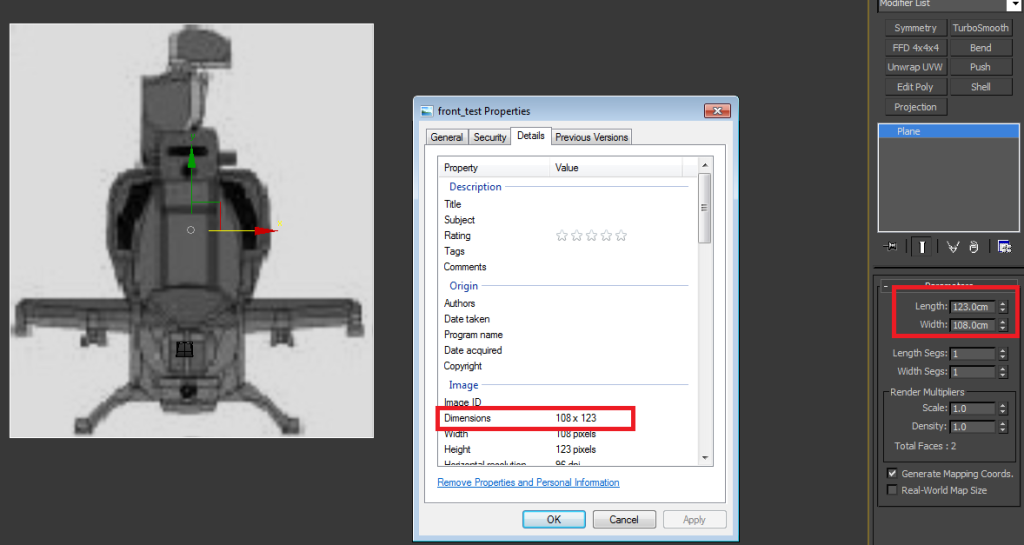
Here are shots showing the plane dimensions and the dimensions of the actual file to show they are set up correctly.
4 REPLIES 4
Message 2 of 5
05-24-2011
08:27 PM
- Mark as New
- Bookmark
- Subscribe
- Mute
- Subscribe to RSS Feed
- Permalink
- Report
05-24-2011
08:27 PM
Rather than messing around with using uvw-mapping and/or offsets in the material editor to try and align this up. I would simply correct this in an application like photoshop and then you do not need to touch 3dsmax. I have attached an example.

--------------------------------------------------------------------------------------
Technical 3D Graphic Artist
Autodesk 3dsMax 2015 - Service Pack 4
--------------------------------------------------------------------------------------
Technical 3D Graphic Artist
Autodesk 3dsMax 2015 - Service Pack 4
--------------------------------------------------------------------------------------
Message 3 of 5
Anonymous
in reply to:
Anonymous
05-24-2011
08:52 PM
- Mark as New
- Bookmark
- Subscribe
- Mute
- Subscribe to RSS Feed
- Permalink
- Report
05-24-2011
08:52 PM
Blakestone, thank you for your response I appreciate it. Besides the grid ruler what other tools did you use to accomplish this? I am new to photoshop, my apologies.
Message 4 of 5
05-24-2011
09:14 PM
- Mark as New
- Bookmark
- Subscribe
- Mute
- Subscribe to RSS Feed
- Permalink
- Report
05-24-2011
09:14 PM
Assuming you have Adobe Photoshop open...
1. Select the Move Tool = (V)
2. Select the Layer you wish to manipulate = in my example its Layer 2
3. Tick the box at the top = Show Transform Controls
- you will see 8 small cubes around the edges of your image
4. Drag the edges to scale your Layer 2 to the size you are after
1. Select the Move Tool = (V)
2. Select the Layer you wish to manipulate = in my example its Layer 2
3. Tick the box at the top = Show Transform Controls
- you will see 8 small cubes around the edges of your image
4. Drag the edges to scale your Layer 2 to the size you are after

--------------------------------------------------------------------------------------
Technical 3D Graphic Artist
Autodesk 3dsMax 2015 - Service Pack 4
--------------------------------------------------------------------------------------
Technical 3D Graphic Artist
Autodesk 3dsMax 2015 - Service Pack 4
--------------------------------------------------------------------------------------
Reply
Topic Options
- Subscribe to RSS Feed
- Mark Topic as New
- Mark Topic as Read
- Float this Topic for Current User
- Bookmark
- Subscribe
- Printer Friendly Page
Forums Links
Can't find what you're looking for? Ask the community or share your knowledge.
Post to forums
