Hello Everyone!
I wanted to make a thread about sharing your favorite tips, tricks, or secrets found within 3ds Max. From awesome hotkey combos to those really essential tools that everyone may not know about, this is the place to share! I've started the ball rolling below with some really cool tidbits on the particle flow presets that people may not be aware of.
Please, share yours too!
Best Regards,
Alfred (AJ) DeFlaminis
3ds Max Technical Support Specialist
Autodesk Here to Help | View Max Tips/Tricks | My Screencasts | Autodesk Virtual Agent | How To Reset User Settings | Change Display Drivers in Max | Feature Request Board | Installation and Licensing Forum | 3ds Max Certified Hardware | Network Rendering Troubleshooting Guide
Hello all!
I wanted to have a tip for some of our newer users who are still familiarizing themselves with the software. If you have a Poly object selected, you can generate interesting topology automatically with a few button clicks as shown below. Some of the topology tools have a mouse-over tooltip with instructions, for example the bricks require an internal edge to be selected to define orientation.
This can be a quick way to make tiling patterns for various flooring and walls or decorative polygon objects for other uses. I do end up using the diagonal lattice quite a bit, personally.
Best Regards,
Alfred (AJ) DeFlaminis
3ds Max Technical Support Specialist
Autodesk Here to Help | View Max Tips/Tricks | My Screencasts | Autodesk Virtual Agent | How To Reset User Settings | Change Display Drivers in Max | Feature Request Board | Installation and Licensing Forum | 3ds Max Certified Hardware | Network Rendering Troubleshooting Guide
A large percentage of the new Max users I interact with struggle with many of the concepts for Texturing and UVs. One task that is important for brush/world geometry for some game engines is that the UVs must be Planar. This video demonstrates how you can do that automatically while modeling an editable poly object and using a Vol. Select + Map Scaler modifiers.
@lightcube wrote:A large percentage of the new Max users I interact with struggle with many of the concepts for Texturing and UVs. One task that is important for brush/world geometry for some game engines is that the UVs must be Planar. This video demonstrates how you can do that automatically while modeling an editable poly object and using a Vol. Select + Map Scaler modifiers.
This always puzzled me (it's not the first time I see that) - why use a Volume Select instead of Poly Select to clear selection (or Mesh Select but my workflow is mostly poly based and I always use Poly Select for that reason)?
That's a good question 🙂
A Poly Select certainly can be used also. And in the specific case that I was using for this video, Poly Select would have worked equally well. I chose to use Vol. Select in part because it's a very useful procedural selection modifier that many of those in my circles do no know about--as such, I wanted to introduce it. A Vol. Select offers more robust control if you intend to actually use sub-object selections further up the stack where using Poly Select essentially cuts off sub-object selection changes that happen below it.
So in the end, Poly Select is certainly a valid choice if just clearing a selection (as in this video) but I'm also hopefully encouraging new Max users to learn about the Vol. Select modifier which is more procedural.
Polar snapping...my God! That's so good. Such a shame that this is the first time I've used it!
Thanks @AdrianWise8371
@AdrianWise8371 you've got more than a few tricks up your sleeve?!
How did you "learn the way" in Max?
Happy weekend,
Melissa
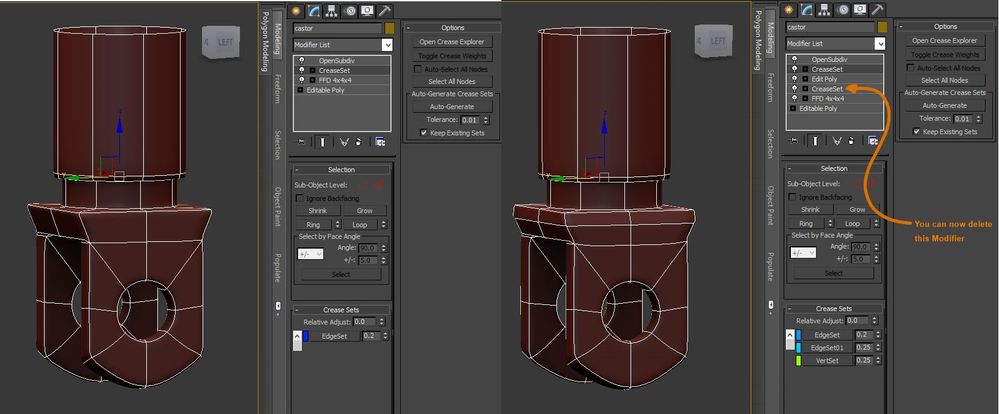
@AdrianWise8371 wrote:Non Destructive Modelling techniques with CreaseSet Modifier.One of the features that sets 3DS Max apart from other applications is modifier stack, the ability to keep a history of the tools that built your geometry, this is known as non-destructive modelling.Some Modifiers are topology dependant, meaning that if your geometry [Vert / Edge / Face Count] changes the modifier no longer works as intended.One of these modifiers is the new CreaseSet Modifier, if you change the geometry below the CreaseSet modifier, the intended results are disturbed. If you need to make changes to your geometry after you have added a CreaseSet Modifier, rather than collapse the CreaseSet down into the geometry [and potentially lose other modifiers in the stack]Add an Edit Poly Modifier make your additions or changes, add a new CreaseSet Modifier and Auto Generate Crease Set, you can then add any new creases you need. and then Delete the earlier Crease Set Modifier and all your Creases are saved in you new CreaseSet Modifier and you stack has not been Collapsed
And when coupled together with the magic of Data Channel modifier, you can have them set automatically without the topology dependent Edit Poly modifier in between:
I this thread. These tips are great!
Best Regards,
Alfred (AJ) DeFlaminis
3ds Max Technical Support Specialist
Autodesk Here to Help | View Max Tips/Tricks | My Screencasts | Autodesk Virtual Agent | How To Reset User Settings | Change Display Drivers in Max | Feature Request Board | Installation and Licensing Forum | 3ds Max Certified Hardware | Network Rendering Troubleshooting Guide
Another thing that I rarely see used yet it's really useful is the Morpher's Capture Current State:
Ah such a shame we couldn't chat at Gunslinger last year....
I Started in 3D Studio Release 3 back in the early 90's and migrated to Max with Release 1 whilst at University in Manchester, my background is product design, so Max was back then my modeller, renderer [Scanline] and animator, I am self taught [before the days of You Tube], I did a lot of things wrong and the hard way for a long time until I met other Maxers. Before I even graduated University I was contracted to teach Max to other students by the university and developed a very focused crash course in how to model and texture products procedurally. I spent a lot of time in Max 1, 2, and 2.5 and then 3 the university skipped 4 [to this day I've never even seen release 4] and then release 5 stayed with me for many years as I then taught [again myself first] SolidWORKS, Solid Edge, and Inventor for modelling and Max for rendering and animation at university whilst freelancing once I graduated in '99 until 2004 when I left the education sector and went into industry full time for a client for a number of years.
In 2006 I briefly worked for a client who was using Max 9 [boy was there a learning curve there!] but I switched to M&E full time creating content [2D & 3D] in 2009 when bought my first copy of Max 2010, as an educator I always told my students the first thing you do when you hit a wall is hit F1 and the context intuitive help will identify where you are and open the relevant help doc, so i did that a lot. Whilst my background was in hard surface modelling I'd never done any character work or rigging so embarked on teaching myself [again] but this time there was You Tube to help and sometimes hinder. I purchased various teaching materials from Arch Viz lighting and rendering to character rigging, just about every focal press book there was on Max, I took the decision to get a Digital Tutors Subscription and whilst there content explains how everything works there was little context as to what and why, I must have watched and created the content for building an IK FK Character rig five times and each time there was a little glitch somewhere that didn't work correctly, by the end I could build that IK FK Rig with out the videos but couldn't tall you why things weren't aligning correctly, or "why" I needed an IK AND an FK rig.
My biggest trick when teaching max was when I taught any tool it was on a simple primitive so you could see what it was doing to a box or sphere, once my student could see what was happening I was then show them how we use it and what we would use it for, explain what and why and then put it in context so they can see when to use it, this was one of the biggest things missing in learning content.
Watershed moment for unlocking the "hidden gems" was Shawn Hendriks meet the experts events with tech specialist and devs. Tapping into their expertise "one more thing" was always the standing joke during the meet the expert sessions because they had so many little tips.
Scene explorers, multiple open configurations
Transform toolbox
Colour pallet
Built in calculator
entering imperial or metric measurements in input fields are automatically converted
I could go on and on. After contributing content for various product launches and AU I got invited to a product preview in London where i met Eddie and Martin. At this meeting were many veteran Max users, during the demonstrations even some seriously talented Max TDs were surprised by hidden gems and tools that had been in Max for years which is what prompted my Facebook page "did you know" I figured if a TD from a multi-national didn't know about the render window lock button in the middle of the UI the maybe I wasn't alone so I figured I'd just start posting all the little things I've found or figure out, I hoped it would become more of a community but as with many other social media platforms there's lots of consumption but not participation.
A
And this video is a personal favourite of mine if only because it shows so many underused tools and concepts in max:
Simple keyboard shortcut tip, so we know W,E,R, are move rotate and scale [and R cycles through the different scale tools].
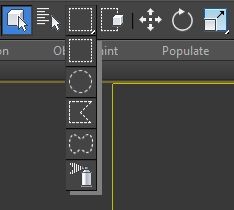
Q keyboard shortcut is the select object tool. Repeatedly pressing it cycles through the different fence tools, rectangle, circle, fence, lasso, and often overlooked spraycan, right click on the spraycan to adjust the nozzle size [default set to 20]
So this is the actual case that gave me the idea for this page. A long time user, during a demonstration of Max 2015 Active shade asked if the padlock was new to 2015 (it isn't its been there for quite a while).
Lock your render output viewport, with the little padlock. No mater which viewport is active, the locked view will always be the rendered viewport. Particularly useful when using active shade.
Not to be confused with the selection lock button next to isolate selection, but that's another post.
Render output settings, Max has a substantial amount of Render Output Presets. Did you know if you right click on any of the Output Resolution buttons you can enter your own settings and keep them for later.
Illustrated are my default output resolutions, portrait/landscape & Draft/Production
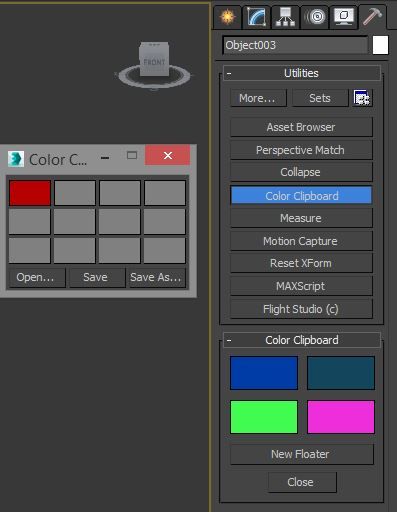
More Utilities Panel Tips. Do you get tired of creating the same colours, enhance your scenes by having you own colour palette there in your scene file.
In the Utilities Panel, Colour Clipboard, Click New Floater, and your own little colour palette appears save your go to colours or the colour palette for you current job, don't forget to save it for later, and then bring it back....
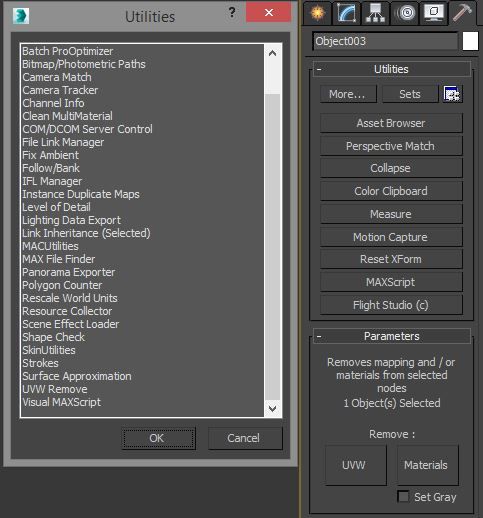
Sometimes its just easier to start a fresh, if you inherit a model and the UV's/Materials just aren't how you like them you can remove them and start again.
in the utilities panel, hit the More... button scroll down and UVW Remove is at the bottom of the list.
you can remove UVW Maps and or Materials assigned to the selected model.
Note: this tool only works on Editable Meshes, right click on your model Convert to Editable Mesh, apply Remove UVW, then Right Click Convert to Editable Poly
And yet another feature that almost no one ever uses yet it's great (when done right) - Select and Manipulate:
You might have noticed the funky little icon in the main toolbar and wondered what that could be for. Lots of stuff, by default there's example radius modifier that makes it easy to manipulate anything that has a radius property, and light cone manipulators (also handy), plus I'm showing a custom SoftSelection Falloff manipulator:
Viewport Switching
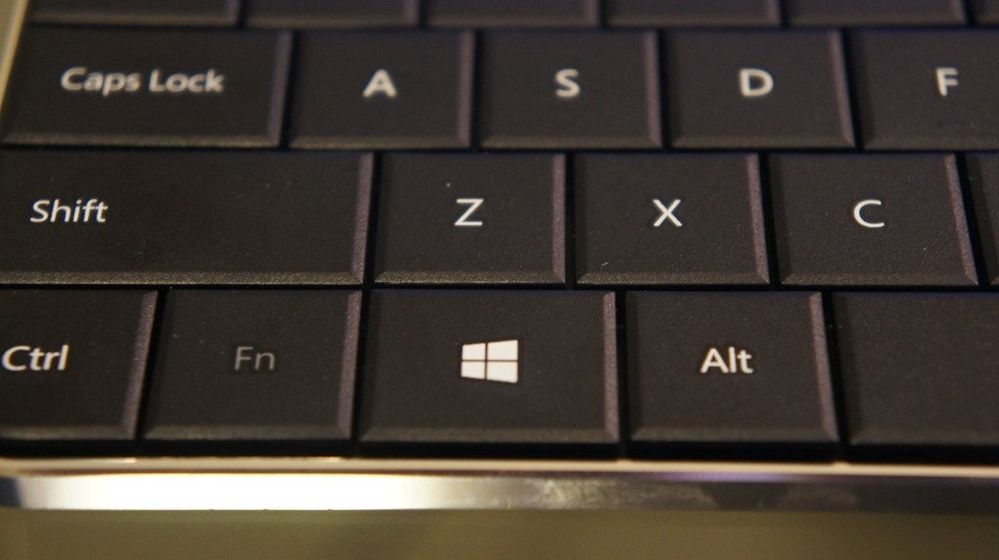
hold down the windows key and hit shift to cycle through your viewports, in full screen too, have a go!
this came courtesy of Neil Hazzard at Autodesk, give him a follow on Twitter @HazardousRender
Can't find what you're looking for? Ask the community or share your knowledge.