Announcements

The Autodesk Community Forums has a new look. Read more about what's changed on the Community Announcements board.

Community
cancel
Showing results for 
Show  only  | Search instead for 
Did you mean: 

Add "Aligned Orientation" option to Break View

Add "Aligned Orientation" option to Break View

Ever had a drawing where you wanted an aligned to edge orientation for a break view? I have!!!


 If yes, please vote to add this simple yet highly effective functionality I feel has always been missing.


Example. Bent piece of pipe that I wanted to put on a B size drawing and in full scale. Can't use the Break tool on the bent section and keep the break aligned how I want it due to limitation of only Vertical or Horizontal Break orientation....


BREAK1.jpg


Result of horizontal break. Not nice to look at in this case is it?


BREAK3.jpg


My proposed fancy new "Aligned" orientation button....


BREAK2ALIGNED.jpg


You would use Edge selection to select the edge you want your Break to be perpendicular to (or possibly ability to edit the Break properties at the sketch level?).....
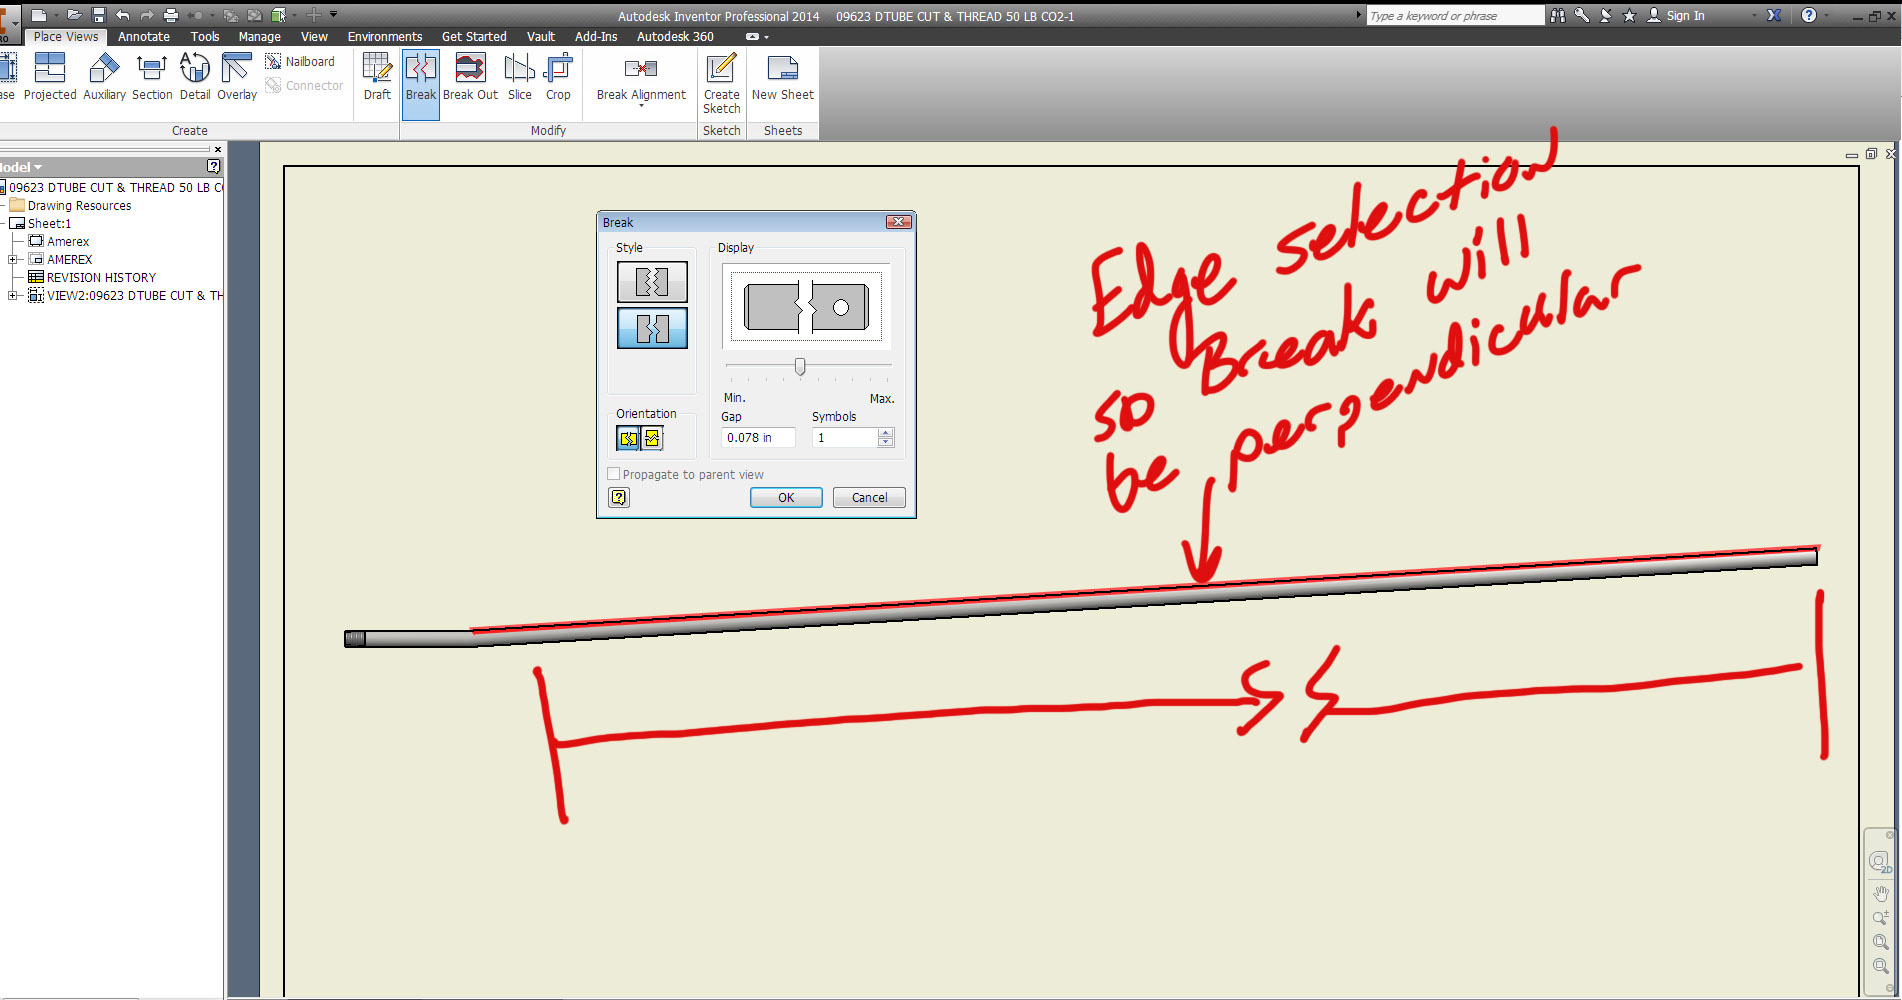
 

BREAKper2.jpg


The end result would be a MUCH nicer and desired result....


break4.jpg

56 Comments
pierre.masson
Alumni

When using Break on a drawing view, you have horizontal and vertical as orientation options.


The wish is to have more orientation possibilities like 45 degrees. Ideally to have a field to put any angle value.


This is useful if you design staircases for example

pierre.masson
Alumni

Example.png

mrattray
Advisor

I would like the input to be linkable to a model edge. I sometimes want this for auxillary views of long sheet metal parts.

Anonymous
Not applicable
I agree with both. Have the ability to select an edge like Aux View and have an input box for exact angle. Wish I could give this more kudos.
timdown73
Collaborator

Kudos! 

kwilson_design
Collaborator

Thank you for the kudos!!!

jletcher
Advisor

Instaed of a new feature way don't you make the long section you want to break in the horizontal?

kwilson_design
Collaborator

I can't do that due of a dimension from the bottom of the theoretical floor to the top edge of the angled pipe. It is a reference dimension they use out in the shop floor to easily check the angle of the pipe. If I lay my angled section 'flat on the ground' then that dimension is not possible to measure on the drawing. Also there are times where the geometry is more complex than a pipe and simply rotating the view is not an option.


Instead of creating yet another Inventor work around, which takes more time for setting up views and in this case wouldn't work, why not allow for more flexibility? Why do I have to be limited to horizontal and vertical? Why can't I have the ability to quickly create views without jumping through hoops? I think those are better questions to ask.


jletcher
Advisor

It is not a work around really.


If it was industry standard it would have been a feature option. In 20 plus years of engineering I have never seen it done..


 But you are telling me is that you put a floor to top of pipe dimension in a detail drawing? So If it gets changed you hope the detail guy remembers to change it?


 How does this  help the welder?

Does he get a detail drawing also?

Does the welder not get a drawing showing that in a weld drawing?


Don't get me wrong if needed put it in but just trying to understand why? When my mind says what you are doing by putting a floor to top of pipe dim in a detail drawing is not a standard. And if Autodesk has to put an option in for everyone's none-standard ways they are going to be busy..


Just trying to understand is all..


kwilson_design
Collaborator

Yes when a change is made to the part the shop floor gets a new drawing (actually we use Vault and they see the DWF on the shop floor via Thinweb client). This drawing has nothing to do with a weldment at this stage. They use this perticular dimension to ensure the pipe has the correct angle on it when in the check fixture.


Ever heard of Siemens NX (Unigraphics)? Yea, you can do much more with their Break than you could dream of in Inventor. Does that mean Inventor shouldn't compete against other CAD packages that currently do offer such features? With NX you can select the vector(s) to define exactly where and how you want your Break to look.


Perhaps these videos will help open your eyes on giving Inventor users more functionality and not just more "fluff" each release....


http://www.youtube.com/watch?v=-bsg38gJdiY

http://www.youtube.com/watch?v=p659tK41O7Q

http://www.youtube.com/watch?v=4Rxd29VBoC4

jletcher
Advisor

Yes I have heard and used Siemens 2 years they do have some nice things but also really not so nice things..


 They use way to many clicks to get to anything something like Inventor is starting to do and I hated it then and starting to hate it in Inventor.


 Does it mean Inventor should not compete? Well let us look at it this way. Inventor is built to have Drafting Standards where Siemens don't care about standards this is why it is very hard to set it up and everyone doing the same. I kind of like every drawing to look the same not this guys way or that guys way...


 I mean did you look at how hard it is just to do a break view took the guy 10 clicks were Inventor is 3 maybe 4 if you move the cut.


 Everything in those videos should show everyone what not to want and with everyone coming from other software seems to want Inventor to be just as hard and clicky..


I don't understand..


 I wish Inventor would take out the new interface because of all the clicks it added to do anything.


 I rather Inventor stay with standards rather then let anyone do as they please in the drawing...


  I still don't understand how a floor dim is what you need to check the pipe angle but I also don't know your environment.


But thanks for trying to give me some insight..

kwilson_design
Collaborator

Please show me in any CAD standard that says a Break View must be Vertical or Horizontal.....


They are typically called "conventional breaks" when they are only vertical or horizontal. Therefore leading you to "unconventional breaks" when used otherwise.


I'm not saying Inventor has to follow exactly what Siemens does. It doesn't need to be a zillion other clicks (lord knows we do that enough in Inventor already). My point was that it DOES exist out there, which you tried to imply otherwise. Clearly there is a use for such times when needed, or people would not be voting for this idea.


Thanks for your input.

jletcher
Advisor


 In all cad standards books or drafting standards there is only a "conventional breaks" there is never anything on "unconventional breaks" there is a reason but will not go into it.


  And yes it does exist out there but it does not mean it is right..


 That would be like saying they have illegal drugs out there seeing they are out there might as well use them..


 All I was saying is Inventor is or was keyed on standards where the other software don't care or is trying to catch up with Inventor..

And with everyone's wishes Inventor may not be to much longer...


Thanks for the chat good luck..

Anonymous
Not applicable

Rotate yuor view to be horizontal then break it...


It is too bad there are not more experiaced useres of Inventor.

kwilson_design
Collaborator

MDS-MQ,


Did you even read the issue with rotating the view in this instance? Or are you here to bump your post count and troll?


PS, before you go calling someone out thinking they don't know Inventor, you might want to proof over your own posts. You can't even use the simple spell checker tools on a forum. Thankfully I have honed my skills at reading internet jibberish, so your post was easy to translate. Oh and I'd gladly take you up on a Pepsi Challenge....

timdown73
Collaborator

Guys, If the break lines stayed vertical (conventional) but Inventor allowed you to line up the view the way Kwil wants it to, would that satisfy both concerns? I can respect Jletch's concern to stick with standards and I can see how if you aligned a break in an assembly this way it would not be right, but for a single part /pipe it does seem logical.  Just trying to find some common ground. 

kwilson_design
Collaborator

timdown73,


Thanks for your input. Take a look at the below example images. The break appears misaligned in these cases and not very attractive to look at. An aligned  break in these types of cases would solve this issue. No matter which way you rotate the view in this case, you would still end up with a misaligned break view.


tube model.jpg


Horizontal break...


tube horizontal break.jpg


Vertical break....


tube vertical break.jpg

jletcher
Advisor

@KW


But that is the way it is suppose to look like sheet 1 in your post.


Sheet 2 come on that would never be done we do have to be realistic.


 I Also I do not see how they would handle the dimension for that improper break. Because that way would not hold a true representation of the part. I am sure they could figure it out with a few bugs.....


This to me would be the same as overwriting dimensions in Autocad a big no no..


dan_szymanski
Autodesk
Status changed to: Accepted

Accepted idea [389]. Thanks!


This idea is similar to http://forums.autodesk.com/t5/ideas/v2/ideapage/blog-id/v1232/article-id/2141

dan_szymanski
Autodesk
Status changed to: Accepted
Accepted idea [US19756]. Thanks! This Idea is similar to http://forums.autodesk.com/t5/ideas/v2/ideapage/blog-id/v1232/article-id/2781

Can't find what you're looking for? Ask the community or share your knowledge.

Submit Idea  

Autodesk Design & Make Report