- Forums Home
- >
- Revit Products Community
- >
- Revit Architecture Forum
- >
- Equivalent of the XCLIP command of AutoCAD is available in Revit?
Equivalent of the XCLIP command of AutoCAD is available in Revit?
- Subscribe to RSS Feed
- Mark Topic as New
- Mark Topic as Read
- Float this Topic for Current User
- Bookmark
- Subscribe
- Printer Friendly Page
- Mark as New
- Bookmark
- Subscribe
- Mute
- Subscribe to RSS Feed
- Permalink
- Report
Equivalent of the XCLIP command of AutoCAD is available in Revit?
Revit 2019:
An AutoCAD drawings was inserted into a Revit 2019 drawing, linked, but all the unneeded junk around the plan of the AutoCAD drawing that was inserted is also seen. Will like to know how to clip the inserted AutoCAD drawing so a boundary is created in which only the desired floor plan is seen in the recipient Revit drawing without all the junk around it. It is the same as the XCLIP of AutoCAD. Is there a command to do this selective clipping in Revit?
Thanks in advance.
- Mark as New
- Bookmark
- Subscribe
- Mute
- Subscribe to RSS Feed
- Permalink
- Report
No you can not create a separate crop region for your linked files and your view.
I normally use the following techniques to declutter the view:
-Open it in Autocad and clean it up before linking.
-Use visibility graphics overrides to hide layers.
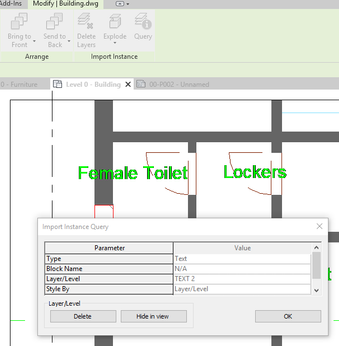
-Query the dwg and hide objects from the dwg.
A third option which gets closed to what you want is as follows
-Create a view with your linked dwg.
-Set a crop view to the area you want to show.
-Have another view were you are going to work in.
-Place both of those views on a sheet on top of each other.
-Enter the view you need to work in.
I only resorted to this technique once or twice. Usually used the techniques mentioned above
Louis
Please mention Revit version, especially when uploading Revit files.
- Mark as New
- Bookmark
- Subscribe
- Mute
- Subscribe to RSS Feed
- Permalink
- Report
- use command EXPORTLAYOUT to save the paperspace to a new file
- open the new file in AutoCAD and you shall see it is cropped in the mode space, clean up whatever else you need
- save and link this new file in Revit
- Mark as New
- Bookmark
- Subscribe
- Mute
- Subscribe to RSS Feed
- Permalink
- Report
I saved the original AutoCAD file in a new separate drawing before cleaning and used this new cleaned file and relinked it. This seems to work, but if the original AutoCAD file was prepared and 'owned" by another coworker who was and is still responsible for it (and what about if he/she is not in the office at the moment or for a week if the person is on vacation), it would not be wise to clean "his/her' file just on short order without proper coordination and planning, which would require additional steps. Also, if the original non-linked file is changed, it requires changing the linked file also (with so many additional steps!).
Seems that this is a loose end that Revit still has.
Thanks to all who responded.
- Mark as New
- Bookmark
- Subscribe
- Mute
- Subscribe to RSS Feed
- Permalink
- Report
Some of the other methods I proposed does not change the Autocad file so will cause no issues when the Autocad file changes
Louis
Please mention Revit version, especially when uploading Revit files.
- Mark as New
- Bookmark
- Subscribe
- Mute
- Subscribe to RSS Feed
- Permalink
- Report
This is preposterous, I totally agree with you, you should be able simply to crop your linked dwg. Most of architects would work with master files ie a ground floor plan of a building that would be positioned somewhere in space accordingly to real world coordinates. Sometimes it of being far away form the 0 point would need to be trimmed down so the software doesn't freak out when the drawing is to far away from the origin. Naturally you would mark the origin on a separate layer. All of that so when exchanging the drawing everybody have them in the same place.
As changes apply to the drawings on a daily basis you want to have them linked so it is easy to update at least till the whole project gets transferred to Revit and the whole team is comfortable using it.
So I have this problem, I did hide undesired layers same i turned them off in the master autocad file as well but I still see the boundary of the linked drawing. It is frustrating as if I want to zoom extend it zoomes out far away same it gets confused all the time when rotating in 3d very often it rotates around the whole plane which is impossible to control unless you highlight something in the drawing it self.
Is there something I am missing or it just cant be done without deleting stuff around the plan in the master autocad file ? We are using Revit 2018 in the office.
- Mark as New
- Bookmark
- Subscribe
- Mute
- Subscribe to RSS Feed
- Permalink
- Report
- Mark as New
- Bookmark
- Subscribe
- Mute
- Subscribe to RSS Feed
- Permalink
- Report
Thank you its easier than I though. I am a new user of Revit, learning new things every day.
Its in Properties tab / Extents / Crop View and Crop Region View and then you adjust.
- Subscribe to RSS Feed
- Mark Topic as New
- Mark Topic as Read
- Float this Topic for Current User
- Bookmark
- Subscribe
- Printer Friendly Page


