


- Mark as New
- Bookmark
- Subscribe
- Mute
- Subscribe to RSS Feed
- Permalink
- Report
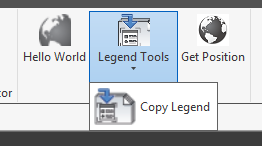
The attached image shows a handful of test icons I made for some of the tools I plan on developing. My question is why the images get cropped. Despite the images being the same size, they either get placed and scaled properly (as I have read Revit will do for the LargeImage property) but lose clarity, or they retain their original size and become cropped, as shown by the two variations. I attempted to make these icons (currently formatted as .png) with transparency. Are there any tips or tricks that I'm missing that would allow me to use these images at the same resolution/quality as standard Revit Ribbon icons? Does Revit place nice with transparency or do I need to let that go?
EDIT: I forgot to mention that I have primarily attempted 32x32 images, as I have read this is the preferred resolution for the LargeImage property, but I have used larger images in an attempt to improve the clarity of icon in Ribbon. All resolutions I've attempted to use have had the above-stated issues.
As a side note, I would also prefer these to be embedded resources (again, .png format, not .bmp), as opposed to resources, and have not yet been able to get a Uri("...") string that will read the image file once I set the Build Action of the image to Embedded Resource. I've gone through every possible solution found here, to no avail: https://forums.autodesk.com/t5/revit-api-forum/ribbon-panel-button-image-from-embedded-resource/m-p/...
NOTE: This project is in VB.net, not C#. I translated the above solutions but could have missed something that I was unaware of on a fundamental level.
Solved! Go to Solution.