Community
Maya Forum
Welcome to Autodesk’s Maya Forums. Share your knowledge, ask questions, and explore popular Maya topics.
Turn on suggestions
Auto-suggest helps you quickly narrow down your search results by suggesting possible matches as you type.
Reply
Topic Options
- Subscribe to RSS Feed
- Mark Topic as New
- Mark Topic as Read
- Float this Topic for Current User
- Bookmark
- Subscribe
- Printer Friendly Page
Message 1 of 7
Anonymous
1654 Views, 6 Replies
04-26-2017
12:24 PM
- Mark as New
- Bookmark
- Subscribe
- Mute
- Subscribe to RSS Feed
- Permalink
- Report
04-26-2017
12:24 PM
I
n this tutorial we are now making an arched door, the instructor has this great shortcut that he doesnt really explain at all. Essentially, he rigs the body of the arch by selecting it and putting a Deform > Cluster (in rigging shelf), then he selects the objects we made to create a stone facade around the arch, and then somehow clicks the "c" and moves the pivot point of the stone to that "c".
I've tried multiple times to recreate this, but I dont know what is going wrong.
I can move my pivot point to go over the "c" point but I am not able to snap to it like he is.
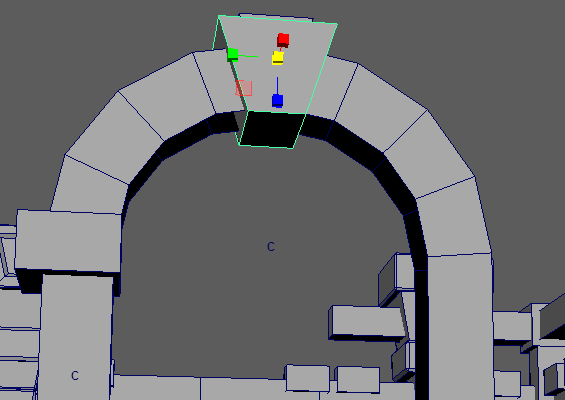
https://gyazo.com/e08d012e4a996776d4804aa98f72838f
Solved! Go to Solution.
Solved by Michael_Todd. Go to Solution.
6 REPLIES 6
Message 2 of 7
04-27-2017
01:46 PM
- Mark as New
- Bookmark
- Subscribe
- Mute
- Subscribe to RSS Feed
- Permalink
- Report
04-27-2017
01:46 PM
hi @Anonymous
Thanks for posting! After watching the video, I believe I am seeing the pivot point snap to the edge/vertex of the back wall behind the arch? I've attached a markup of your image to illustrate the position I am talking about.
If you think that may be the outcome you are looking for, you can use your snap function to move the pivot to snap to whatever component you choose. Here's a couple articles that outlines that tool: Snap Custom Pivot Point to a Component and Snapping Toolset
Let me know if that answers your question. If not, I'd be happy to keep working with you until we figure it out!
I am here to help.

![]()
Jordan Giboney
Technical Solutions Engineer | Media & Entertainment
Installation & Licensing forums | Contact product support | Autodesk AREA
Message 3 of 7
04-28-2017
09:09 AM
- Mark as New
- Bookmark
- Subscribe
- Mute
- Subscribe to RSS Feed
- Permalink
- Report
04-28-2017
09:09 AM
Hi @Anonymous
I wanted to check back in and see if the information I provided was the solution you were looking for 🙂 if you still have questions about this issue, I would be happy to keep working with you until we figure it out. Happy to help!
Have a great day!
![]()
Jordan Giboney
Technical Solutions Engineer | Media & Entertainment
Installation & Licensing forums | Contact product support | Autodesk AREA
Message 4 of 7
04-28-2017
11:37 AM
- Mark as New
- Bookmark
- Subscribe
- Mute
- Subscribe to RSS Feed
- Permalink
- Report
04-28-2017
11:37 AM
You can create a locator and parent it under the cluster. Zero out the locators transforms and this should move it to the origin. Select the Cluster handle to see the clusters pivot transforms:

Copy the cluster handles pivot transforms to the locator and snap the pivot to that.

Cheers
Michael Todd
XGen Product Owner and Designer
Message 5 of 7
04-28-2017
11:39 AM
- Mark as New
- Bookmark
- Subscribe
- Mute
- Subscribe to RSS Feed
- Permalink
- Report
04-28-2017
11:39 AM
Hey there! thanks for the help!
The Gif i posted was of me stumbling around and still getting used to the pivot feature. In that gif I did indeed attach it to the point in the background. However, the artist in the tutorial somehow used the rigged "c" point as a centering point in his "neat trick". I'll check up one the tutorial again when I get home and see If i can't figure our what he did or If i missed something.
Message 6 of 7
04-28-2017
01:26 PM
- Mark as New
- Bookmark
- Subscribe
- Mute
- Subscribe to RSS Feed
- Permalink
- Report
04-28-2017
01:26 PM
hi @Anonymous!
Thanks for the reply! Sorry I misunderstood your initial post, but it looks like @Michael_Todd provided a great answer!
Let us know if that's the solution you are looking for, if not we can keep working together to figure it out 🙂
Have a good weekend!
![]()
Jordan Giboney
Technical Solutions Engineer | Media & Entertainment
Installation & Licensing forums | Contact product support | Autodesk AREA
Message 7 of 7
Anonymous
in reply to:
Anonymous
09-19-2018
03:55 AM
- Mark as New
- Bookmark
- Subscribe
- Mute
- Subscribe to RSS Feed
- Permalink
- Report
09-19-2018
03:55 AM
I had the same issue with the same tutorial and this is how I fixed it. I think in some old versions of Maya this was the default setting but they changed it.

Reply
Topic Options
- Subscribe to RSS Feed
- Mark Topic as New
- Mark Topic as Read
- Float this Topic for Current User
- Bookmark
- Subscribe
- Printer Friendly Page
Forums Links
Can't find what you're looking for? Ask the community or share your knowledge.
Post to forums
