My angular dimensions, aren't displaying the correct measurements.

My angular dimensions, aren't displaying the correct measurements.

g4m3rf7w
Explorer Explorer
707 Views
9 Replies
Message 1 of 10

My angular dimensions, aren't displaying the correct measurements.

g4m3rf7w
Explorer
Explorer

I specified the angle of a line and then I checked to ensure it was correct. But it shows the wrong measurement.


The angle I specified.

https://imgur.com/N6f7LTA


The Angle displayed.

https://imgur.com/qA7X7yh


Do I have to change a setting? or is there something I'm doing wrong?

0 Likes
Accepted solutions (2)
708 Views
9 Replies
  • Help
Replies (9)
Message 2 of 10

paullimapa
Mentor
Mentor

The first # you enter is the length of the line.

Then you hit the lesser than symbol "<" on the keyboard

now you enter the angle 133.5

paullimapa_0-1740810825455.png


Paul Li
IT Specialist
@The Office
Apps & Publications | Video Demos
0 Likes
Message 3 of 10

cadffm
Consultant
Consultant

Hi,


I think your dimstyle is not correct.

Start a drawing, based on acadiso.dwt, or acad.dwt for imperial units, 

Try it again and it will work well.


Share your  .dwg file in question(your screenshots)  so we can check the issue.


Sebastian

0 Likes
Message 4 of 10

g4m3rf7w
Explorer
Explorer

I tried using "<" after writing the distance of a line and the angle I specified was further off than the previous attempts.

0 Likes
Message 5 of 10

g4m3rf7w
Explorer
Explorer

this is the document I used in those screenshots. I created a new document as you suggested but the issue was the same.

0 Likes
Message 6 of 10

g4m3rf7w
Explorer
Explorer

So I've tried to figure out where my specified angle goes. I apologize if the explanation sounds confusing. If I make a vertical line that's at a 90° angle, let's say the top point of the line is aa and the bottom point is ab, and I start another line from ab at a 43.5° angle. Then I use the angular dimension to show the angle from my vertical line to my diagonal line, it will display 46.5°. But if I make another line from point ab, a straight horizontal line at 0°, and then use the angular dimension to find the angle of the horizontal line to the previously made diagonal line it will display 43.5°. The problem is when specifying an angle its not finding the angular from the previous line I made it's finding the angle from 0° every time. 


Here are screenshots from a new acadiso.dwt file. Step-by-step  showing what I've explained ^.

https://imgur.com/n2xLMip


https://imgur.com/uztDRs5 (yes I just realized it shows where the angle starts in dotted lines, is it possible for that to start from the line made?)


https://imgur.com/xhiY2Fd


https://imgur.com/pSHdPnc


https://imgur.com/0OZCm28

0 Likes
Message 7 of 10

paullimapa
Mentor
Mentor
Accepted solution

you can try this lisp function called ALIN.lsp which lets you select the LINE segment you want to base the angle off of and it switches the UCS to match with that LINE to create the next desired angle LINE:

https://forums.autodesk.com/t5/visual-lisp-autolisp-and-general/can-use-vlisp-write-a-routine-thanks...


Paul Li
IT Specialist
@The Office
Apps & Publications | Video Demos
Message 8 of 10

Kent1Cooper
Consultant
Consultant
Accepted solution

@g4m3rf7w wrote:

.... (yes I just realized it shows where the angle starts in dotted lines, is it possible for that to start from the line made?)


For Polar Tracking [F10 key] angle increments, you can set them to be relative to the last segment:

Kent1Cooper_0-1740859942768.png

but I don't think you can for free-angle drawing.

Kent Cooper, AIA
Message 9 of 10

g4m3rf7w
Explorer
Explorer

Thanks for the help. Saved a lot of confusion, I appreciate the help.

0 Likes
Message 10 of 10

jskalaXDDX5
Advocate
Advocate

Posting this in response to the subject in general, and no other post in particular.  This is just a Gumby look at drawing angles.

At one point I became very interested in annotating complimentary angles in a very particular orientation.  After a lot of digging I discovered that AutoCAD did not care what I wanted, at least in that regard.

jskalaXDDX5_0-1741036287825.png


Metal cutting tools are convinced that a right angle is 90 degrees.  Woodworking tools, where I live, in most cases, consider a right angle to be 0 degrees.  I was hoping to create construction drawings for an introductory course introducing both types of tools.  Without teaching geometry.  Or arithmetic. 

jskalaXDDX5_1-1741036287826.png


So I ended up with an approach that made sense most of the time to people learning to use saws.  I can share macros for that if anyone is interested.

But after struggling with the software and my own limitations I still do not understand if the software makes this complicated, or I do.  It does not seem logical to me that a line that is contiguous is not referenced from itself.

Perhaps it cannot be so, or it could not be so at one time and has not evolved.  Or should not be so.

In either case there are ways to get around it.

First, a Line drawn from left to right has an orientation of 0 degrees.

jskalaXDDX5_2-1741036287827.png


A Line drawn from right to left has an orientation of 180 degrees.

jskalaXDDX5_3-1741036287827.png


I do not believe one can change that, someone please correct me if I am wrong.

The direction of travel one might take from 0 degrees to 180 degrees can be changed.

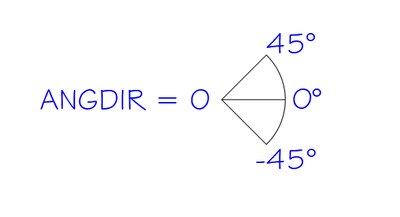
By default, the software reads positive degrees in a counter-clockwise direction.  Negative numbers are read clockwise.

Some, but not all people, read left to right.  I believe clockwise is universal.  If it makes more sense to you to think about angles clockwise, the default can be changed by switching ANGDIR from 0 to 1.
jskalaXDDX5_4-1741036287828.png


Looking at the challenges we might encounter so far from this system, consider the results from the original post.  Maybe complimentary angles are not useful usually, but…

jskalaXDDX5_5-1741036287829.png


Line B is a contiguous (extension?)  of Line A, but references its position from 0 degrees.  One way around that might be to input the complimentary angle.  46.5 away from 0  =  43.5 away from A.


Looking at an angle greater than 90 degrees, we end up needing  to add the minus sign.

Ain’t English fun?

jskalaXDDX5_6-1741036287831.png


If that doesn’t make sense, play around with it.  And remember that we are working with a line that is oriented left to right at 0 degrees.  If you need to work in the other direction (or up/down) the line will be oriented to something else and things will change.

Uffda.

A Gumbyer way of getting there is to Copy, Rotate, Move, and Lengthen the Line you would like to create.  The advantage of this approach is that you can reference the line you want, and only use a whole or negative number to create the angle.

In the next example, I need to make a line 1’ at an angle of 45 degrees from Line A.

 I have no idea what the angle of Line A is. 

But I am pretty sure Line B ends up at a 45 degree angle from it, and 1’ long.


jskalaXDDX5_7-1741036287834.png


This works just fine for what I do with it.  I knew a person once many years ago who used a Vemco Elbow to make the geometry pretty and a calculator to make the annotation correct.

I can’t do that.  But it seems like there are strengths within the software that can compensate.

Sort of…according to the Rotate Command I should be able to use Rotate to make a copy…I can’t do that either.

Uffda.


0 Likes