Community
ArtCAM Forum
Welcome to Autodesk’s ArtCAM Forums. Share your knowledge, ask questions, and explore popular ArtCAM topics.
Turn on suggestions
Auto-suggest helps you quickly narrow down your search results by suggesting possible matches as you type.
Reply
Topic Options
- Subscribe to RSS Feed
- Mark Topic as New
- Mark Topic as Read
- Float this Topic for Current User
- Bookmark
- Subscribe
- Printer Friendly Page
Message 1 of 14
01-19-2017
05:18 PM
- Mark as New
- Bookmark
- Subscribe
- Mute
- Subscribe to RSS Feed
- Permalink
- Report
01-19-2017
05:18 PM
I'm brand new to CAD and am trying to create a sign with layered text. I'd like to have a last name in the background and a couple's first names in the foreground. I'm able to position the lettering how I want it, but the top layer is just in line with the back layer and the front text isn't "covering over" the vectors in the back.
I'm using the most recent version of ArtCam and have attached the project to this post.
I've done a search in the forums and nothing comes up for layering text- am I using the right vocabulary here?
Any help would be appreciated- thanks so much!
Solved! Go to Solution.
Solved by Gary.B. Go to Solution.
Solved by prashant.gurav. Go to Solution.
13 REPLIES 13
Message 2 of 14
01-19-2017
07:54 PM
- Mark as New
- Bookmark
- Subscribe
- Mute
- Subscribe to RSS Feed
- Permalink
- Report
01-19-2017
07:54 PM
What is you desire here, and how do you intend to do such? With your lettering do you wish to hide some? Would it not be better to bring it all out so it all is seen?
When you are doing something like this, you would want to have everything viewed right? I redid your file fixed some of the lettering, moved some of it around so it will show everything.
mike
Message 3 of 14
01-19-2017
08:02 PM
- Mark as New
- Bookmark
- Subscribe
- Mute
- Subscribe to RSS Feed
- Permalink
- Report
01-19-2017
08:02 PM
Thanks for your help Mikeis, but artistically I really like the layered effect. Do you have any ideas about layering? I'm thinking I might have to extrude to different depths, but I'm just not sure.
Message 4 of 14
01-19-2017
08:45 PM
- Mark as New
- Bookmark
- Subscribe
- Mute
- Subscribe to RSS Feed
- Permalink
- Report
01-19-2017
08:45 PM
Hi @lumert83,
Welcome me to the Autodesk Community and the ArtCAM Forum!
@lumert83 wrote:
I'm brand new to CAD and am trying to create a sign with layered text. I'd like to have a last name in the background and a couple's first names in the foreground. I'm able to position the lettering how I want it, but the top layer is just in line with the back layer and the front text isn't "covering over" the vectors in the back.
I'm using the most recent version of ArtCam and have attached the project to this post.
@lumert83 wrote:
artistically I really like the layered effect. Do you have any ideas about layering? I'm thinking I might have to extrude to different depths, but I'm just not sure.
Many thanks for attaching your Cook.art file.
You can create the text (last name & couple's first names) on separate relief layers in Autodesk ArtCAM Standard 2017, as demonstrated in the screencast below, in order to create the text in the background and foreground respectively:
You can also use the Merge High option, available to select from the relief layer's context menu, and create all of the text in only one single relief layer if you do not want to use separate relief layers.
I have attached a modified version of your Cook_mod.art file for your reference.
If you are not working in Autodesk ArtCAM 2017 Service Pack 4 (build 268), I would like to inform you that the fourth service pack for the Autodesk ArtCAM 2017 product range (Free, Standard & Premium) is now available to download through the Autodesk Desktop App, as announced here by @dillon.moulder. You can also download the fourth service pack for the Autodesk ArtCAM 2017 product range from the Product Updates area of your Autodesk Account.
If the provided information is helpful to you, please be kind enough to click the Accept As Solution button. Alternatively, Reply back to me and I will be happy to assist you further.
Thank you for your time and cooperation.
Kind regards,
Prashant.G
Message 6 of 14
01-20-2017
09:06 PM
- Mark as New
- Bookmark
- Subscribe
- Mute
- Subscribe to RSS Feed
- Permalink
- Report
01-20-2017
09:06 PM
Oh and by the way I usually use the highest pixel count, in a 10by10 area I go with 4000x4000 this way my jagged edges are not so noticeable. that would be the resolution. I really don't like dealing with low resolution, it's fast and easy to fix and to mess up, sculpting takes less time but then again if you screw it up you do it big time.
mike
mike
Message 7 of 14
01-21-2017
10:45 AM
- Mark as New
- Bookmark
- Subscribe
- Mute
- Subscribe to RSS Feed
- Permalink
- Report
01-21-2017
10:45 AM
Thank you so very much for your help. I've had to play your video multiple times to really understand what is going on- I'm that much of a newbie :). Do you have any recommendations for an absolute beginner to CAD? I've tried multiple beginner tutorial series (including the one offered by ArtCam), but they all presume a basic knowledge and understanding of the vocabulary used in the program. I don't have that and I'm not sure how to acquire it. I need a rock bottom tutorial that takes me through each and every button in Artcam- any ideas?
Message 8 of 14
01-21-2017
10:01 PM
- Mark as New
- Bookmark
- Subscribe
- Mute
- Subscribe to RSS Feed
- Permalink
- Report
01-21-2017
10:01 PM
Ummm,
Artcam is by the most simple cad program that you could ever get, it may be simple but you can do much with it once you start to use it.
I myself like to get photos off the net and draw lines (we call these vectors) then using those lines bringing up the shape be it rounded or slanted or some other shape, there is really no other program that can compete with it though many like to puff out their chest and thump it this program is far better than many others that cost more and every one that doesn't cost as much.
there are many things that could help you but do your self a pleasure and get a photo of say some butterfly, or a cow, a dog, or a lovely lady (like your wife) draw those lines that are her face (her nose, eyes, hair, eye brows) and while you are drawing enjoy her beauty. now this is just for practice.
when you start drawing those lines start with a start and end point, highlight it hit the "N" on your keyboard then point to the highlighted line then hit the "B" letter this will give you a Bezier curve, this is a line you can adjust with 2 points.
Practice drawing first and enjoy it.
then you can get into the other parts of this program.
like using the shape editor, 2 rail sweep, sculpting, may more to really have fun making things on your computer.
mike
ps.. here are some practice 2 rail sweeps I put together a few years ago.
Message 9 of 14
01-23-2017
03:50 AM
- Mark as New
- Bookmark
- Subscribe
- Mute
- Subscribe to RSS Feed
- Permalink
- Report
01-23-2017
03:50 AM
Hi @lumert83,
@lumert83 wrote:
Thank you so very much for your help. I've had to play your video multiple times to really understand what is going on- I'm that much of a newbie :). Do you have any recommendations for an absolute beginner to CAD? I've tried multiple beginner tutorial series (including the one offered by ArtCam), but they all presume a basic knowledge and understanding of the vocabulary used in the program. I don't have that and I'm not sure how to acquire it. I need a rock bottom tutorial that takes me through each and every button in Artcam- any ideas?
Are you aware of Help option in Autodesk ArtCAM Standard 2017's Welcome page which is displayed when you start the software? If not, this includes links to all of the areas from where you can access help on using ArtCAM software. Please refer to the screencast below:
Hope this helps.
Kind regards,
Prashant.G
Message 10 of 14
02-11-2017
09:41 PM
- Mark as New
- Bookmark
- Subscribe
- Mute
- Subscribe to RSS Feed
- Permalink
- Report
02-11-2017
09:41 PM
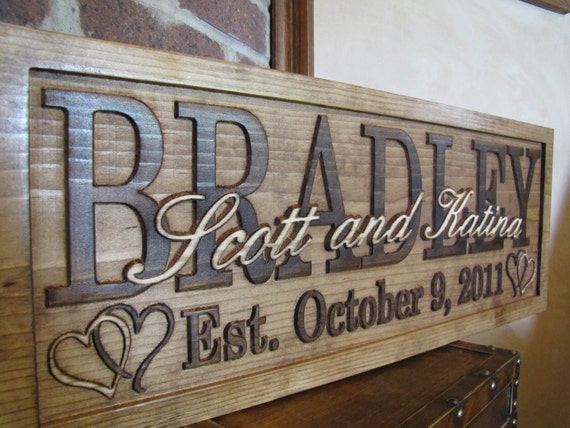
Prashant- I had thought that your solution was perfect, but after a few weeks of working with it- I finally realize that the words are layered weirdly. If you look really closely, the areas where the words cross are double layered. I tried to merge high to fix this, but it didn't work either. For example, where the "p" in Stephen crosses the back layer "O", part of the p is extra raised where the letters come into contact. The photo below is what I would like my end product to look like. Any ideas?
Message 11 of 14
02-12-2017
08:34 AM
- Mark as New
- Bookmark
- Subscribe
- Mute
- Subscribe to RSS Feed
- Permalink
- Report
02-12-2017
08:34 AM
@lumert83 wrote:
I finally realize that the words are layered weirdly. If you look really closely, the areas where the words cross are double layered. I tried to merge high to fix this, but it didn't work either.
The reason the merge high did not work correctly is due to when selecting a combine mode in the shape editor it does not automatically change the combine mode of the relief layer you are on.
Depending on the stack order of the layers you will need to change the combine mode of the layer
I did a quick screen capture of your cook file to demo
Gary
Message 12 of 14
02-12-2017
04:19 PM
- Mark as New
- Bookmark
- Subscribe
- Mute
- Subscribe to RSS Feed
- Permalink
- Report
02-12-2017
04:19 PM
That worked perfectly Gary! Thank you so much. My last step was to run the toolpath, but I get several errors- 1)contains both open and closed vectors and that no attempt will be made to determine vector orientations. 2) 2 or more vectors overlap
I can't create a toolpath. I was using a 1/16 end mill in the simulation.
Message 13 of 14
02-12-2017
08:20 PM
- Mark as New
- Bookmark
- Subscribe
- Mute
- Subscribe to RSS Feed
- Permalink
- Report
02-12-2017
08:20 PM
If you post your art file that includes the attempted toolpaths, then one of us will be able to advise you where your issues lie
Gary
Message 14 of 14
02-14-2017
01:03 PM
- Mark as New
- Bookmark
- Subscribe
- Mute
- Subscribe to RSS Feed
- Permalink
- Report
02-14-2017
01:03 PM
I did finally figure the toolpath out. I didn't realize that because this is relief, I had to go under Toolpath> New 3D Toolpath> Machine Relief. It worked! Thank you so much for all the help on this forum- you guys are so knowledgeable and helpful! What a wonderful community.
Reply
Topic Options
- Subscribe to RSS Feed
- Mark Topic as New
- Mark Topic as Read
- Float this Topic for Current User
- Bookmark
- Subscribe
- Printer Friendly Page
