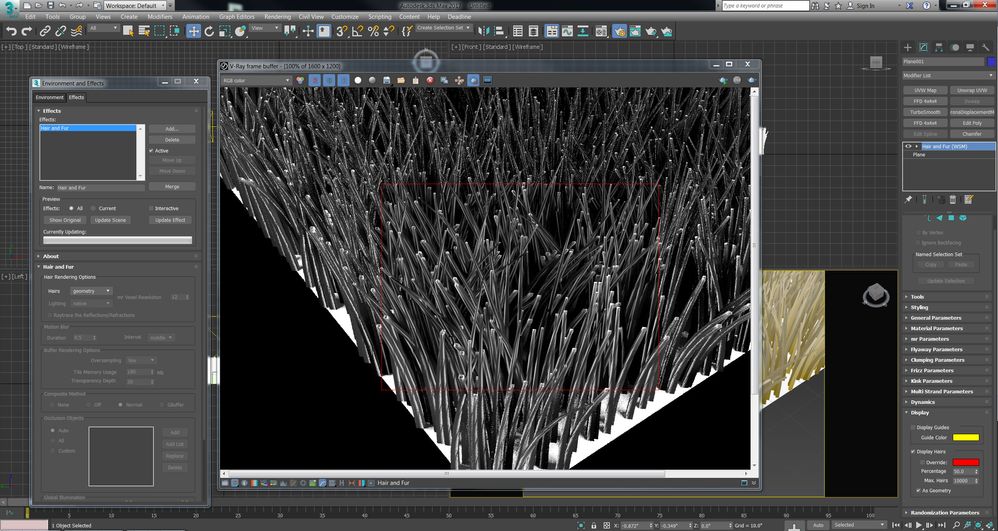
Hair and Fur appears to be tubes!! Help!!

Anonymous

Hair and Fur appears to be tubes!! Help!!

Anonymous
Not applicable

Hi,


I am using Hair and fur in 3ds max 2017, while rendering it in Corona (1.5). It appears to be like tubes(as shown in the picture attached).

Need help solutioning this.


Thanks in advance 


Dhruv

0 Likes
Reply
Accepted solutions (1)
5,978 Views
15 Replies
Replies (15)

Anonymous
Not applicable
0 Likes

Anonymous
Not applicable

Hi Vusta,


I want to use the default max hair and fur with the circular geometry and be able to manipulate the same parameters provided in hair and fur modifier rollout. Appreciate your time to respond on the issue.


@Anonymous.DeFlaminis It would be great if you throw some light on this issue. I guess it was always there but only realized it when I took a really closeup shot to see that all the fur geometry is nothing but a hollow tubes. Please help!!


I am attaching few examples again with some new tests in corona and vray.


My ultimate goal  is to create rugs in corona setup.


Vray_DispAsGeoOn.jpgCorona_DispAsGeoOn.jpgCorona_DispAsGeoOff.jpg


thanks,

Dhruv

0 Likes

Anonymous
Not applicable
Accepted solution

no worries @Anonymous...


if there's no solution, I still say use an instance geo...I think the only thing you lose is the mr material...all other params would still work (I hope). Now the advantage...and to me it's a huge advantage is you can actually do one that looks like a real carpet strand...ie. an upside down U shape...as illustrated here: (and if you feel adventurous..why not throw in Twist too ?)


Carpet.jpg

Anonymous
Not applicable

Hi Vusta,


It's a good alternative, I would try it for my personal project for sure but the nature of work I am sitting on is high precision. So I would love to have the flexibility that H&F modifier provides but without the issues that I showcased above.


It would be great to know why this glitch is happening.

0 Likes

Anonymous
Not applicable

well if you can't beat them....join them...the 2 ends......well almost...


see here, I'm using a spline, then pick it in Spline Deform...and voila...the 2 hollow ends are now at the bottom !!! And no Instance..all parameters are still working.... and material, you'll have to zero out the Kinks/Frizz...to get straight look, then dial them back as desired


HairDeform.jpg

0 Likes

Alfred.DeFlaminis
Alumni
Alumni

Hello @Anonymous,


I'd be happy to help.  I had posted in this thread and with a follow up, I had thought you abandoned the thread.  Would it be possible to attach a scene file for me to investigate?  You can just copy your Hair and Fur mod onto a sphere and post that, that would be fine.  I'll do whatever I can to help you.


Best Regards,

0 Likes

Judith.Hageman
Advocate
Advocate

Looking forward to this solution, have been looking for an answer as well, so far unsuccessfully..

0 Likes

Anonymous
Not applicable

what about this then...


adjust as much as you like with the 'tubular' hair...then Tools>Hair->Mesh


Turn off 'tubular' Hair since it doesn't quite work...Select newly created Mesh Object....add Cap Holes, then TurboSmooth/Opensubdiv.....whatever you like

add material...render...


Obviously, this assumes your hair is static like carpet instead of moving 'grass'....

0 Likes

Alfred.DeFlaminis
Alumni
Alumni

Hello @Judith.Hageman and @Anonymous,


I can't repro this weird issue in the 1st post, I'd love a file to investigate, @Anonymous.  Without it I can only assume it's a problem in Corona, or something weird with the modifier or base geo that I cannot reproduce.  Thanks for a scene to look at when you get a chance!

Best Regards,

0 Likes

Anonymous
Not applicable

Hi Alfred,


Sorry for the delay in response, I am attaching the max file for you to have a better look at it.


Awaiting your response.

0 Likes

Anonymous
Not applicable

Hi Vusta,


Thanks for you reply, appreciate it. Very good alternative for rug. Would definite use this technique, but curiosity remains on why such a good modifier is failing to work appropriately especially in the closeup shots is when you see the problem.


regards,

Dhruv

0 Likes

Anonymous
Not applicable

yeah to me it's a slight oversight by the devs I think....so they assume that you'll always use the 'tip' at radius 0...effectively capping the tip...but if you want a constant hair width...then tip radius won't be zero and therefore there should be a simple 'cap' option to close up the end....or if you clip your hair at less than 100% length, you'd see the hollow tube so definitely need a 'cap' option.


(what do you reckon...2 mins job for the devs ?)

0 Likes

Alfred.DeFlaminis
Alumni
Alumni

Hello @Anonymous,


I see, thanks for attaching the file... that really helps.  I can see the issue now and I didn't realize it was related to the tip size in my earlier posts.  


Originally Hair and Fur was based on a plugin called Shave and a Haircut by Joe Alter.  As I go back to previous versions this operates the same way.  I've seen a few tutorials in years past that had root 3 and tip 1 for grass, but the camera would never have been close enough to see the caps there.  


I don't know for sure if the original developer assumed a tip of 0 or assumed that the tip of the hair would be small enough not to be noticeable, but I think the best path forward is to use instanced geometry. 


Best Regards,

0 Likes

drewmeskew
Community Visitor
Community Visitor

I know this is a really old thread but if anyone still gets this issue, I figured out that if you set the Rand. Scale size to zero it fixes it. I guess what its doing is making the tips random bigger amounts than zero. Also I think that if you were using a dark hair texture you wouldn't notice the tube effect.

0 Likes

coilbookmedia
Advocate
Advocate

Hello,

Did anyone find the solution?  Rand scale to zero does nothing (renders tubes). Also hairs are copies and not instances clogging octane vram.  Thanks' 

0 Likes