Community
- Forums Home
- >
- Revit Products Community
- >
- Revit Architecture Forum
- >
- Re: Interior Rendering shows up black
Revit Architecture Forum
Welcome to Autodesk’s Revit Architecture Forums. Share your knowledge, ask questions, and explore popular Revit Architecture topics.
Turn on suggestions
Auto-suggest helps you quickly narrow down your search results by suggesting possible matches as you type.
Reply
Topic Options
- Subscribe to RSS Feed
- Mark Topic as New
- Mark Topic as Read
- Float this Topic for Current User
- Bookmark
- Subscribe
- Printer Friendly Page
Message 1 of 24
05-18-2012
10:46 AM
- Mark as New
- Bookmark
- Subscribe
- Mute
- Subscribe to RSS Feed
- Permalink
- Report
05-18-2012
10:46 AM
I've been googling and looking through the discussion forums and I just can't figure out why my interior rendering scenes just show up black. I have opened up projects from previous releases that I was able to get interior scenes to render correctly and they render fine in 2013. I've imported the modified fixtures to the current projects file and they still don't do anything. The scene I'm talking about has a ceiling modeled on the underside of a floor. I've read this may be an issue, but my light fixtures light source is to be 1/4" above the plane of the ceiling. In my case, it's a 5/8" layer of drywall. I just can't figure this out.
Thanks,
Logan
Solved! Go to Solution.
Solved by thaner9. Go to Solution.
23 REPLIES 23
Message 2 of 24
05-18-2012
10:52 AM
- Mark as New
- Bookmark
- Subscribe
- Mute
- Subscribe to RSS Feed
- Permalink
- Report
05-18-2012
10:52 AM
I would throw in a studio light to see if it is the light fixtures or not - it is jut an orb of light - no fixture. You can specify the offset from the floor to get the height you want.
LD
If this helped solve your issue - remember to 'accept as solution' to help other find answers!
You can't think AutoCAD and run Revit.
Email: LisaDragoEE@gmail.com
Message 4 of 24
05-18-2012
11:15 AM
- Mark as New
- Bookmark
- Subscribe
- Mute
- Subscribe to RSS Feed
- Permalink
- Report
05-18-2012
11:15 AM
On the rendering dialog box - what do you have the lighting set to? see attached image...
LD
If this helped solve your issue - remember to 'accept as solution' to help other find answers!
You can't think AutoCAD and run Revit.
Email: LisaDragoEE@gmail.com
Message 5 of 24
05-18-2012
11:21 AM
- Mark as New
- Bookmark
- Subscribe
- Mute
- Subscribe to RSS Feed
- Permalink
- Report
05-18-2012
11:21 AM
I've tried Interior and Exterior with Sun only, sun and artificial...etc. Doesn't seem to change anything. I'm just rendering in Draft mode to save time, not sure that matters. I've also adjusted the exposure to no avail.
I've edited the fixture to move the Light Source Elevation to be inside the depth of my Ceiling, but that doesn't seem to help.
I've also turned off the floor 'layer' and that hasn't helped...
Message 6 of 24
05-18-2012
11:27 AM
- Mark as New
- Bookmark
- Subscribe
- Mute
- Subscribe to RSS Feed
- Permalink
- Report
05-18-2012
11:27 AM
WOW I am really at a loss - not sure what to say... hopefully an autodesk employee will take a look at this one...
LD
If this helped solve your issue - remember to 'accept as solution' to help other find answers!
You can't think AutoCAD and run Revit.
Email: LisaDragoEE@gmail.com
Message 7 of 24
05-18-2012
11:29 AM
- Mark as New
- Bookmark
- Subscribe
- Mute
- Subscribe to RSS Feed
- Permalink
- Report
05-18-2012
11:29 AM
No problem. Thanks for trying.
I'm tempted to start up a "dummy" project with Revit's Out-of-the-Box template and insert lights and see if it works there. Seems I always run into this problem when the upgrade happens.
Message 8 of 24
05-18-2012
11:35 AM
- Mark as New
- Bookmark
- Subscribe
- Mute
- Subscribe to RSS Feed
- Permalink
- Report
05-18-2012
11:35 AM
Would not hurt to try...
Hope you get it to work.. when you do post what you did - if you don't mind.
LD
If this helped solve your issue - remember to 'accept as solution' to help other find answers!
You can't think AutoCAD and run Revit.
Email: LisaDragoEE@gmail.com
Message 9 of 24
05-18-2012
01:02 PM
- Mark as New
- Bookmark
- Subscribe
- Mute
- Subscribe to RSS Feed
- Permalink
- Report
05-18-2012
01:02 PM
You didn't say you cranked up the wattage on the light. If that's
too low it's going to render black no matter where you set the
exposure.
Message 10 of 24
05-18-2012
01:15 PM
- Mark as New
- Bookmark
- Subscribe
- Mute
- Subscribe to RSS Feed
- Permalink
- Report
05-18-2012
01:15 PM
I changed to 150W and still nothing. I created a "dummy" file and just made a 40'x40' box with a floor and a flat roof and then added a ceiling and some fixtures and everything works fine there.
Message 12 of 24
05-19-2012
05:02 PM
- Mark as New
- Bookmark
- Subscribe
- Mute
- Subscribe to RSS Feed
- Permalink
- Report
05-19-2012
05:02 PM
If your issue is with a black bottom ceiling which refuses to change color, I had the problem today and resolved it by adding a new layer "finish" under the ceiling with a new layer of 5/8" gypboard, and then I delved into the additional dialogs and changed the colors to white. (It was an involved and trial and error process). Now I do not have the black ceiling any more.
Message 13 of 24
05-21-2012
08:49 AM
- Mark as New
- Bookmark
- Subscribe
- Mute
- Subscribe to RSS Feed
- Permalink
- Report
05-21-2012
08:49 AM
I've attached two images showing the space I'm working on. I've just generically added a ceiling, below the floor, and added 4- out of the box recessed cans from Revit. I cut a Section Box so that it'd actually show up, if I don't have the Section Box, it's ALL black (not just the ceiling).
I've done this same view without the floor "layer" on and it didn't help. My ceiling is just a 5/8" thick "structure" component of drywall, which isn't generic and actually has a material associated with it.
In the "dummy" file I created, I used the same basic set up and I was able to get the lights to appear. However, I used the generic ceiling material and there wasn't a floor. I can't imagine you just can't have a floor above, but who knows.
I can provide more information if necessary.
Thanks again to all of you,
Logan
Message 14 of 24
05-21-2012
09:47 AM
- Mark as New
- Bookmark
- Subscribe
- Mute
- Subscribe to RSS Feed
- Permalink
- Report
05-21-2012
09:47 AM
Now serving a big plate of "yes, you're still just learning"...
Even though the image on the screen suggested my camera was not inside a wall, when I looked at it in plan form, it was. I moved it forward a bit, out of the wall, and now things work.
Notes for future forum'ers...
It still requires (at least when placed under a floor element) that the Light Source Elevation remain within the thickness of the ceiling element. I rendered with it outside of my 5/8" material (back to the original 3" above bottom plane) and it did not render. So, light fixtures won't render "inside" a floor.
If you want the fixture itself to have a "glow", you need to edit the fixture's "Light Source Definition" to have it's "Light Distribution" to be a spherical instead of spot. I've attached an image that illustrates this.
Thanks for everyone's help...
Message 16 of 24
05-21-2012
05:50 PM
- Mark as New
- Bookmark
- Subscribe
- Mute
- Subscribe to RSS Feed
- Permalink
- Report
05-21-2012
05:50 PM
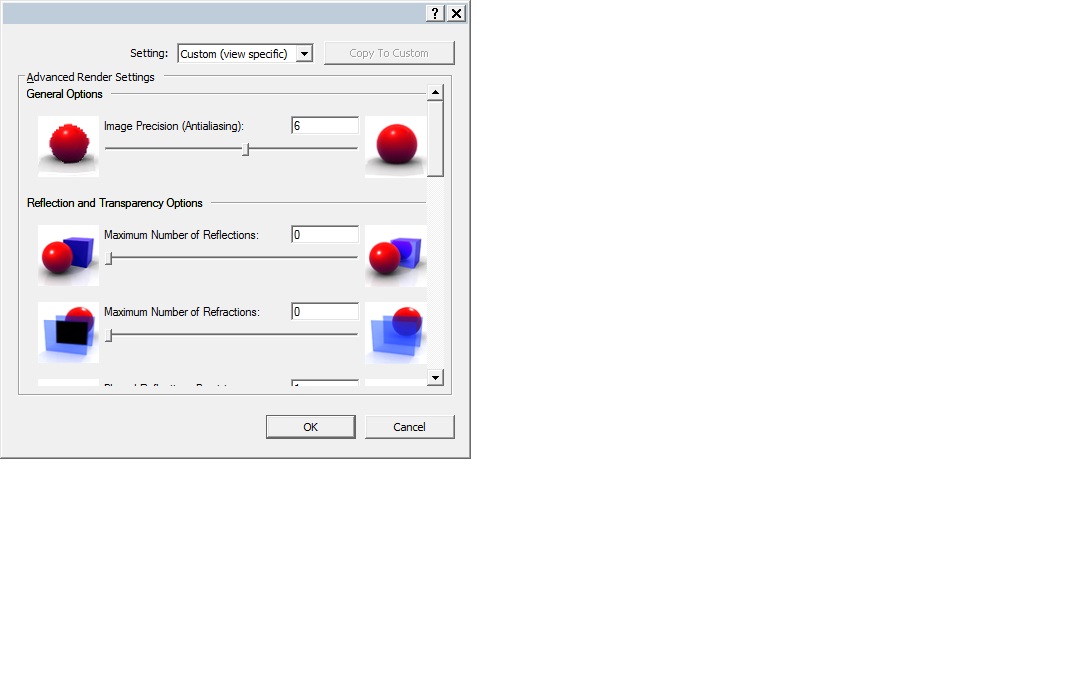
These are the render settings that will give you the
FASTEST and most COMPLETE rendering. The image
won't look like a realistic photo, but everything will
get rendered.
Message 17 of 24
05-22-2012
10:01 AM
- Mark as New
- Bookmark
- Subscribe
- Mute
- Subscribe to RSS Feed
- Permalink
- Report
05-22-2012
10:01 AM
Thanks Vector2. That definitely sped up rendering. I did notice the windows rendered black now though. The adjacent door (also using glass as it's glazing material) rendered transparent. Any ideas why? I used your custom rendering settings and did all the different lighting schemes possible and the glazing in the windows always rendered black/opaque...
Message 18 of 24
05-22-2012
03:17 PM
- Mark as New
- Bookmark
- Subscribe
- Mute
- Subscribe to RSS Feed
- Permalink
- Report
05-22-2012
03:17 PM
thaner- Those settings just mean it's not taking all that time
to accurately trace the rays, but it IS filling out the elements,
(except glass), because the antialiasing is set to at least 6.
But that's just for a quick preview render.
For quallity renderings put antialiasing to 9 and those two illumination
precision settings to 9. 10 is infinitely better if you can let it render
for hours and hours. And bump up those other settings a little to give
you the transparent glass. And of course the soft shadows at 8 or 9.
As for some elements rendering black, that's just in their material
settings.
Message 19 of 24
10-01-2012
07:40 PM
- Mark as New
- Bookmark
- Subscribe
- Mute
- Subscribe to RSS Feed
- Permalink
- Report
10-01-2012
07:40 PM
We just had this same issue in my Revit class. The problem we encountered - the rendering all black - is that Revit renders doors as being CLOSED. The camera was just on the wrong side of the door! Try moving the camera, see if it's something like that for your issue.
Message 20 of 24
06-02-2014
09:12 AM
- Mark as New
- Bookmark
- Subscribe
- Mute
- Subscribe to RSS Feed
- Permalink
- Report
06-02-2014
09:12 AM
Hi everyone.
Hope you're well.
There is a black strip that keeps appearing in the render.
I have rendered this same view more than 4times.
I even changed the pendant light and the camera angle without ANY luck!

Please help me with this problem in the attachment below.
Reply
Topic Options
- Subscribe to RSS Feed
- Mark Topic as New
- Mark Topic as Read
- Float this Topic for Current User
- Bookmark
- Subscribe
- Printer Friendly Page

