Community
Inventor Forum
Welcome to Autodesk’s Inventor Forums. Share your knowledge, ask questions, and explore popular Inventor topics.
Turn on suggestions
Auto-suggest helps you quickly narrow down your search results by suggesting possible matches as you type.
Reply
Topic Options
- Subscribe to RSS Feed
- Mark Topic as New
- Mark Topic as Read
- Float this Topic for Current User
- Bookmark
- Subscribe
- Printer Friendly Page
Message 1 of 17
Anonymous
736 Views, 16 Replies
10-22-2009
04:13 AM
- Mark as New
- Bookmark
- Subscribe
- Mute
- Subscribe to RSS Feed
- Permalink
- Report
10-22-2009
04:13 AM
Subtract part
Hej to all
I need a big help, I have a part, but i need now is the negative of that
part.
This part have a few channels inside and I need the volume of the channels,
in other words, i need to have in 3d the channels and all the other paths. I
need the empty shapes in my part to became a solid.
How can i do this?
Thanks to all.
sofia
16 REPLIES 16
Message 2 of 17
10-22-2009
04:17 AM
- Mark as New
- Bookmark
- Subscribe
- Mute
- Subscribe to RSS Feed
- Permalink
- Report
10-22-2009
04:17 AM
You didn't state what version of Inventor you are using.
You didn't post example file here.
2010 Combine with cut
earlier - Derived Component with Split or Sculpt.
-----------------------------------------------------------------------------------------
Autodesk Inventor 2019 Certified Professional
Autodesk AutoCAD 2013 Certified Professional
Certified SolidWorks Professional
Message 3 of 17
Anonymous
in reply to:
Anonymous
10-22-2009
04:30 AM
- Mark as New
- Bookmark
- Subscribe
- Mute
- Subscribe to RSS Feed
- Permalink
- Report
10-22-2009
04:30 AM
Sorry
I am using IV2010.
I am attachging the file, I need all the inner channels as solids. like the
negative,
than ks
"JDMather" wrote in message news:6275993@discussion.autodesk.com...
> You didn't state what version of Inventor you are using.
> You didn't post example file here.
>
> 2010 Combine with cut
>
> earlier - Derived Component with Split or Sculpt.
Message 4 of 17
Anonymous
in reply to:
Anonymous
10-22-2009
05:29 AM
- Mark as New
- Bookmark
- Subscribe
- Mute
- Subscribe to RSS Feed
- Permalink
- Report
10-22-2009
05:29 AM
> {quote:title=JDMather wrote:}{quote}
> You didn't post example file here.
JD, her sketches are constrained 🙂
> You didn't post example file here.
JD, her sketches are constrained 🙂
Message 5 of 17
Anonymous
in reply to:
Anonymous
10-22-2009
05:40 AM
- Mark as New
- Bookmark
- Subscribe
- Mute
- Subscribe to RSS Feed
- Permalink
- Report
10-22-2009
05:40 AM
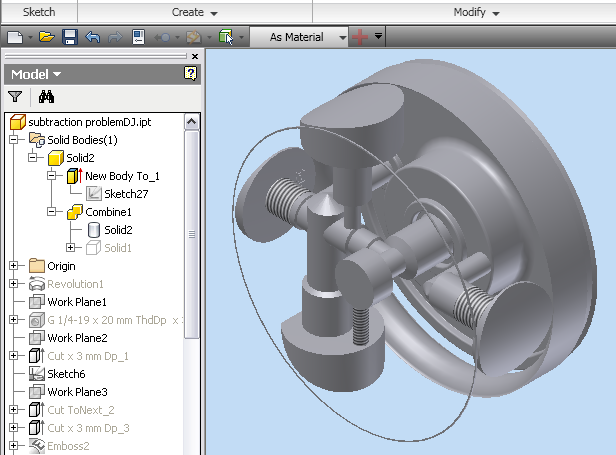
Results of 2010:
1. Extrude a new body over the entire part.
2. Using the new Solid 2 as the Base, Combine - intersect using the
original Solid 1 as the Toolbody.
Result is as shown.
3. Use Delete Face (Lump) to remove any unwanted geometry.
--
Dennis Jeffrey, Autodesk Inventor Certified Expert
Autodesk Manufacturing Implementation Certified Expert.
Instructor/Author/Sr. App Engr. Tel. (260) 399-6615
http://teknigroup.com
Message 6 of 17
Anonymous
in reply to:
Anonymous
10-22-2009
06:29 AM
- Mark as New
- Bookmark
- Subscribe
- Mute
- Subscribe to RSS Feed
- Permalink
- Report
10-22-2009
06:29 AM
Wonderful answer, but now cames the next question, how did you made the
solid over the 1 solid?
but that is exactly what I want.
"Dennis Jeffrey" wrote in message
news:6276057@discussion.autodesk.com...
> Results of 2010:
>
> 1. Extrude a new body over the entire part.
> 2. Using the new Solid 2 as the Base, Combine - intersect using the
> original Solid 1 as the Toolbody.
>
> Result is as shown.
>
> 3. Use Delete Face (Lump) to remove any unwanted geometry.
> --
> Dennis Jeffrey, Autodesk Inventor Certified Expert
> Autodesk Manufacturing Implementation Certified Expert.
> Instructor/Author/Sr. App Engr. Tel. (260) 399-6615
> http://teknigroup.com
>
solid over the 1 solid?
but that is exactly what I want.
"Dennis Jeffrey"
news:6276057@discussion.autodesk.com...
> Results of 2010:
>
> 1. Extrude a new body over the entire part.
> 2. Using the new Solid 2 as the Base, Combine - intersect using the
> original Solid 1 as the Toolbody.
>
> Result is as shown.
>
> 3. Use Delete Face (Lump) to remove any unwanted geometry.
> --
> Dennis Jeffrey, Autodesk Inventor Certified Expert
> Autodesk Manufacturing Implementation Certified Expert.
> Instructor/Author/Sr. App Engr. Tel. (260) 399-6615
> http://teknigroup.com
>
Message 7 of 17
Anonymous
in reply to:
Anonymous
10-22-2009
06:30 AM
- Mark as New
- Bookmark
- Subscribe
- Mute
- Subscribe to RSS Feed
- Permalink
- Report
10-22-2009
06:30 AM
Here's the part.
--
Dennis Jeffrey, Autodesk Inventor Certified Expert
Autodesk Manufacturing Implementation Certified Expert.
Instructor/Author/Sr. App Engr. Tel. (260) 399-6615
http://teknigroup.com
--
Dennis Jeffrey, Autodesk Inventor Certified Expert
Autodesk Manufacturing Implementation Certified Expert.
Instructor/Author/Sr. App Engr. Tel. (260) 399-6615
http://teknigroup.com
Message 8 of 17
Anonymous
in reply to:
Anonymous
10-22-2009
06:47 AM
- Mark as New
- Bookmark
- Subscribe
- Mute
- Subscribe to RSS Feed
- Permalink
- Report
10-22-2009
06:47 AM
Thnak you,
But I would love to know how you did that.
"Dennis Jeffrey" wrote in message
news:6276120@discussion.autodesk.com...
> Here's the part.
> --
> Dennis Jeffrey, Autodesk Inventor Certified Expert
> Autodesk Manufacturing Implementation Certified Expert.
> Instructor/Author/Sr. App Engr. Tel. (260) 399-6615
> http://teknigroup.com
>
But I would love to know how you did that.
"Dennis Jeffrey"
news:6276120@discussion.autodesk.com...
> Here's the part.
> --
> Dennis Jeffrey, Autodesk Inventor Certified Expert
> Autodesk Manufacturing Implementation Certified Expert.
> Instructor/Author/Sr. App Engr. Tel. (260) 399-6615
> http://teknigroup.com
>
Message 9 of 17
Anonymous
in reply to:
Anonymous
10-22-2009
07:17 AM
- Mark as New
- Bookmark
- Subscribe
- Mute
- Subscribe to RSS Feed
- Permalink
- Report
10-22-2009
07:17 AM
Sorry, meant CUT, not Intersect. I'll do a video for you...
--
Dennis Jeffrey, Autodesk Inventor Certified Expert
Autodesk Manufacturing Implementation Certified Expert.
Instructor/Author/Sr. App Engr. Tel. (260) 399-6615
http://teknigroup.com
--
Dennis Jeffrey, Autodesk Inventor Certified Expert
Autodesk Manufacturing Implementation Certified Expert.
Instructor/Author/Sr. App Engr. Tel. (260) 399-6615
http://teknigroup.com
Message 10 of 17
Anonymous
in reply to:
Anonymous
10-22-2009
07:33 AM
- Mark as New
- Bookmark
- Subscribe
- Mute
- Subscribe to RSS Feed
- Permalink
- Report
10-22-2009
07:33 AM
Thank you thank you, that will be a huge help for the future.
"Dennis Jeffrey" wrote in message
news:6276157@discussion.autodesk.com...
> Sorry, meant CUT, not Intersect. I'll do a video for you...
> --
> Dennis Jeffrey, Autodesk Inventor Certified Expert
> Autodesk Manufacturing Implementation Certified Expert.
> Instructor/Author/Sr. App Engr. Tel. (260) 399-6615
> http://teknigroup.com
"Dennis Jeffrey"
news:6276157@discussion.autodesk.com...
> Sorry, meant CUT, not Intersect. I'll do a video for you...
> --
> Dennis Jeffrey, Autodesk Inventor Certified Expert
> Autodesk Manufacturing Implementation Certified Expert.
> Instructor/Author/Sr. App Engr. Tel. (260) 399-6615
> http://teknigroup.com
Message 11 of 17
Anonymous
in reply to:
Anonymous
10-22-2009
07:33 AM
- Mark as New
- Bookmark
- Subscribe
- Mute
- Subscribe to RSS Feed
- Permalink
- Report
10-22-2009
07:33 AM
Here's the video...
http://teknigroup.com/Videos/InvDiscussions/Combine1/Combine1.html
--
Dennis Jeffrey, Autodesk Inventor Certified Expert
Autodesk Manufacturing Implementation Certified Expert.
Instructor/Author/Sr. App Engr. Tel. (260) 399-6615
http://teknigroup.com
http://teknigroup.com/Videos/InvDiscussions/Combine1/Combine1.html
--
Dennis Jeffrey, Autodesk Inventor Certified Expert
Autodesk Manufacturing Implementation Certified Expert.
Instructor/Author/Sr. App Engr. Tel. (260) 399-6615
http://teknigroup.com
Message 12 of 17
10-22-2009
07:54 AM
- Mark as New
- Bookmark
- Subscribe
- Mute
- Subscribe to RSS Feed
- Permalink
- Report
10-22-2009
07:54 AM
>JD, her sketches are constrained 🙂
Most of them anyhow. I think I would have moved Fillet1 below Hole15 instead of adding Sketch25 and Extrusion9.
A work of art, a thing of beauty.
-----------------------------------------------------------------------------------------
Autodesk Inventor 2019 Certified Professional
Autodesk AutoCAD 2013 Certified Professional
Certified SolidWorks Professional
Message 13 of 17
Anonymous
in reply to:
Anonymous
10-22-2009
09:36 AM
- Mark as New
- Bookmark
- Subscribe
- Mute
- Subscribe to RSS Feed
- Permalink
- Report
10-22-2009
09:36 AM
> {quote:title=Guest wrote:}{quote}
> Thnak you,
> But I would love to know how you did that.
Roll the "End of Part" marker all the way up to the top of the feature tree. Move it down item/feature by item/feature. Do "Edit Feature" on each on as you go to see what he did.
> Thnak you,
> But I would love to know how you did that.
Roll the "End of Part" marker all the way up to the top of the feature tree. Move it down item/feature by item/feature. Do "Edit Feature" on each on as you go to see what he did.
Message 14 of 17
Anonymous
in reply to:
Anonymous
10-23-2009
02:12 AM
- Mark as New
- Bookmark
- Subscribe
- Mute
- Subscribe to RSS Feed
- Permalink
- Report
10-23-2009
02:12 AM
Thank you for the movie, very good.
How can I save the movie to me? So i can always remember how to do it.
"Dennis Jeffrey" wrote in message
news:6276207@discussion.autodesk.com...
> Here's the video...
>
> http://teknigroup.com/Videos/InvDiscussions/Combine1/Combine1.html
> --
> Dennis Jeffrey, Autodesk Inventor Certified Expert
> Autodesk Manufacturing Implementation Certified Expert.
> Instructor/Author/Sr. App Engr. Tel. (260) 399-6615
> http://teknigroup.com
How can I save the movie to me? So i can always remember how to do it.
"Dennis Jeffrey"
news:6276207@discussion.autodesk.com...
> Here's the video...
>
> http://teknigroup.com/Videos/InvDiscussions/Combine1/Combine1.html
> --
> Dennis Jeffrey, Autodesk Inventor Certified Expert
> Autodesk Manufacturing Implementation Certified Expert.
> Instructor/Author/Sr. App Engr. Tel. (260) 399-6615
> http://teknigroup.com
Message 15 of 17
Anonymous
in reply to:
Anonymous
10-23-2009
12:23 PM
- Mark as New
- Bookmark
- Subscribe
- Mute
- Subscribe to RSS Feed
- Permalink
- Report
10-23-2009
12:23 PM
Just bookmark it in Internet Explorer or Firefox. A version with sound
will be available in the new courseware I'm releasing in January.
Here's a brief "First Look" at the new courseware:
http://teknigroup.com/training/Inventor/courseware%20preview%20sk-1.html
The courseware consists of text, all color images, videos, and one on
one mentoring by an instructor.
--
Dennis Jeffrey, Autodesk Inventor Certified Expert
Autodesk Manufacturing Implementation Certified Expert.
Instructor/Author/Sr. App Engr. Tel. (260) 399-6615
http://teknigroup.com
Message 17 of 17
10-30-2012
11:47 AM
- Mark as New
- Bookmark
- Subscribe
- Mute
- Subscribe to RSS Feed
- Permalink
- Report
10-30-2012
11:47 AM
You should be able to figure it out from the ipt files.
Dennis died about a 15 months ago, not sure what portions of his work might still be avialable.
Attach your file here if you can't figure out your problem.
-----------------------------------------------------------------------------------------
Autodesk Inventor 2019 Certified Professional
Autodesk AutoCAD 2013 Certified Professional
Certified SolidWorks Professional
Reply
Topic Options
- Subscribe to RSS Feed
- Mark Topic as New
- Mark Topic as Read
- Float this Topic for Current User
- Bookmark
- Subscribe
- Printer Friendly Page
