Community
Inventor Forum
Welcome to Autodesk’s Inventor Forums. Share your knowledge, ask questions, and explore popular Inventor topics.
Turn on suggestions
Auto-suggest helps you quickly narrow down your search results by suggesting possible matches as you type.
Reply
Topic Options
- Subscribe to RSS Feed
- Mark Topic as New
- Mark Topic as Read
- Float this Topic for Current User
- Bookmark
- Subscribe
- Printer Friendly Page
Message 1 of 25
04-08-2011
07:36 AM
- Mark as New
- Bookmark
- Subscribe
- Mute
- Subscribe to RSS Feed
- Permalink
- Report
04-08-2011
07:36 AM
Hi,
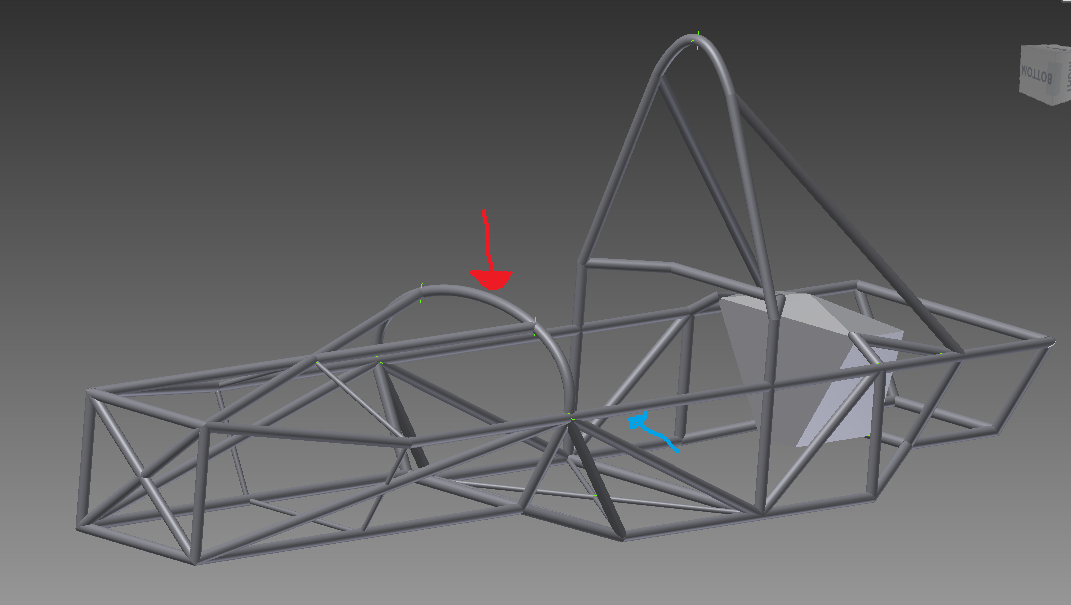
I'm trying to notch a curved pipe with another pipe and its giving me many problems because I can't select it. What can I do to work it out?
Thank you.
Solved! Go to Solution.
Solved by Dennis_Jeffrey. Go to Solution.
Solved by Curtis_Waguespack. Go to Solution.
Solved by JDMather. Go to Solution.
Solved by JDMather. Go to Solution.
24 REPLIES 24
Message 3 of 25
04-08-2011
08:34 AM
- Mark as New
- Bookmark
- Subscribe
- Mute
- Subscribe to RSS Feed
- Permalink
- Report
04-08-2011
08:34 AM
1. Copy Object as Surface cutting object face and Split part or Sculpt
(Attach the two parts and iam if you can't figure it out - don't need the entire assembly).
2. Derived Component combine.
-----------------------------------------------------------------------------------------
Autodesk Inventor 2019 Certified Professional
Autodesk AutoCAD 2013 Certified Professional
Certified SolidWorks Professional
Message 4 of 25
04-08-2011
08:54 AM
- Mark as New
- Bookmark
- Subscribe
- Mute
- Subscribe to RSS Feed
- Permalink
- Report
04-08-2011
08:54 AM
I couldnt do as you said in the first part, because each pipe is one separate body and you can't edit them. I tried combining them then doing it aswell, but I can't for the same reason.
Message 5 of 25
04-08-2011
08:56 AM
- Mark as New
- Bookmark
- Subscribe
- Mute
- Subscribe to RSS Feed
- Permalink
- Report
04-08-2011
08:56 AM
@cinim wrote:I couldnt do as you said in the first part, because each pipe is one separate body and you can't edit them. I tried combining them then doing it aswell, but I can't for the same reason.
You don't understand my solution because I didn't supply enough detail.
Attach your files here.
-----------------------------------------------------------------------------------------
Autodesk Inventor 2019 Certified Professional
Autodesk AutoCAD 2013 Certified Professional
Certified SolidWorks Professional
Message 6 of 25
04-08-2011
09:35 AM
- Mark as New
- Bookmark
- Subscribe
- Mute
- Subscribe to RSS Feed
- Permalink
- Report
04-08-2011
09:35 AM
thanks so much, because I was stuck there in my thesis and i need it get proper results from ANSYS
I hosted the file here: https://www.yousendit.com/download/UFh1SkhUY1NCSnBFQlE9PQ thanks once again.
Message 7 of 25
04-08-2011
12:58 PM
- Mark as New
- Bookmark
- Subscribe
- Mute
- Subscribe to RSS Feed
- Permalink
- Report
04-08-2011
12:58 PM
Mr Mather, I kept on trying because I don't agree on the easy way out, and I managed to trim it or split it, but how do I delete the unwanted parts of the tube?
Thank you for your guidance.
Message 8 of 25
04-08-2011
01:06 PM
- Mark as New
- Bookmark
- Subscribe
- Mute
- Subscribe to RSS Feed
- Permalink
- Report
04-08-2011
01:06 PM
The Split command has options to Split AND delete.
See below:

Please mark this response as "Accept as Solution" if it answers your question.
____________________________________________________________
Dennis Jeffrey, Author and Manufacturing Trainer, Autodesk Inventor Certified Expert
Autodesk Manufacturing Implementation Certified Expert
Autodesk Silver Manufacturing Partner
Subscribe to the free digital "The Creative Inventor Magazine" now available at: http://teknigroup....
XP64 SP2, GeForce 9800GT-1GB, Driver: 6.14.12.7061, 8GB Ram, AMD Athlon II 3.2 Ghz
Laptop: Win7-64 Pro, 4GB, ATI Graphics on board, 2012 Ultimate, IV2011 or 2010 Pro, all SP's
Message 10 of 25
04-08-2011
01:14 PM
- Mark as New
- Bookmark
- Subscribe
- Mute
- Subscribe to RSS Feed
- Permalink
- Report
04-08-2011
01:14 PM
First of all thanks for the reply, any help is appreciated
I tried doing that, but it seems that still the pipe won't really trim. the construction lines are perfect and everything, but when i open the pipe alone, it is still as it was before.

Message 11 of 25
04-08-2011
01:33 PM
- Mark as New
- Bookmark
- Subscribe
- Mute
- Subscribe to RSS Feed
- Permalink
- Report
04-08-2011
01:33 PM
thanks for the reply. that command seems only to delete the surface, whilst I need to delete a piece of the body. is there a similar command for a solid please?
Message 12 of 25
04-08-2011
01:51 PM
- Mark as New
- Bookmark
- Subscribe
- Mute
- Subscribe to RSS Feed
- Permalink
- Report
04-08-2011
01:51 PM
Hi cinim,
Use this option, as rdyson mentioned:

I hope that helps.
Good luck with all of your Inventor pursuits,
Curtis
http://inventortrenches.blogspot.com/
Message 13 of 25
04-08-2011
01:51 PM
- Mark as New
- Bookmark
- Subscribe
- Mute
- Subscribe to RSS Feed
- Permalink
- Report
04-08-2011
01:51 PM
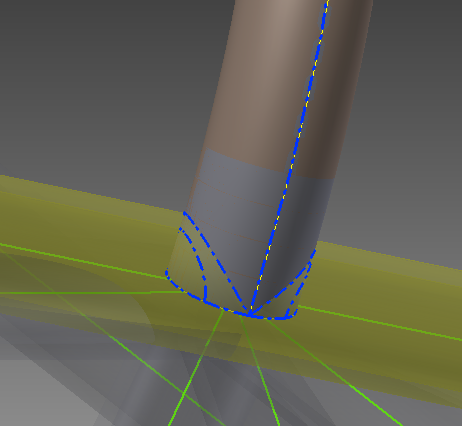
If done correctly with the selected options, the Split tool works. See below:

If I open the trimmed tube, this is what you should see before the surface is turned off.

Please mark this response as "Accept as Solution" if it answers your question.
____________________________________________________________
Dennis Jeffrey, Author and Manufacturing Trainer, Autodesk Inventor Certified Expert
Autodesk Manufacturing Implementation Certified Expert
Autodesk Silver Manufacturing Partner
Subscribe to the free digital "The Creative Inventor Magazine" now available at: http://teknigroup....
XP64 SP2, GeForce 9800GT-1GB, Driver: 6.14.12.7061, 8GB Ram, AMD Athlon II 3.2 Ghz
Laptop: Win7-64 Pro, 4GB, ATI Graphics on board, 2012 Ultimate, IV2011 or 2010 Pro, all SP's
____________________________________________________________
Dennis Jeffrey, Author and Manufacturing Trainer, Autodesk Inventor Certified Expert
Autodesk Manufacturing Implementation Certified Expert
Autodesk Silver Manufacturing Partner
Subscribe to the free digital "The Creative Inventor Magazine" now available at: http://teknigroup....
XP64 SP2, GeForce 9800GT-1GB, Driver: 6.14.12.7061, 8GB Ram, AMD Athlon II 3.2 Ghz
Laptop: Win7-64 Pro, 4GB, ATI Graphics on board, 2012 Ultimate, IV2011 or 2010 Pro, all SP's
Message 14 of 25
04-08-2011
02:02 PM
- Mark as New
- Bookmark
- Subscribe
- Mute
- Subscribe to RSS Feed
- Permalink
- Report
04-08-2011
02:02 PM
thank you gentlemen, your kindness is really appreciated. I managed to do it.
If i may, can i ask for one last favour. Could someone guide me to how I can combine each frame into one complete structure please? That would be very helpful when converting it to ANSYS.
For future reference, if someone needs to here are the steps:
1. Select the part you want to trim, and "copy to construction" found under surfaces
2. there should be a folder named "Construction". Double click on it
3. Double click "Copy objects" and select the pipes you want the part to be trimmed around. Make sure you select surfaces
4. Finish Construction and go the Model Section. Double click on Split, select trim solid and trim as needed
5. To delete extra parts, go to "Delete face" found under Surface, and make sure you select lump
That should be all.
Message 15 of 25
04-08-2011
02:18 PM
- Mark as New
- Bookmark
- Subscribe
- Mute
- Subscribe to RSS Feed
- Permalink
- Report
04-08-2011
02:18 PM
You are doing way to much work...
1. In the assembly file, edit the part you want to trim.
2. Select Copy Object from the Model tab
3. In Copy Object with Surface option selected, select the Trimming face of the other part.
4. Select Split, then select the Surface created in step 3.
Use these options (marked in red) to trim the solid tube.

@cinim wrote:
thank you gentlemen, your kindness is really appreciated. I managed to do it.
If i may, can i ask for one last favour. Could someone guide me to how I can combine each frame into one complete structure please? That would be very helpful when converting it to ANSYS.
For future reference, if someone needs to here are the steps:
1. Select the part you want to trim, and "copy to construction" found under surfaces
2. there should be a folder named "Construction". Double click on it
3. Double click "Copy objects" and select the pipes you want the part to be trimmed around. Make sure you select surfaces
4. Finish Construction and go the Model Section. Double click on Split, select trim solid and trim as needed
5. To delete extra parts, go to "Delete face" found under Surface, and make sure you select lump
That should be all.
Please mark this response as "Accept as Solution" if it answers your question.
____________________________________________________________
Dennis Jeffrey, Author and Manufacturing Trainer, Autodesk Inventor Certified Expert
Autodesk Manufacturing Implementation Certified Expert
Autodesk Silver Manufacturing Partner
Subscribe to the free digital "The Creative Inventor Magazine" now available at: http://teknigroup....
XP64 SP2, GeForce 9800GT-1GB, Driver: 6.14.12.7061, 8GB Ram, AMD Athlon II 3.2 Ghz
Laptop: Win7-64 Pro, 4GB, ATI Graphics on board, 2012 Ultimate, IV2011 or 2010 Pro, all SP's
____________________________________________________________
Dennis Jeffrey, Author and Manufacturing Trainer, Autodesk Inventor Certified Expert
Autodesk Manufacturing Implementation Certified Expert
Autodesk Silver Manufacturing Partner
Subscribe to the free digital "The Creative Inventor Magazine" now available at: http://teknigroup....
XP64 SP2, GeForce 9800GT-1GB, Driver: 6.14.12.7061, 8GB Ram, AMD Athlon II 3.2 Ghz
Laptop: Win7-64 Pro, 4GB, ATI Graphics on board, 2012 Ultimate, IV2011 or 2010 Pro, all SP's
Message 16 of 25
04-09-2011
01:15 AM
- Mark as New
- Bookmark
- Subscribe
- Mute
- Subscribe to RSS Feed
- Permalink
- Report
04-09-2011
01:15 AM
you made it sound much more easier, heh 🙂
if i may ask another question, how could i combine all the frame members into one whole body, i.e. having 1 frame and not many separate tubes.
thanks.
Message 17 of 25
04-09-2011
05:00 AM
- Mark as New
- Bookmark
- Subscribe
- Mute
- Subscribe to RSS Feed
- Permalink
- Report
04-09-2011
05:00 AM
If you had attached just two part files involved and assemble iam here instead of the entire assembly on a third party site - I would have shown you the easy way with your parts.
To combine your assembly into one part use the Shrinkwrap tool (see attached).
I suspect you want to delete the associative link (see image), but you could always do that later - you don't have to do it now as indicated.
-----------------------------------------------------------------------------------------
Autodesk Inventor 2019 Certified Professional
Autodesk AutoCAD 2013 Certified Professional
Certified SolidWorks Professional
Message 18 of 25
04-10-2011
09:40 AM
- Mark as New
- Bookmark
- Subscribe
- Mute
- Subscribe to RSS Feed
- Permalink
- Report
04-10-2011
09:40 AM
just want to thank you all for your invaluable help. I finally managed to construct the frame as desired. Now i can move on to ANSYS and start banging my head there.
cheers.
Message 19 of 25
04-10-2011
09:44 AM
- Mark as New
- Bookmark
- Subscribe
- Mute
- Subscribe to RSS Feed
- Permalink
- Report
04-10-2011
09:44 AM
Why not use Inventor for the analysis?
-----------------------------------------------------------------------------------------
Autodesk Inventor 2019 Certified Professional
Autodesk AutoCAD 2013 Certified Professional
Certified SolidWorks Professional
Message 20 of 25
04-10-2011
10:11 AM
- Mark as New
- Bookmark
- Subscribe
- Mute
- Subscribe to RSS Feed
- Permalink
- Report
04-10-2011
10:11 AM
my thesis supervisor is very keen on ANSYS as he suggests it gives better results, and since he's the one correcting the dissertation who am I to disagree? 🙂
Reply
Topic Options
- Subscribe to RSS Feed
- Mark Topic as New
- Mark Topic as Read
- Float this Topic for Current User
- Bookmark
- Subscribe
- Printer Friendly Page
