Community
AutoCAD Plant 3D Forum
Welcome to Autodesk’s AutoCAD Plant 3D Forums. Share your knowledge, ask questions, and explore popular AutoCAD Plant 3D topics.
Turn on suggestions
Auto-suggest helps you quickly narrow down your search results by suggesting possible matches as you type.
Reply
Topic Options
- Subscribe to RSS Feed
- Mark Topic as New
- Mark Topic as Read
- Float this Topic for Current User
- Bookmark
- Subscribe
- Printer Friendly Page
Message 1 of 3
04-27-2010
02:21 AM
- Mark as New
- Bookmark
- Subscribe
- Mute
- Subscribe to RSS Feed
- Permalink
- Report
04-27-2010
02:21 AM
Custom Part Valve
I have a question.
How can I make a custom valve and modify the End Type to FL and the Facing to RF.
I have tried but this items are blocked.
How can I make a custom valve and modify the End Type to FL and the Facing to RF.
I have tried but this items are blocked.
2 REPLIES 2
Message 2 of 3
04-27-2010
05:41 AM
- Mark as New
- Bookmark
- Subscribe
- Mute
- Subscribe to RSS Feed
- Permalink
- Report
04-27-2010
05:41 AM
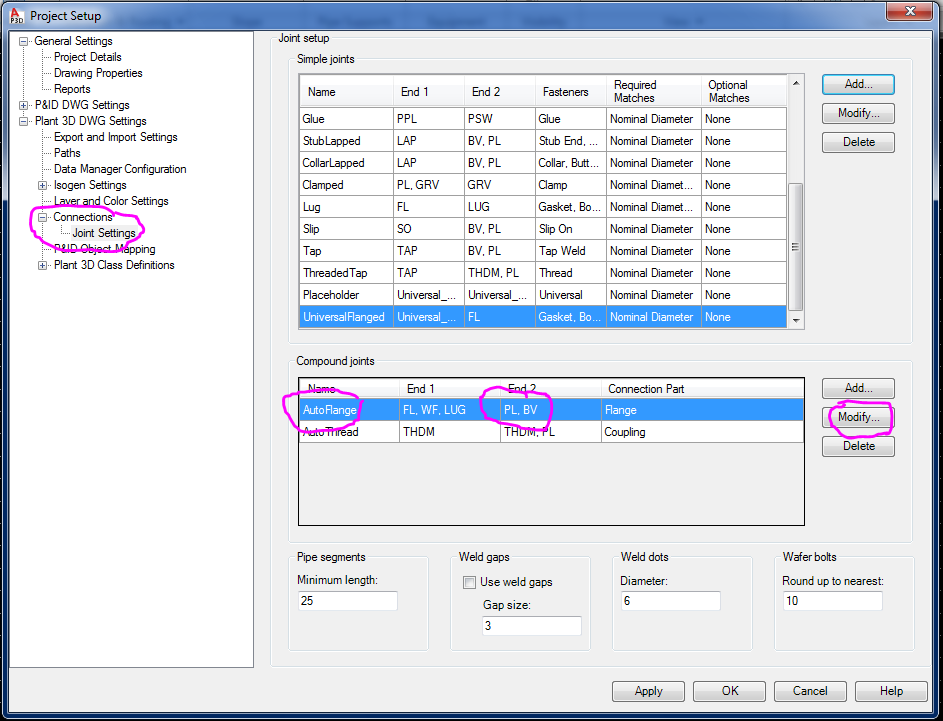
These fields cannot be modified and defined out of the box as "Universal End Type", meaning could connect with any other end types. If you need to connect this Univesal_ET to a flange, then certain changes to the project setup, Plant 3D DWG Settings, Connections, Joint Settings are required. First modify the AutoFlange and remove Universal_ET from End 2. Next Add a new Joint, say UniversalFlanged, and select Universal_ET as End 1 and FL as End 2. Under Fasteners, select Gasket and Bolt Set. Under Property matches select Nominal diameter and then click the Add button to add the joint. OK to close project setup. Now in the model, you can place a custom valve and then add flanges to it. Note that when a custom valve is inserted to a pipeline flanges will not be placed automatically. This is because of a joint settings called Placeholder in project setup which makes connection between Universal_ET and all other end types valid. So with the Placeholder, Universal_ET and PE or BE or SW is valid connection and it will not add flanges. So delete the pipe, add flanges from tool palette or spec viewer and then add pipes to finish. Screen snapshots are attached for clarity.
Thanks, Siva (Autodesk)

Siva Thankappan
Technical Sales, Plant Solutions, Asia Pacific
Autodesk Singapore
Thanks, Siva (Autodesk)
Siva Thankappan
Technical Sales, Plant Solutions, Asia Pacific
Autodesk Singapore
Message 3 of 3
04-27-2010
05:43 AM
- Mark as New
- Bookmark
- Subscribe
- Mute
- Subscribe to RSS Feed
- Permalink
- Report
04-27-2010
05:43 AM
This is for second screenshot.
Thanks, Siva (Autodesk)
Siva Thankappan
Technical Sales, Plant Solutions, Asia Pacific
Autodesk Singapore
Thanks, Siva (Autodesk)
Siva Thankappan
Technical Sales, Plant Solutions, Asia Pacific
Autodesk Singapore
Reply
Topic Options
- Subscribe to RSS Feed
- Mark Topic as New
- Mark Topic as Read
- Float this Topic for Current User
- Bookmark
- Subscribe
- Printer Friendly Page

