Community
AutoCAD Electrical Forum
Welcome to Autodesk’s AutoCAD Electrical Forums. Share your knowledge, ask questions, and explore popular AutoCAD Electrical topics.
Turn on suggestions
Auto-suggest helps you quickly narrow down your search results by suggesting possible matches as you type.
Reply
Topic Options
- Subscribe to RSS Feed
- Mark Topic as New
- Mark Topic as Read
- Float this Topic for Current User
- Bookmark
- Subscribe
- Printer Friendly Page
Message 1 of 5
12-23-2010
09:20 PM
- Mark as New
- Bookmark
- Subscribe
- Mute
- Subscribe to RSS Feed
- Permalink
- Report
12-23-2010
09:20 PM
Maintained PB
Maybe I am totally missing it, but is there a maintained pushbutton symbol in the JIC library?
We use a SquareD 9001KR9P35R as a standard Emergency Stop.
This is a 30mm; illuminated;24VDC;with 1 NO and 1 NC contact block
Just want to check to see if there is something already there before I draw a block.
4 REPLIES 4
Message 2 of 5
12-24-2010
02:57 AM
- Mark as New
- Bookmark
- Subscribe
- Mute
- Subscribe to RSS Feed
- Permalink
- Report
12-24-2010
02:57 AM
You can insert a normally-open mushroom-head pushbutton and then insert a normally-closed child (2nd+ NC contact) or vice versa. Then use the Dashed Link Lines command to connect the two contacts. (see attached) AcadE offers this dyanamic approach so you are not bound to a specific rung spacing. You can even scoot one contact and leave the other in place. The dashed line will adjust.
Doug McAlexander
Design Engineer/Consultant/Instructor/Mentor specializing in AutoCAD Electrical training and implementation support
Phone and Web-based Support Plans Available
Phone: (770) 841-8009
www.linkedin.com/in/doug-mcalexander-1a77623
Please Accept as Solution if I helped you. Likes are also much appreciated.
Message 3 of 5
12-24-2010
07:29 AM
- Mark as New
- Bookmark
- Subscribe
- Mute
- Subscribe to RSS Feed
- Permalink
- Report
12-24-2010
07:29 AM
Thanks Doug--thats what I have been doing, I was just hoping for a lazy solution.
I should have gone ahead and made this a block and ran the symbol builder----it would have saved me some time.
Message 4 of 5
12-24-2010
12:34 PM
- Mark as New
- Bookmark
- Subscribe
- Mute
- Subscribe to RSS Feed
- Permalink
- Report
12-24-2010
12:34 PM
This was actually one of the features that attracted early customers. You are not bound to a particular rung spacing. Other programs require that you create a complete symbol for every combination of NO and NC and the number of contacts. AutoCAD Electrical is all about flexibility. You can insert any combination of contacts to create the perfect switch or pushbutton, or relay and you can either insert them next to one another or spread the contacts across multiple pages. The PLCs were developed with the same thought in mind. You can insert the PLC modules into a ladder with any rung spacing, and you can split the module up. It's all about flexibility. It avoids the scenario where you have to bend your wires to match the symbol, as illustrated in the attached screen capture from a competitive program I also use and teach.
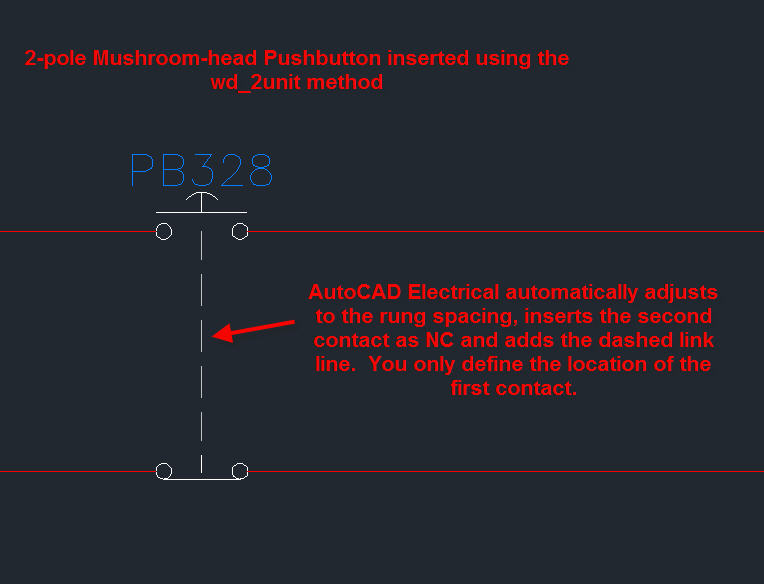
If you really want to create a symbol that already has the two contacts you want for your scenario you can have your cake and eat it too. Use the Icon Menu Wizard to create a 2-pole Mushroom-head Pushbutton using the WD_2Unit method. Create an icon image by drawing the 2-pole symbol on your screen. I suggest using polylines against a white background. After you have the icon image drawn, initiate the Icon Menu Wizard and click Add>Command. Note: You do not click Add>Component, even though you might think that makes sense. Name the symbol/command Mushroom Head 1NO 1NC. Select Active and zoom to the icon image you created on screen. The wizard will capture this image for the icon. In the Command line enter wd_2unit followed by the two symbol names you wish to insert. I created a sample symbol and inserted it as an example. (See the attached screen capture) The command I used to create this symbol was wd_2unit HPB11M HPB22 which inserts the NO Mushroom-head PB first, followed by a NC additional contact; both are then automatically joined with a dashed link line automatically.
Doug McAlexander
Design Engineer/Consultant/Instructor/Mentor specializing in AutoCAD Electrical training and implementation support
Phone and Web-based Support Plans Available
Phone: (770) 841-8009
www.linkedin.com/in/doug-mcalexander-1a77623
Please Accept as Solution if I helped you. Likes are also much appreciated.
Message 5 of 5
10-03-2012
08:01 AM
- Mark as New
- Bookmark
- Subscribe
- Mute
- Subscribe to RSS Feed
- Permalink
- Report
10-03-2012
08:01 AM
Thanks for this info Doug--I have been using this method, and recently decided to try a WD3 command----since our
E STOPs are illuminated from the NO contact, I added a RED pilot light as a seperate component.
This is OK.....it gets all 3 parts of the button inserted, but it will only build up or down. It is a trivial matter to simply move the light symbol to the proper place, but would I be better using an illuminated Mushroom PB as a starting point?
Thanks again
Reply
Topic Options
- Subscribe to RSS Feed
- Mark Topic as New
- Mark Topic as Read
- Float this Topic for Current User
- Bookmark
- Subscribe
- Printer Friendly Page

