- Subscribe to RSS Feed
- Mark Topic as New
- Mark Topic as Read
- Float this Topic for Current User
- Bookmark
- Subscribe
- Printer Friendly Page
- Mark as New
- Bookmark
- Subscribe
- Mute
- Subscribe to RSS Feed
- Permalink
- Report
Duct Fitting Issue
Hello,
I am trying to make a custom tee and I have problem that I can't solve.
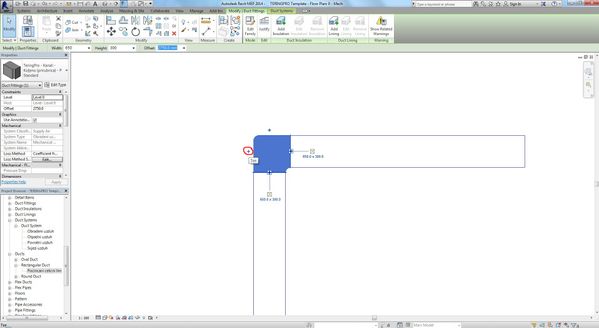
When I make a tee from an elbow it works fine (Duct Fitting_1.jpg and Duct Fitting_2.jpg) but when I try to make a tee from the middle of the duct I get an error and I don't know what to do (Duct Fitting_3.jpg an Duct Fitting_4.jpg).
Please help! I have attached pictures and revit family of the duct fitting.
- Mark as New
- Bookmark
- Subscribe
- Mute
- Subscribe to RSS Feed
- Permalink
- Report
You can change it as follows- go to edit type of duct-> routing preference-edit->preferred junction type-> "TEE"
- Mark as New
- Bookmark
- Subscribe
- Mute
- Subscribe to RSS Feed
- Permalink
- Report
~picks up loupe and inspects Family~
To begin, I'm of the electrical discipline so my expertise it not quite up to par in this category. Anyway, I was comparing your Family to the default OOTB Tee and I did not see what could be causing that error.
Also, I had loaded your Family into my test Project and create a separate Duct Type for it. I was using the stardard Rectangular Duct and remove the "Tee" Preference (set it to "none") and for whatever reason, Revit uses your Family correctly. I'll keep investigating this if I get some more time to do so.
![]()
BTW - Welcome to the Discussion Groups!
- Mark as New
- Bookmark
- Subscribe
- Mute
- Subscribe to RSS Feed
- Permalink
- Report
- Mark as New
- Bookmark
- Subscribe
- Mute
- Subscribe to RSS Feed
- Permalink
- Report
- Mark as New
- Bookmark
- Subscribe
- Mute
- Subscribe to RSS Feed
- Permalink
- Report
I have looked into this further, I think that this may be caused by the orientation of the geometry in the Family Editor AND/OR the placement order of the Duct Connectors (compared to the OOTB Duct Fitting Family). Originally, I started a new Duct Tee Family and built it haphazardly and encountered the exact same errors you did. However, I went back this morning and create another one a bit more carefully, matching the orientation and the placement order (below) of the Connectors, and my Fitting worked. In lieu of dissecting this Family to find the cause, see if you can recreate it based off of the way the OOTB Duct Tee is designed.
linked
DC #1 (Pri) <---------> DC #2
─────────┬────────
│
│
│
│
DC #3
- Mark as New
- Bookmark
- Subscribe
- Mute
- Subscribe to RSS Feed
- Permalink
- Report
I looked at your fitting I believe it's one of two things and not easy to correct or at least would take time.
1. your fitting needs to be rotated 90 deg counter clockwise. Also make sure primary connected is at 9 o'clock position as primary connectors should be placed on the X plane. Obviously to correct this will require a rebuild so save as on this one and try another.
if this does not work try
2. all tees are built with sweeps and not one extrusion. not sure if this could be the issue, I have personally never built a tee without using sweeps, so you might want to look into that.
As for the changing of the part type this did not work. If it worked for the other posted encourage him to post the fixed tee.
good luck.
- Subscribe to RSS Feed
- Mark Topic as New
- Mark Topic as Read
- Float this Topic for Current User
- Bookmark
- Subscribe
- Printer Friendly Page


