- Forums Home
- >
- Revit Products Community
- >
- Revit Architecture Forum
- >
- Re: Filled Region visibility control in Title Block Family
- Subscribe to RSS Feed
- Mark Topic as New
- Mark Topic as Read
- Float this Topic for Current User
- Bookmark
- Subscribe
- Printer Friendly Page
- Mark as New
- Bookmark
- Subscribe
- Mute
- Subscribe to RSS Feed
- Permalink
- Report
Filled Region visibility control in Title Block Family
But this send to back and bring to front option is not available in family editor.
I am creating a new title block family. Drawn two filled region (one above another and both are solid filled), They looks right in family but are wrong when loaded into project.
See attached image
- Mark as New
- Bookmark
- Subscribe
- Mute
- Subscribe to RSS Feed
- Permalink
- Report
- Alex
- Mark as New
- Bookmark
- Subscribe
- Mute
- Subscribe to RSS Feed
- Permalink
- Report
It appears that whatever you draw first ends up on top, even though it doesn't look that way in the family.
Select the object you want to go to the back, Modify > Paste Aligned > Same Place.
Since there is only one work plane in a titleblock family, the only way I see to get your black object to the background is to cut it and paste it to the same place.
In 3D families, I would draw a reference plane in Elevation above Z=0 and place all the regions I wanted above on that ref planes by either setting it before I start drawing or selecting the object and picking the button from the Modify tab to "edit work plane."
In this case, though, I would agree with Alex-just edit the black filled region to have a void where the colors cross it. You can have multiple closed polygons in a filled region. See Sketch which illustrates drawing the 4 polygons in sketch mode of the filled region command. You can use reference lines to set the boundaries you want but Revit will also snap/track to all lines drawn in the family.
Josh Sidde
The Freelon Group
www.freelon.com
- Mark as New
- Bookmark
- Subscribe
- Mute
- Subscribe to RSS Feed
- Permalink
- Report
Hi Guys,
I have a problem with filled regions in titleblock family. I created filled regions with different colors for my legends but every time I export the sheet with those legends the color of the titleblock family is the same with the filled regions and everything inside the titleblock family. Yes, Why didn't I use the Legends in the Project Browser, it's because I want to use that specific titleblock family into different projects using the same legends without copying them from one project into another using copy to clipboard,etc. I also checked the layers when exporting, the titleblock has only 1 layer which corresponds to a certain color of your choice. I just want to make filled regions that retain its color even when exported to CAD.
see the attached photos for the filled regions in titleblock family where there are still different in colors compared to the exported sheet having one color which is the default color magenta.
Thanks.
- Mark as New
- Bookmark
- Subscribe
- Mute
- Subscribe to RSS Feed
- Permalink
- Report
@rkitect28 I'm having the same problem
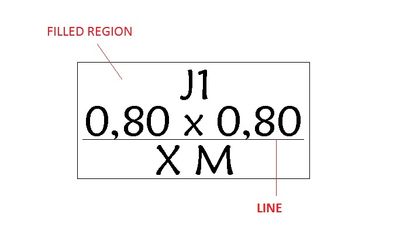
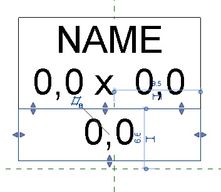
I've created a new window tag, and it was working till I drew a line:
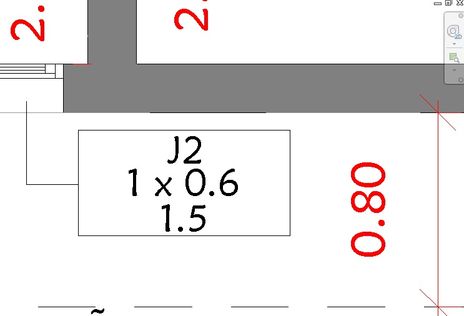
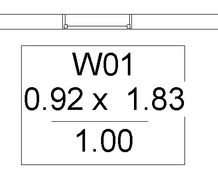
And the same tag inserted in the project:
The line is gone! Someone today know what it could be?
- Mark as New
- Bookmark
- Subscribe
- Mute
- Subscribe to RSS Feed
- Permalink
- Report
- Mark as New
- Bookmark
- Subscribe
- Mute
- Subscribe to RSS Feed
- Permalink
- Report
Well, this is not the main problem soluction, but how I've made the post above, I think it would be nice to show my soluction (who knows it can help someone in a similiar problem?)
I made a tag with filled regions and no line. Maybe the step by step shows it better:
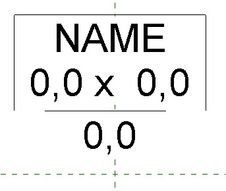
First the labels:
And Start to draw the region:
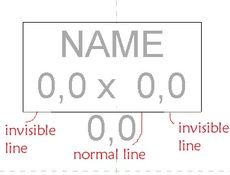
And the secret was change the line edge to invisible lines...
Then, just use a mirror and ajust the region size
Now, it placed in a project:
That's it!
- Subscribe to RSS Feed
- Mark Topic as New
- Mark Topic as Read
- Float this Topic for Current User
- Bookmark
- Subscribe
- Printer Friendly Page


