Community
Inventor Forum
Welcome to Autodesk’s Inventor Forums. Share your knowledge, ask questions, and explore popular Inventor topics.
Turn on suggestions
Auto-suggest helps you quickly narrow down your search results by suggesting possible matches as you type.
Reply
Topic Options
- Subscribe to RSS Feed
- Mark Topic as New
- Mark Topic as Read
- Float this Topic for Current User
- Bookmark
- Subscribe
- Printer Friendly Page
Message 1 of 11
Anonymous
761 Views, 10 Replies
06-15-2012
06:45 AM
- Mark as New
- Bookmark
- Subscribe
- Mute
- Subscribe to RSS Feed
- Permalink
- Report
06-15-2012
06:45 AM
texture
pls see attached .jpg texture picture...what steps are required to have this available to use in INV 2013.I want to use it on a metal floor..How do i import it into INV 2013
Regards
Tont Borland
10 REPLIES 10
Message 2 of 11
06-15-2012
07:35 AM
- Mark as New
- Bookmark
- Subscribe
- Mute
- Subscribe to RSS Feed
- Permalink
- Report
06-15-2012
07:35 AM
Tont,
See if this link helps you.
http://www.trainingtutorial.com/TAT5.htm
FYI though, if you go to the styles library and under color there is a perforated metal 01 color that is very close to what you are looking for.

Best Regards,
Scott McFadden
(Colossians 3:23-25)
Scott McFadden
(Colossians 3:23-25)
Message 3 of 11
06-15-2012
10:16 PM
- Mark as New
- Bookmark
- Subscribe
- Mute
- Subscribe to RSS Feed
- Permalink
- Report
06-15-2012
10:16 PM
Scott
For some reason i do not have the same information visible in my Styles and Standard Editor.Your pictures shows your Styles and Standard Editor has all the materials/colors visible.How do i get my Styles and Standard Editor Library to show all the materials/Colors.There is a pictures i have included to show my Styles Editor for comparison with your Styles Editor.
I`m assuming i cannot do anything regarding Textures if my Style Editor has nothing available
Thanks
Tony
Message 4 of 11
06-16-2012
04:54 AM
- Mark as New
- Bookmark
- Subscribe
- Mute
- Subscribe to RSS Feed
- Permalink
- Report
06-16-2012
04:54 AM
Tont,
The styles I showed you a pic of are right out of the box for me. We are using Inventor pro 2012.
DIdn't the link I gave you in my last posting show you how to import textured finishes into the styles library?
Best Regards,
Scott McFadden
(Colossians 3:23-25)
Scott McFadden
(Colossians 3:23-25)
Message 5 of 11
Anonymous
in reply to:
Anonymous
06-17-2012
03:47 AM
- Mark as New
- Bookmark
- Subscribe
- Mute
- Subscribe to RSS Feed
- Permalink
- Report
06-17-2012
03:47 AM
Tony, in Inventor 2013 the styles library has been relocated to the 'Appearance Editor' which can be found on the Quick Access Toolbar at the top of the screen.
The button you're looking for is the rainbow colored circle to the left of the 'Appearance' box.
To grab that texture you showed without the symbol, go back to the website, click on that image and the texture will display in another tab or window in your browser, right click and choose 'save image as', saves you having to modify it later.
To use the texture, first, open a part or assembly, then click the rainbow button, then either duplicate an existing color or
click on the sphere with the blue cross located at the bottom left of the appearance editor and choose an apropriate template.
Using the 'Metal' type as an example, first rename the template to your desired name. Next, checkmark either the 'relief pattern' or 'cutouts' selection and then click on the 'type' drop down box and select 'custom' or 'custom image'.
You can then click on the box underneath the 'type' drop down and select your texture.
When you are happy with your creation, DO NOT forget to Add it back to the library. Failure to do so will mean you are only able to access your custom colour within that part or assembly file.
HTH
Message 6 of 11
Anonymous
in reply to:
Anonymous
06-17-2012
06:17 AM
- Mark as New
- Bookmark
- Subscribe
- Mute
- Subscribe to RSS Feed
- Permalink
- Report
06-17-2012
06:17 AM
Hi Andy
Thank you for the explanation.I followed your steps but could not get it to work.I have picture attached of what i did.Can you see if i have missed something.The texture was saved on to my desktop.Does it need to be in a certain folder?
I selected Metal from the sphere with the blue cross located at the bottom left of the appearance editor and choose Metal
Tony
Message 7 of 11
Anonymous
in reply to:
Anonymous
06-17-2012
05:04 PM
- Mark as New
- Bookmark
- Subscribe
- Mute
- Subscribe to RSS Feed
- Permalink
- Report
06-17-2012
05:04 PM
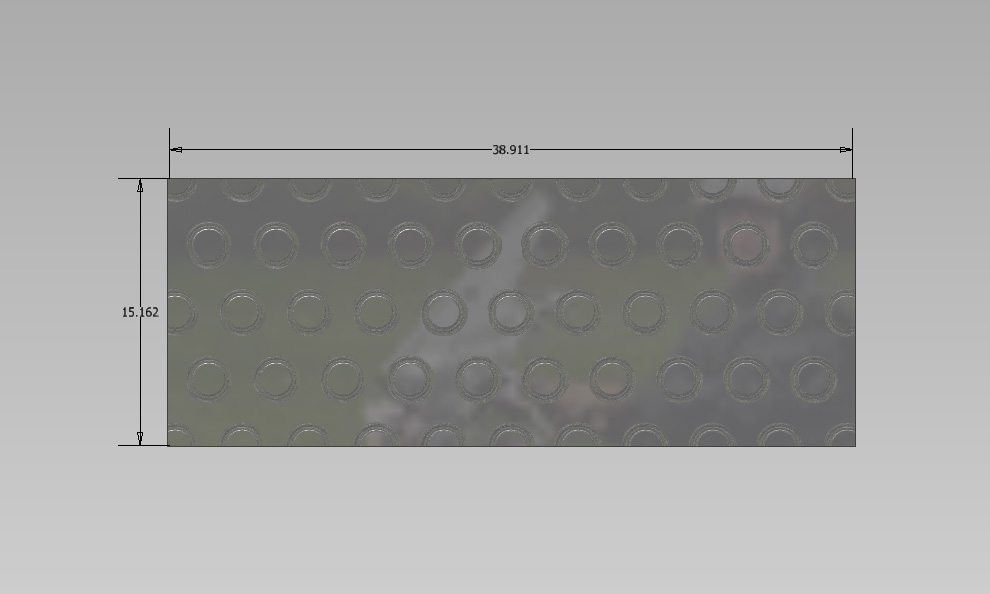
Tony, I should have mentioned scale. In the Texture Editor (picture of custom image 2.png) set the scale to something like 0.12 inches instead of 12 inches as it is in the picture.
There seems to be an error with scaling that was supposedly repaired in Update 1, but I haven't seen any evidence of that as yet. You'll also notice that the texture does not show up in the Texture editor, which makes life difficult also.
There are a lot of errors with the new appearances that really need to be addressed IMO. I'm hopeful that they will be taken care of in SP1, but there is no guarantee of that.
In the meantime, I have attached a picture of what I was able to achieve using that texture. It didn't turn out the way I thought it would, especially when you consider the transparency in the texture (the pink color). I expected to see holes in the material, but that did not happen. I will examine the texture and experiment with it and let you know what my findings are.
The settings are:
Type - Stainless Steel
Finish - Brushed
Relief Pattern - Custom Image
Amount - 2.00
Texture Editor
Brightness - 100
Position - 0 & 0
Rotation - 0.00
Scale - 3.80 mm W & H
You can play with the above until you are happy with the results.
Good Luck and Happy Inventing!
Message 11 of 11
Anonymous
in reply to:
Anonymous
06-18-2012
08:04 AM
- Mark as New
- Bookmark
- Subscribe
- Mute
- Subscribe to RSS Feed
- Permalink
- Report
06-18-2012
08:04 AM
Thanks Doug, I eventually figured out that I had forgotten about the naming convention, but you beat me to the punch.
Anyhow, I ended up creating a cutout to match the texture. I've attached them here.
Both files should work once you play with the scale settings to suit the piece your working on.
Reply
Topic Options
- Subscribe to RSS Feed
- Mark Topic as New
- Mark Topic as Read
- Float this Topic for Current User
- Bookmark
- Subscribe
- Printer Friendly Page
