Community
- Forums Home
- >
- Inventor Community
- >
- Inventor Forum
- >
- Modeling off of Derived Parts - Is there a better way?
Inventor Forum
Welcome to Autodesk’s Inventor Forums. Share your knowledge, ask questions, and explore popular Inventor topics.
Turn on suggestions
Auto-suggest helps you quickly narrow down your search results by suggesting possible matches as you type.
Reply
Topic Options
- Subscribe to RSS Feed
- Mark Topic as New
- Mark Topic as Read
- Float this Topic for Current User
- Bookmark
- Subscribe
- Printer Friendly Page
Message 1 of 11
07-05-2011
12:38 PM
- Mark as New
- Bookmark
- Subscribe
- Mute
- Subscribe to RSS Feed
- Permalink
- Report
07-05-2011
12:38 PM
Modeling off of Derived Parts - Is there a better way?
Attached is the quickest and easiest way I've found to build our companies assemblies. We add masonry to a steel shell, layer by layer. Sometimes casting the last layer. The end result is an assembly of a furnace that holds molten metal.
I've reviewed the skeletal modeling and I feel this uses that same idea, but with derived parts.
Unfortunately, our assemblies seem to be getting into the "Complex / Large" range that requires a powerful workstation do to all of the links in the model tree.
Anyone have a better idea, other than a 1000 and one sketches that may or may not meet at every surface of the layer before?
Please note, I am aware that Thicken and Split are not the most robust tools in Inventor when changes are made to the base part.
10 REPLIES 10
Message 2 of 11
07-06-2011
05:22 AM
- Mark as New
- Bookmark
- Subscribe
- Mute
- Subscribe to RSS Feed
- Permalink
- Report
07-06-2011
05:22 AM
Hi there,
Unfortunately I can't open the parts with Inventor 2010. Could you upload a screen shot?
You can combine Skeletal modeling and Multi solid modeling if your Master part is going to get too big.
For example, you create your geometry in part one (No solids or surfaces) this is your Master part.
You then derive this Master part into part's two and three - kind of like sub assemblies. You can then begin to create your solids within these 'Sub' Master parts.
When you derive them out, they will all work together because they are all using the same geometry, but the Sub Master part files won't be so complex, which will keep the file size down in the part files.
Another tip is to right click on the Sub Master part in the browser and chose 'Suppress link'. I haven't checked to see what effect this has on file size, but it does prevent Inventor automatically updating parts when the Master part is changed. You will need to toggle this on and off when you do an update to the Master part - but at least you are in control.
Message 3 of 11
07-06-2011
07:23 AM
- Mark as New
- Bookmark
- Subscribe
- Mute
- Subscribe to RSS Feed
- Permalink
- Report
07-06-2011
07:23 AM
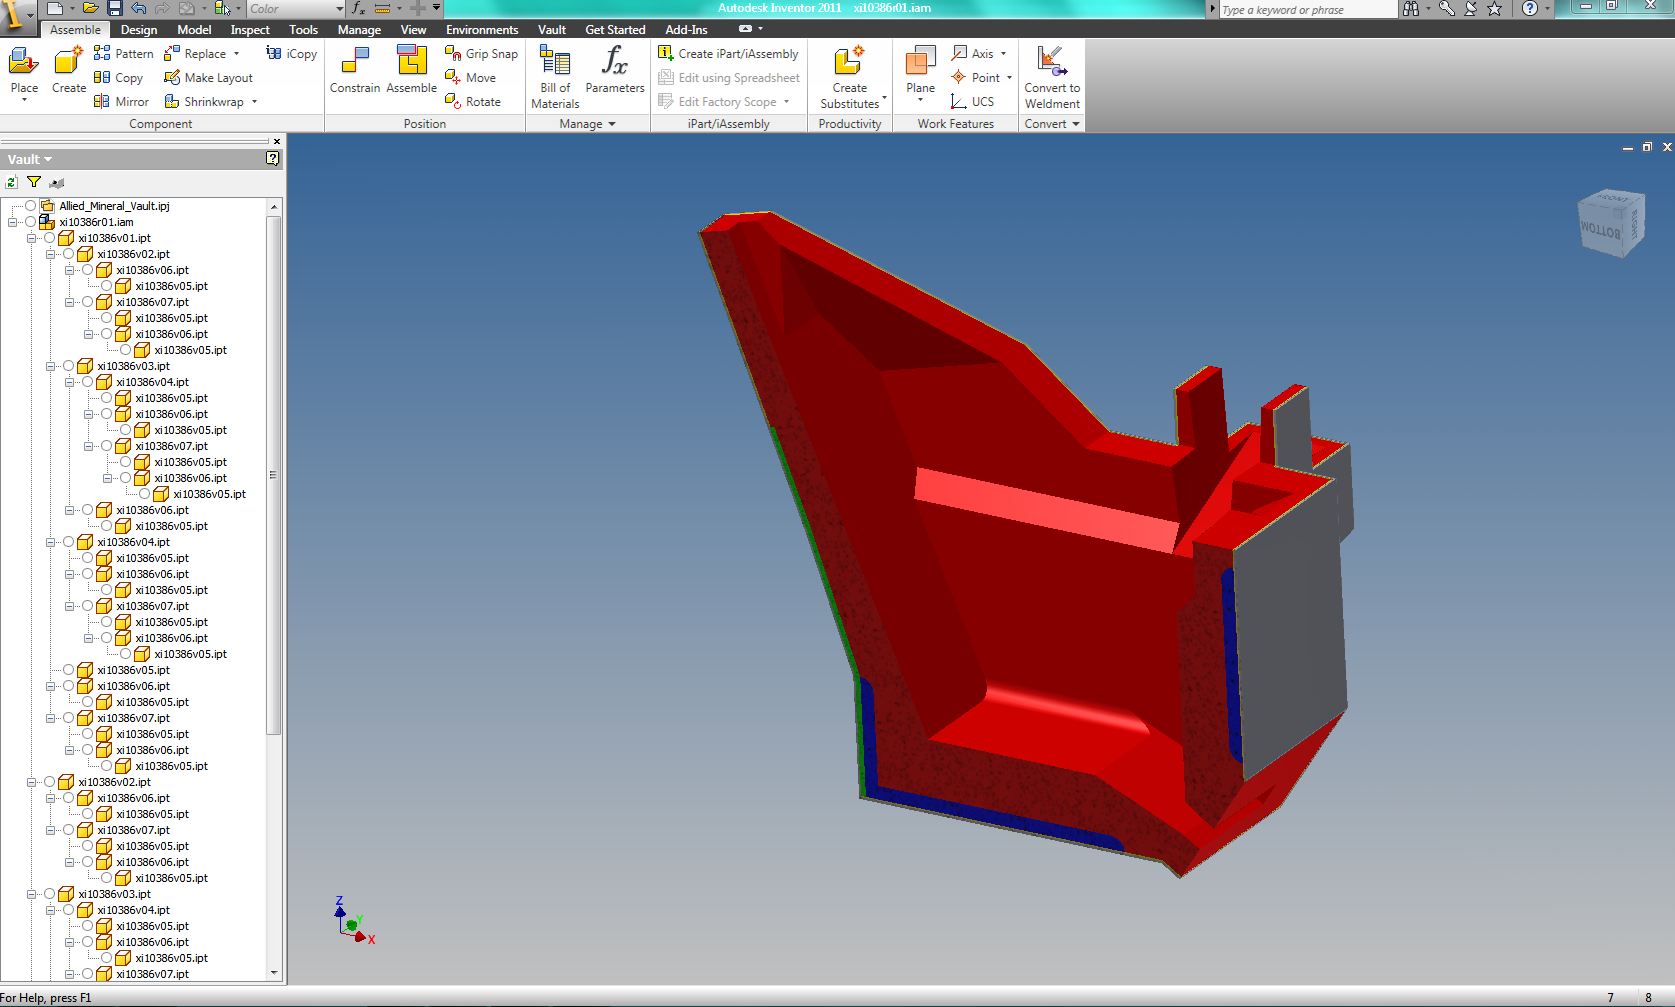
From the picture you can see the assymbly and the part tree from the Vault view.
The first part is the steel shell. The next part is the ceramic fiber paper created from the derived surfaces of the steel shell. Then super duty fire brick are created from the derived surfaces of the paper. And so on and so on till finally the inside material is created and all of the other parts "Split" away from the solid.
Message 4 of 11
07-06-2011
12:25 PM
- Mark as New
- Bookmark
- Subscribe
- Mute
- Subscribe to RSS Feed
- Permalink
- Report
07-06-2011
12:25 PM
Did you know that you use Thicken to create new solids? This would save you haviing to split them up at the end.
Did you know that you can create a zero offset surface by chosing Thicken, surface option an putting zero in as the offset. You could derive your offset surfaces into sperate part files, then apply the thicken surface to create a body, hen apply any other operations.
Make sense? Is this any help?
Message 5 of 11
07-06-2011
02:21 PM
- Mark as New
- Bookmark
- Subscribe
- Mute
- Subscribe to RSS Feed
- Permalink
- Report
07-06-2011
02:21 PM
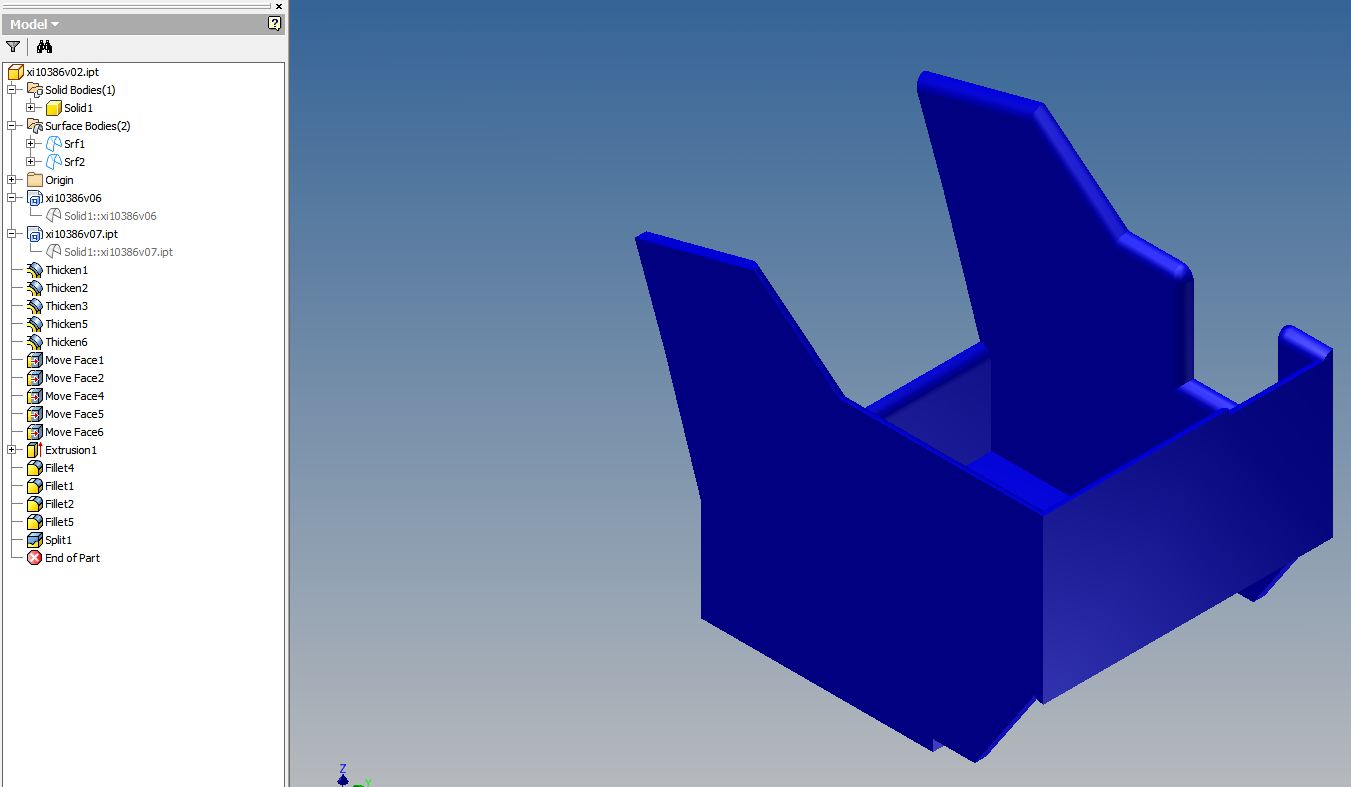
We always thicken as a solid. The thicken is from the derived part / material layer created before it.
As the thicken and final shape get more complex, the splits a used to clean up the edges.
But as a design practice, we thicken all the material layers, each as a different part, until the last layer of material.
The last layer has all of the previous parts, the ones that use thicken, split from it. Leaving just the last layer with some intricate, Boolean subtractions.
See the attached image as an example.
Message 6 of 11
07-08-2011
02:36 AM
- Mark as New
- Bookmark
- Subscribe
- Mute
- Subscribe to RSS Feed
- Permalink
- Report
07-08-2011
02:36 AM
As mentioned before, you could work backwards. Create the final shape without separate solids (or with if there is not too many parts) then derive out from that the next part, so you remove material instead of adding it. See if it is any better.
Regards,
Ozitag.
IV 2010
Message 7 of 11
07-08-2011
03:33 AM
- Mark as New
- Bookmark
- Subscribe
- Mute
- Subscribe to RSS Feed
- Permalink
- Report
07-08-2011
03:33 AM
The final shape is the most complex, so working backwards is not an option.
Message 8 of 11
07-12-2011
04:46 AM
- Mark as New
- Bookmark
- Subscribe
- Mute
- Subscribe to RSS Feed
- Permalink
- Report
07-12-2011
04:46 AM
I don't have time to open the files and look at them in detail, but it seems to me that this would be a great application for a multibody part. That way the complicated dependencies are all in the same part file, and the parts that make up the assembly are nothing but derivatives of that layout.
Message 9 of 11
07-12-2011
05:00 AM
- Mark as New
- Bookmark
- Subscribe
- Mute
- Subscribe to RSS Feed
- Permalink
- Report
07-12-2011
05:00 AM
That's not a bad idea.
I've been think of multi part bodies, but stopped when I discovered the i-properties only show the total volume of all the solid bodies.
You reminded me of a trick I've used before. I could create a multi part body as the first part, then derive one body at a time into a new part. The assembly would be the single bodies and then would have the individual volumes I am looking for. This method would be better in terms of memory, because the model tree would only be one level deep.
I'll try this and let you know.
It just dawn on me that I just repeated what you said.
Message 10 of 11
07-12-2011
05:10 AM
- Mark as New
- Bookmark
- Subscribe
- Mute
- Subscribe to RSS Feed
- Permalink
- Report
07-12-2011
05:10 AM
This is basically what I suggested above, although it may not have been clear. Build the entire assembly as one part with or without separate solid bodies (using separate solid bodies allows it to be quicker in the end but if there is a lot of parts can be a little messy) then derive all the solid bodies into parts, which then should have the correct volume. If you do it as a single part, then you derive the small part from the final and cut out the parts you don't require. But as you said, this is a lot of extra work.
Best off going with multi solid bodies.
You can then place all the parts into a final assembly if you need to have different design views etc for drawings.
Regards,
Ozitag.
IV 2010
Message 11 of 11
07-12-2011
05:22 AM
- Mark as New
- Bookmark
- Subscribe
- Mute
- Subscribe to RSS Feed
- Permalink
- Report
Reply
Topic Options
- Subscribe to RSS Feed
- Mark Topic as New
- Mark Topic as Read
- Float this Topic for Current User
- Bookmark
- Subscribe
- Printer Friendly Page
