Community
Inventor Forum
Welcome to Autodesk’s Inventor Forums. Share your knowledge, ask questions, and explore popular Inventor topics.
Turn on suggestions
Auto-suggest helps you quickly narrow down your search results by suggesting possible matches as you type.
Reply
Topic Options
- Subscribe to RSS Feed
- Mark Topic as New
- Mark Topic as Read
- Float this Topic for Current User
- Bookmark
- Subscribe
- Printer Friendly Page
Message 1 of 12
10-15-2012
12:59 PM
- Mark as New
- Bookmark
- Subscribe
- Mute
- Subscribe to RSS Feed
- Permalink
- Report
10-15-2012
12:59 PM
HI
I am after help on sorting out our projects over a network, as we all know materials and styles are in a right mess at the moment an hopefully autodesk will release a service pack that actually works soon. However t keep battling on I would like some guidance if possible.
I have set up a project over a network so all employees at our office can get template files,design data etc so we can keep everybody upto date,but because the way inventor 2013 works it will not let us map materials to anywhere apart from C:\Users\Public\Documents\Autodesk\Inventor 2013 this is very frustrating as we have over 21 staff out our office and to get everybody upto date if there are any changes is quite time consuming as every body has to download to local c drive .
is there a preferred workflow that is used for network user's using vault.
Any feed back would be appreciated
Dave
Solved! Go to Solution.
Solved by scottmoyse. Go to Solution.
11 REPLIES 11
Message 2 of 12
10-15-2012
04:31 PM
- Mark as New
- Bookmark
- Subscribe
- Mute
- Subscribe to RSS Feed
- Permalink
- Report
10-15-2012
04:31 PM
BUMP... As I would also like this question answered, or for a solution to be brought to our attention.
Thank you!
Message 3 of 12
10-15-2012
05:04 PM
- Mark as New
- Bookmark
- Subscribe
- Mute
- Subscribe to RSS Feed
- Permalink
- Report
10-15-2012
05:04 PM
Dave,
Can you expand a bit more on "it will not let us map materials to anywhere apart from C:\Users\Public\Documents\Autodesk\Inventor 2013" ?
What is not working for you ? You can define a material/appearance library file for your project to be on a network & subsequently add custom materials/appearances back to that over the network. These in turn can also reference image files for textures, etc that also reside on the network.
Do you have any screenshots of errors or specific problems ?
Many Thanks,
Chris
Chris Mitchell
PDMS Customer Engagment Team
Autodesk, Inc.
Message 4 of 12
10-15-2012
09:04 PM
- Mark as New
- Bookmark
- Subscribe
- Mute
- Subscribe to RSS Feed
- Permalink
- Report
10-15-2012
09:04 PM
I Have attached a few images
- firstly I removed my custom library and then placed over a network location
- In projects I browsed to new area
- selected my custom library
- import failed (No Materials found)
- re-attached same library but at default public user area and (Success)
However this is no good trying to deploy over networks,
Also you mention You can define a material/appearance library file for your project to be on a network & subsequently add custom materials/appearances back to that over the network. These in turn can also reference image files for textures, etc that also reside on the network.
We have support calls logged with symetri showing issues with appearances and image files,
- Anything that was defined in inventor 2011 i.e. images assigned to certain material types always shows as 3rd Party image attached to file (that's the version we jumped from to 2013) these files always have to be purged.
- This is recognized more clearly if you use vault projects as it requires you to map your image files to a folder in your vault.
- Any new material that we create and try to attach a image to reference aesthetics of material (always attaches as 3rd party file on parts)
Firstly if this is possible to do what you say can you provide me with a workflow as we have had several people looking at this with no success
- Help with best practice on how to deploy vault projects that look over networks for style templates etc
- how to attach images to files without it attaching a 3rd party image file
- where exactly do we place all image files that assigned to materials (nobody seams to know this ?


Thanks for your help
Dave
Message 5 of 12
10-16-2012
05:56 AM
- Mark as New
- Bookmark
- Subscribe
- Mute
- Subscribe to RSS Feed
- Permalink
- Report
10-16-2012
05:56 AM
Dave,
As previously posted by an Autodesk employee, here is some expanded documentation which provides more guidance on the new materials and appearances tools. Also, there are updated wikihelp files with this information as well.
http://forums.autodesk.com/t5/Autodesk-Inventor/Color-changes-Inventor-2013/m-p/3537884#M441376
Cheers,
Mark
Regards,
Mark
---------------------------------------------------------------------------------
Autodesk PDSU 2016 Ultimate, Inventor Professional 2016 Build: 236, SP2 Update 1
Windows 10 Pro 64-bit, Ver. 1607, Build 14393.1198
Dell Latitude E6530; 16 GB RAM; Core i7-3520M 0 2.90 GHz, 2.90 GHz
NVIDIA NVS 5200M, driver 376.54; SpaceNavigator, driver 10.3.0
Message 6 of 12
10-16-2012
04:16 PM
- Mark as New
- Bookmark
- Subscribe
- Mute
- Subscribe to RSS Feed
- Permalink
- Report
10-16-2012
04:16 PM
Thanks for posting those links, Mark, there lots of good info there.
Dave - I'll try to answer some of your specific questions.
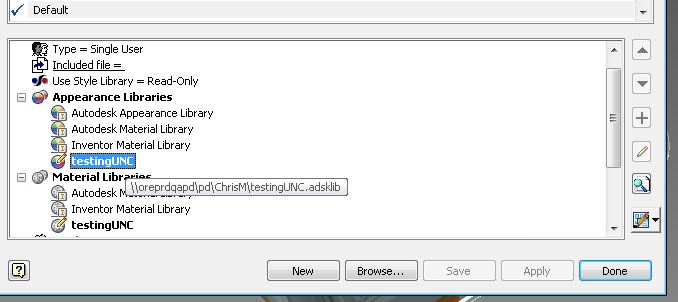
- The "No materials are available" message bascially occurs when Inventor already has one library loaded in memory & you are essentially trying to unload/reload a new library by editing the project. Usually an exit & restart without actually going past the project editor will allow you to add a new library (from the network or loal disk), or remove the libraries you no longer need access to. Or you can just Rt click the .ipj file & use edit, so that none of the material libraries are loaded in memory. (See attached image).
- Regarding the image file location & the creation of the 3rd party folder in vault. The default location of the texture files is defined in the registry - see (HKEY_CURRENT_USER\Software\Autodesk\Inventor\RegistryVersionXX.0\System\Preferences\File => “C:\Program Files\Autodesk\Inventor 20XX\Bin\Inventor.exe:TextureDir”) , you can change that to be a network location & move your image files there & then the 3rd party folder shouldn't be created on a vault check-in. Note that any existing image file paths in the library file will not get updated as part of this action. The full paths there are written in to the library & will only be changed on edit.
- Going forward you can put your image files there & then in your custom material/appearance library you should always reference files from there & you won't see the 3rd party folder.
- I've also seen other customer project files where their textures folder is defined in the .ipj file as a library - see attached. This may also be another option for you for storing custom images for appearances.
Hope this helps,
Chris
Chris Mitchell
PDMS Customer Engagment Team
Autodesk, Inc.
Message 7 of 12
10-16-2012
11:35 PM
- Mark as New
- Bookmark
- Subscribe
- Mute
- Subscribe to RSS Feed
- Permalink
- Report
10-16-2012
11:35 PM
Hi all,
I can confirm the use of the registry key.
Here is the method we use to migrate material and apperance to 2013:
- Create on the network (based on the original texture folder in C:\Users\Public\Documents\Autodesk\Inventor 2013\Textures) a folder with standard textures + custom textures.
- Open registry and navigate to the key HKEY_CURRENT_USER\Software\Autodesk\Inventor\RegistryVersion17.0\System\Preferences\File
- Edit the value C:\Program Files\Autodesk\Inventor 2013\Bin\Inventor.exe:TextureDir and set the path to you network textures.
****************
(Optional step)
Inventor 2013 will migrate old Inventor colors (local and style library) using this method:
If a realistic appearance is set in the old color, this realistic is used to create the new 2013 appearance.
Else the new 2013 appearance is creating based on the standard settings (emissive, specular, etc...)
But for a majority of customer, nobody care about the realistic appearance in old Inventor release. It's why you get some strange conversion of colors btw 2012 and 2013....
Then Autodesk with the help of Chris (thanks again 🙂 provide a workaround supported if you have SP1 or SP1.1 installed:
Create a Windows variable called InvCM_ForceConvertToGeneric and set the value to 1.
Then how Inventor will migrate color and appearance now?
ALWAYS using old standard settings (emissive, specular, etc….) and it create only generic appearance.
This workaround works for manually migrating file, task scheduler migration and style library migration. You have to set this variable on all computers.
*********************
- Edit your old Colors.xml files located in your old Design Data (notepad++ or XML Notepad)
- Find TexturePath="2" and change it to TexturePath="1" and look if in this block TextureFile don’t include a path but only the filename.
- - Find TexturePath="4" and change it to TexturePath="1" and look if in this block TextureFile don’t include a path but only the filename.
- Create a new part
- Launch the material manager
- Call the tools to Migrate Inventor Styles
- Browse to the Design Data with the colors.xml you fix manually.
- Check Color + Material Style library (don’t separate it, it’s a bad idea)
- Create a new Library and call it YouCompanyNAme.adsklib
- Migrate.
- Close Inventor and open it again.
- Add this adsklib to your IPJ and remove all Autodesk Library (we create a tool in order to do that on all IPJ files. If interested, contact me).
Now, if you use or create an appearance with a BMP as texture or something else, the OLE link doesn’t appear anymore. Maybe you have to update your local style regarding the style library.
Xavier Dumont
CAD/PDM Consultant
Hurni Engineering Sàrl
Autodesk Gold Partner
Switzerland
Message 8 of 12
10-19-2012
12:17 PM
- Mark as New
- Bookmark
- Subscribe
- Mute
- Subscribe to RSS Feed
- Permalink
- Report
10-19-2012
12:17 PM
Thanks for posting this additional info Xavier,
To add a bit of clarity around the colors.xml file edits you mentioned :
- TexturePath=”2” means the texture is located at the project’s content library directory;
- TexturePath=”3” means it is located at project’s style folder;
- TexturePath=“4” means the texture is an absolute path.
- TexturePath=”1” means the file is located at the application texture file directory.
So the following modifications Xavier mentions are to tell Inventor to find all textures relative to the application texture file directory, that the registry key indicates. Subsequently when the colors/materials xml files are migrated to 2013, then the resulting adsklib file will still contain the appropriate image path info.
Thanks to Michael Zhang for this info.
Hope this helps,
Chris
Chris Mitchell
PDMS Customer Engagment Team
Autodesk, Inc.
Message 9 of 12
04-30-2013
09:33 PM
- Mark as New
- Bookmark
- Subscribe
- Mute
- Subscribe to RSS Feed
- Permalink
- Report
04-30-2013
09:33 PM
@Anonymous wrote:
Create a Windows variable called InvCM_ForceConvertToGeneric and set the value to 1.
Xavier,
For clarity please can you confirm that the Windows Variable should be created within this registry folder?
HKEY_CURRENT_USER\Software\Autodesk\Inventor\RegistryVersion17.0\System\Preferences\File
Scott Moyse
Did you find this post helpful? Feel free to Like this post.
Did your question get successfully answered? Then click on the ACCEPT SOLUTION button.
Design & Manufacturing Technical Services Manager at Cadpro New Zealand
Co-founder of the Grumpy Sloth full aluminium billet mechanical keyboard project
Message 10 of 12
04-30-2013
10:05 PM
- Mark as New
- Bookmark
- Subscribe
- Mute
- Subscribe to RSS Feed
- Permalink
- Report
04-30-2013
10:05 PM
It's ok, I found your video Xavier. I'll post an English version later cheers
Scott Moyse
Did you find this post helpful? Feel free to Like this post.
Did your question get successfully answered? Then click on the ACCEPT SOLUTION button.
Design & Manufacturing Technical Services Manager at Cadpro New Zealand
Co-founder of the Grumpy Sloth full aluminium billet mechanical keyboard project
Message 11 of 12
05-02-2013
02:50 PM
- Mark as New
- Bookmark
- Subscribe
- Mute
- Subscribe to RSS Feed
- Permalink
- Report
05-02-2013
02:50 PM
@ChrisMitchell01 wrote:
To add a bit of clarity around the colors.xml file edits you mentioned :
- TexturePath=”2” means the texture is located at the project’s content library directory;
- TexturePath=”3” means it is located at project’s style folder;
- TexturePath=“4” means the texture is an absolute path.
- TexturePath=”1” means the file is located at the application texture file directory.
Hope this helps,
Chris
Chris,
Can you confirm the same needs to be done to the BumpMapImagePath property in the colors.xml file as well please?
Scott Moyse
Did you find this post helpful? Feel free to Like this post.
Did your question get successfully answered? Then click on the ACCEPT SOLUTION button.
Design & Manufacturing Technical Services Manager at Cadpro New Zealand
Co-founder of the Grumpy Sloth full aluminium billet mechanical keyboard project
Message 12 of 12
05-08-2013
11:39 AM
- Mark as New
- Bookmark
- Subscribe
- Mute
- Subscribe to RSS Feed
- Permalink
- Report
05-08-2013
11:39 AM
Hi Scott,
Sorry for the delayed reply. Yes, the same applies there. Inventor handles the bump image and texture image in the same way. The following description about texture are also suitable for Bump map:
- TexturePath=”2” means the texture is located at the project’s content library directory;
- TexturePath=”3” means it is located at project’s style folder;
- TexturePath=“4” means the texture is an absolute path.
- TexturePath=”1” means the file is located at the application texture file directory.
Thanks,
Chris
Chris Mitchell
PDMS Customer Engagment Team
Autodesk, Inc.
Reply
Topic Options
- Subscribe to RSS Feed
- Mark Topic as New
- Mark Topic as Read
- Float this Topic for Current User
- Bookmark
- Subscribe
- Printer Friendly Page
