Community
Inventor Forum
Welcome to Autodesk’s Inventor Forums. Share your knowledge, ask questions, and explore popular Inventor topics.
Turn on suggestions
Auto-suggest helps you quickly narrow down your search results by suggesting possible matches as you type.
Reply
Topic Options
- Subscribe to RSS Feed
- Mark Topic as New
- Mark Topic as Read
- Float this Topic for Current User
- Bookmark
- Subscribe
- Printer Friendly Page
Message 1 of 9
11-11-2011
06:27 AM
- Mark as New
- Bookmark
- Subscribe
- Mute
- Subscribe to RSS Feed
- Permalink
- Report
11-11-2011
06:27 AM
BOM Subassembly Numbering not correct
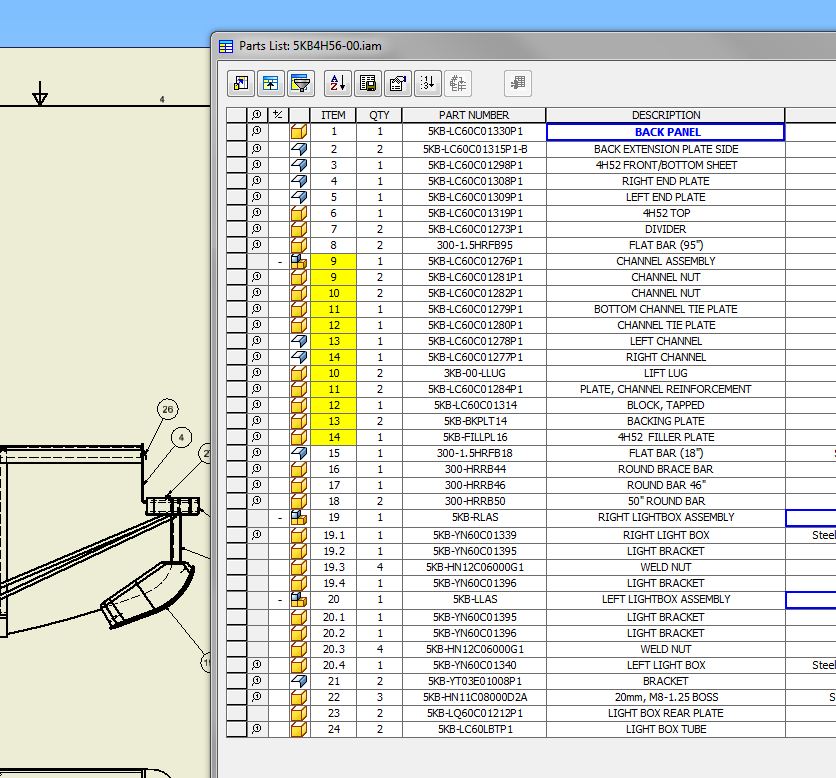
My assembly drawing BOM is not numbering the parts correctly. In the Bill of Materials editing, I have selected Structured View, and expanded the subassemblies. When I go back to edit the parts list from the drawing, I expanded the subassemblies so that the subassembly number and the parts in the subassembly are visible and should show as parts 9, 9.1, 9.2, 9.3, 9.4, 9.5, 10, 11 etc. In the posted example, I have three subassemblies and two are correct, but the parts in yellow (Inventor highlighted them all on its own???) are not correct now. One is a subassembly number and some of the highlighted parts are subassembly parts.
Is there a way to renumber the BOM parts list and it keep the subassembly part numbering?
If there is a subassembly not showing correctly is there a way to fix it?
Thank you.
INV Professional 2017 (Build: 142, Release: 2017RTM), Windows 10 Professional (64-bit), Intel Xeon E5-1620 3.5GHz CPU, 32GB RAM, NVIDIA Quadro K2200, Vault Basic 2017
8 REPLIES 8
Message 3 of 9
11-11-2011
10:35 AM
- Mark as New
- Bookmark
- Subscribe
- Mute
- Subscribe to RSS Feed
- Permalink
- Report
11-11-2011
10:35 AM
I tried that, many times, trying different settings, different changes, etc. Nothing worked.
INV Professional 2017 (Build: 142, Release: 2017RTM), Windows 10 Professional (64-bit), Intel Xeon E5-1620 3.5GHz CPU, 32GB RAM, NVIDIA Quadro K2200, Vault Basic 2017
Message 4 of 9
11-11-2011
11:36 AM
- Mark as New
- Bookmark
- Subscribe
- Mute
- Subscribe to RSS Feed
- Permalink
- Report
11-11-2011
11:36 AM
WELL, try this way.
open your bom in the assembly file. disable bom and save, exit.
open assembly file again, enable bom and create part list again.
i guess most likely you press wrong key when you rearrange partslist. there is nothing wrong with inventor.
Autodesk Inventor Professional 2019
Message 5 of 9
11-11-2011
12:44 PM
- Mark as New
- Bookmark
- Subscribe
- Mute
- Subscribe to RSS Feed
- Permalink
- Report
11-11-2011
12:44 PM
Ok.
I disabled the BOM view.
I saved the part.
I closed the part.
I restarted Inventor.
I opened the drawing.
I put the parts list on the drawing again.
I followed the attached procedure, which I have used for months.
Still, I get the same result.
The steps I used haven't changed, so I'm a bit confused as to what has happened.
INV Professional 2017 (Build: 142, Release: 2017RTM), Windows 10 Professional (64-bit), Intel Xeon E5-1620 3.5GHz CPU, 32GB RAM, NVIDIA Quadro K2200, Vault Basic 2017
Message 6 of 9
11-11-2011
06:05 PM
- Mark as New
- Bookmark
- Subscribe
- Mute
- Subscribe to RSS Feed
- Permalink
- Report
11-11-2011
06:05 PM
well, have you tried those steps i wront down?
that should reset BOM in assembly file.
like i mentioned before, you press wrong button or key carelessly when you rearrange your partslist.
in your procedure, it doesnt ask you to renumber partslist.
Autodesk Inventor Professional 2019
Message 7 of 9
11-23-2011
02:50 AM
- Mark as New
- Bookmark
- Subscribe
- Mute
- Subscribe to RSS Feed
- Permalink
- Report
11-23-2011
02:50 AM
Hi,
Yellow item numbers indicate duplicate item numbers.
You can try renumber the BOM:
- Open BOM by RMC on parts list, Bill of Materials…
- Go to Structured tab
- Expand subassembly with wrong numbers
- Click renumber button at BOM toolbar (4th icon from the left)
- Click ok in the dialog.
BOM should be renumbered including expanded subassembly items and parts list should update automatically.
Regards,
Jozef
Message 8 of 9
11-23-2011
06:05 AM
- Mark as New
- Bookmark
- Subscribe
- Mute
- Subscribe to RSS Feed
- Permalink
- Report
11-23-2011
06:05 AM
Thank you.
I will try it when I get a chance.
INV Professional 2017 (Build: 142, Release: 2017RTM), Windows 10 Professional (64-bit), Intel Xeon E5-1620 3.5GHz CPU, 32GB RAM, NVIDIA Quadro K2200, Vault Basic 2017
Message 9 of 9
09-30-2019
08:23 AM
- Mark as New
- Bookmark
- Subscribe
- Mute
- Subscribe to RSS Feed
- Permalink
- Report
Reply
Topic Options
- Subscribe to RSS Feed
- Mark Topic as New
- Mark Topic as Read
- Float this Topic for Current User
- Bookmark
- Subscribe
- Printer Friendly Page