Community
Inventor Forum
Welcome to Autodesk’s Inventor Forums. Share your knowledge, ask questions, and explore popular Inventor topics.
Turn on suggestions
Auto-suggest helps you quickly narrow down your search results by suggesting possible matches as you type.
Reply
Topic Options
- Subscribe to RSS Feed
- Mark Topic as New
- Mark Topic as Read
- Float this Topic for Current User
- Bookmark
- Subscribe
- Printer Friendly Page
Message 1 of 14
06-29-2013
07:46 PM
- Mark as New
- Bookmark
- Subscribe
- Mute
- Subscribe to RSS Feed
- Permalink
- Report
06-29-2013
07:46 PM
Ok, I have read about 20 forums about how to align a model to the origin, and NONE of them seem to be correct. I am using Inventor 2013. I tried the move body command, however there is no part of the dialog box that lets me choose a face or plane to align to.
What do you guys do when you import a model that is not aligned to the origin?
Solved! Go to Solution.
Solved by JDMather. Go to Solution.
Solved by blair. Go to Solution.
13 REPLIES 13
Message 2 of 14
06-29-2013
07:48 PM
- Mark as New
- Bookmark
- Subscribe
- Mute
- Subscribe to RSS Feed
- Permalink
- Report
06-29-2013
07:48 PM
And, please tell me how to do this within the part file instead of the assembly. As I understand it, the assembly does not update the part file, but the part file can update the assembly. If that is the case, although I align the model to the assembly origin, the part file will be the same when I export it. This will mean when I open it in another program it will still have the old (wrong) origin alignment.
Message 3 of 14
06-29-2013
09:26 PM
- Mark as New
- Bookmark
- Subscribe
- Mute
- Subscribe to RSS Feed
- Permalink
- Report
06-29-2013
09:26 PM
The easiest is to just set the view cube (upper RH corner of main screen) to be what you want. Rotate your model and RMB on the cube and set your Front and Home views there. It will also be used in the IDW enviroment as well for your Front, Side and Top views along with ISO
Inventor 2020, In-Cad, Simulation Mechanical
Just insert the picture rather than attaching it as a file
Did you find this reply helpful ? If so please use the Accept as Solution or Kudos button below.
Delta Tau Chi ΔΤΧ
Message 4 of 14
06-29-2013
09:32 PM
- Mark as New
- Bookmark
- Subscribe
- Mute
- Subscribe to RSS Feed
- Permalink
- Report
06-29-2013
09:32 PM
Thanks Blair,
Yes, I have been doing this while modeling as I can't find a way to realign the origin. But, what I would really like to do is move the model to fit the origin, or realign the origin to the model. If I just change the views, as you suggest, it works for modeling but when I am rendering, using FEA, or assembling components it becomes cumbersome.
I have read all the forums on this topic and no one seems to know how to simply align an imported model with the origin. Any more ideas?
Message 5 of 14
06-29-2013
09:38 PM
- Mark as New
- Bookmark
- Subscribe
- Mute
- Subscribe to RSS Feed
- Permalink
- Report
06-29-2013
09:38 PM
Depending on how you modeled the part, you are stuck with the location and model orientation.
A little of planning before one starts a model can prove beneficial down the road. We try to model at the Origin. This allows use to use the Origin Planes for future modeling and constraints.
If it's a IAM, just unground the base part and contrain to the origins as required. Single parts you are stuck with as they are modeled on the XZY.
Inventor 2020, In-Cad, Simulation Mechanical
Just insert the picture rather than attaching it as a file
Did you find this reply helpful ? If so please use the Accept as Solution or Kudos button below.
Delta Tau Chi ΔΤΧ
Message 6 of 14
06-30-2013
02:24 AM
- Mark as New
- Bookmark
- Subscribe
- Mute
- Subscribe to RSS Feed
- Permalink
- Report
06-30-2013
02:24 AM
This post by Curtis Waguespack on changing the origin of imported components:
http://inventortrenches.blogspot.co.uk/2011/06/change-origin-of-imported-model.html?m=1
http://inventortrenches.blogspot.co.uk/2011/06/change-origin-of-imported-model.html?m=1
Message 7 of 14
06-30-2013
02:27 AM
- Mark as New
- Bookmark
- Subscribe
- Mute
- Subscribe to RSS Feed
- Permalink
- Report
06-30-2013
02:27 AM
Thanks, however I have already checked that tutorial as well and although it will put the model back at the 0,0,0 point, it will NOT rotate the model to the correct angles as the menu he has in the screenshots no longer seems to exist, or at least not in the Inventor 2013 im using.
Thanks anyway.
Message 8 of 14
06-30-2013
05:25 AM
- Mark as New
- Bookmark
- Subscribe
- Mute
- Subscribe to RSS Feed
- Permalink
- Report
06-30-2013
05:25 AM
@synapse709 wrote:
... it will NOT rotatethe model to the correct angles as the menu he has in the screenshots no longer seems to exist, or at least not in the Inventor 2013 im using.
Thanks anyway.
Post your file here.
You can move and/or rotate.
The rotate is a drop down - bit of a trick for beginners to find.
It is there, (are you using LT? I have no experience with LT, but I suspect it is there as well).
-----------------------------------------------------------------------------------------
Autodesk Inventor 2019 Certified Professional
Autodesk AutoCAD 2013 Certified Professional
Certified SolidWorks Professional
Message 9 of 14
06-30-2013
06:41 AM
- Mark as New
- Bookmark
- Subscribe
- Mute
- Subscribe to RSS Feed
- Permalink
- Report
06-30-2013
06:41 AM
The model is too large to attach, however I have added a screenshot. Exactly where is this difficult to find rotate button you are speaking of?
Message 10 of 14
06-30-2013
07:10 PM
- Mark as New
- Bookmark
- Subscribe
- Mute
- Subscribe to RSS Feed
- Permalink
- Report
06-30-2013
07:10 PM
Hi synapse709,
See this image for the rotation option:
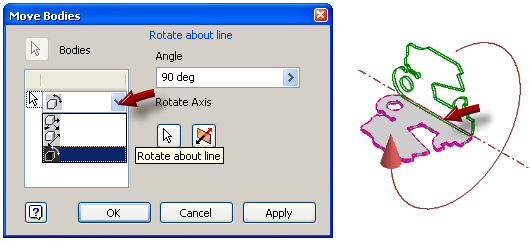
I hope this helps.
Best of luck to you in all of your Inventor pursuits,
Curtis
http://inventortrenches.blogspot.com
Message 11 of 14
06-30-2013
07:14 PM
- Mark as New
- Bookmark
- Subscribe
- Mute
- Subscribe to RSS Feed
- Permalink
- Report
06-30-2013
07:14 PM
Thanks for the help Curtis and screenshot, but strangly I don't have that drop down box. You are using Inventor 2013 Pro? ![]()
Message 12 of 14
07-01-2013
06:01 AM
- Mark as New
- Bookmark
- Subscribe
- Mute
- Subscribe to RSS Feed
- Permalink
- Report
07-01-2013
06:01 AM
@synapse709 wrote:.... I don't have that drop down box.
As I noted in my original response - this one is difficult for beginners to find as it is hidden.
You must click on the icon for a translation move for the drop down to appear.
Notice the left image no drop-down. The right image the hidden functionality appears.

Also, you can dramatically reduce the file size for posting here by,
1. drag the red End of Part marker to the top of the browser hiding all features in the graphics window.
Save the file with the EOP in this rolled up state.
2. right click on the filename and select Send to Compressed (zipped) Folder.
attach the resulting *.zip file here
if it is still larger than 1.5M
then attach here http://www.augi.com
-----------------------------------------------------------------------------------------
Autodesk Inventor 2019 Certified Professional
Autodesk AutoCAD 2013 Certified Professional
Certified SolidWorks Professional
Message 13 of 14
07-01-2013
06:34 AM
- Mark as New
- Bookmark
- Subscribe
- Mute
- Subscribe to RSS Feed
- Permalink
- Report
07-01-2013
06:34 AM
OMG!! THANK YOU!!!!!!!!!!!!!!!!!!!!!!!!!!!
You know, I chose inventor over Solidworks because the interface is so intuitive and attractive at the same time. THIS however, is the first case where they seem to have made a completely unintuitive interface choice.
I greatly appreciate your help!
TT
Message 14 of 14
07-02-2013
04:09 AM
- Mark as New
- Bookmark
- Subscribe
- Mute
- Subscribe to RSS Feed
- Permalink
- Report
07-02-2013
04:09 AM
@synapse709 wrote:
THIS however, is the first case....
TT
Post back when you need to do a curve driven pattern. There are lots of other hidden goodies in Inventor. One recommendation - right click everything and look around.
There are plenty of other examples - in both programs.
-----------------------------------------------------------------------------------------
Autodesk Inventor 2019 Certified Professional
Autodesk AutoCAD 2013 Certified Professional
Certified SolidWorks Professional
Reply
Topic Options
- Subscribe to RSS Feed
- Mark Topic as New
- Mark Topic as Read
- Float this Topic for Current User
- Bookmark
- Subscribe
- Printer Friendly Page
